



General information
The air from the clutch hydraulic system must be bled if the clutch disengages poorly when changing gear, the clutch pedal returns slowly or does not return back, or if the hydraulic system has been opened.
Since the hydraulic clutch system operates on brake fluid, it is necessary to read the subsection Bleeding the brake system.
Warning: Brake fluid is poisonous. Never suck out the fluid with your mouth through a hose. Store the fluid only in containers that cannot be accidentally accessed.
Execution order
1. Raise and support the vehicle. Remove the lower engine compartment cover, referring to subsection Removal and installation the lower engine compartment cover.
2. Check the brake fluid level in the common reservoir. If necessary, top up to the Max mark.
3. Remove the dust boots from the air bleed nipple on the slave cylinder and on the front left caliper.
4. Carefully unscrew and screw in the nipple.
5. Place the clear hose onto the fitting on the caliper.
6. Fill the hose with brake fluid. To do this, open the nipple on the caliper. Ask an assistant to slowly press the clutch pedal and hold it in this position. Close the nipple and release the pedal. Then open the nipple again and press the clutch pedal again. Repeat the process until the hose is filled with fluid. Press the hose with your finger so that the fluid does not spill out.
Warning: Do not allow the fluid level in the reservoir to drop too much. If it does, add fluid.
7. Place the free end of the hose onto the nipple of the working cylinder and open both nipples.
8. Press the brake pedal, close the nipple on the caliper and release the brake pedal. Repeat this procedure as many times as necessary to ensure that there are no air bubbles in the reservoir. At the same time, constantly add new fluid.
9. Close the nipples on the caliper and slave cylinder. Remove the hose and put on the dust boots.
10. Lower the car onto its wheels.
11. Fill the reservoir with brake fluid up to the Max mark.
12. Press the clutch pedal several times. This way you can check whether the remaining air in the system is released into the reservoir.
13. Check the operation of the brake system and clutch drive system.
Warning: During the described process of air removal, air may remain in the system. This can be determined by the characteristic sound when the gear is engaged and poor clutch disengagement. In this case, it is necessary to remove the air in a service station using a special device.
14. Install the lower engine compartment cover, referring to the subsection Removal and installation the lower engine compartment cover.
Removal air using a special device
In service station conditions, air is removed from the hydraulic system using a special device. This device creates a pressure of 2.5 bar on the brake fluid in the reservoir.
15. Unscrew the brake fluid reservoir cap. Fill the fluid to the Max mark. Connect the device according to the instructions without turning it on.
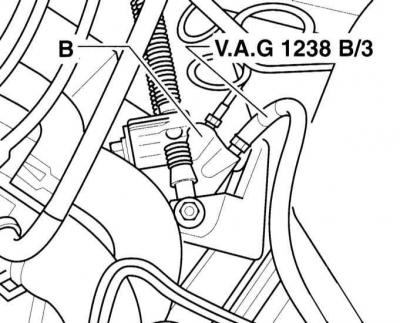
16. Place the hose on the air bleed nipple (arrow on the accompanying illustration), for example, VAG 1238 B/3 working cylinder (B). Place the end of the hose in a container filled with brake fluid or connect it to the container of the air bleeding device.
17. Open the nipple and keep it open until air bubbles stop coming out.
18. Press the clutch pedal several times.
19. Fill the tank with liquid up to the Max mark. Screw the cap onto the tank.