
Repair Chevrolet Repair Toyota Repair Honda Repair AvtoVAZ Repair Mercedes-Benz Repair BMW Repair Opel
Home  |  Contacts  |  Sitemap  |    
English Русский
Български
Беларускі
Український
Српски
Hrvatski
Română
Polski
Slovenský
Magyar
AudiManual.ru


  • AUDI 80
  • AUDI 100
  • AUDI A3
  • AUDI A4
  • AUDI A6
  • AUDI A8
  • AUDI Q
  • OTHER
  • ARTICLES
Type 8L (1996-2003)

Disassembling the drive shaft (Audi A3 8L)

  • Home
  • Audi A3
  • Type 8L (1996-2003)
  • Transmission
  • Clutch and drive shafts
  • Disassembling the drive shaft
            0
Table of contents: Disassembly instructions ↓ Assembly instructions ↓

Disassembly instructions


1. Remove the shaft and clamp it in a vice. Protect the shaft with aluminum pads.

2. Mark the edge of the protective cover on the shaft so that during assembly the cover can be returned to its original position.

3. Use side cutters to cut the clamps on both protective covers and remove them. Move the cover back.
3. Use side cutters to cut the clamps on both protective covers and remove them. Move the cover…


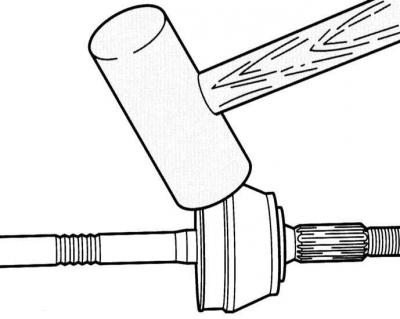
4. Outer joint: Remove the joint from the shaft with a strong blow from a light metal hammer.

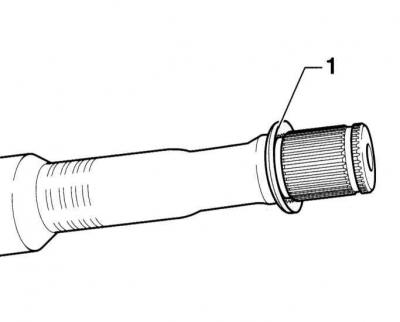
5. Inner joint: Remove the retaining ring with suitable pliers, such as VW-161a or HAZET 2525K. Press the joint on a press, while placing a support under the inner hub of the joint.

Assembly instructions


6. When installing the protective cover on the hinge body, the cover is often compressed. Therefore, fill the cover with air on the small diameter using a screwdriver.

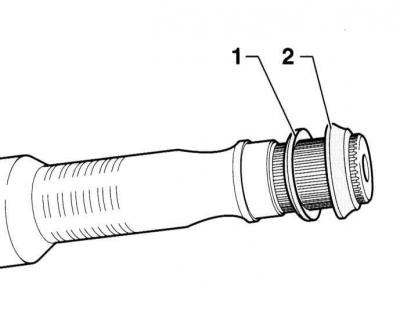
7. Fill the joint with "AUDI G6.3" grease. Inject half of the grease into the boot, the other half into the joint. The total amount of grease is given in the Specifications.
7. Fill the joint with «AUDI G6.3» grease. Inject half of the grease into the boot, the other half…


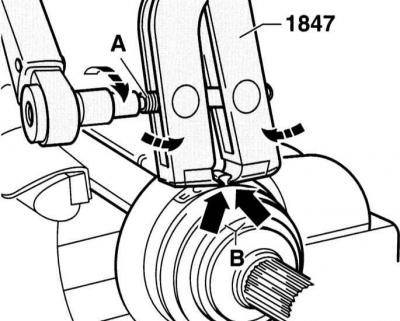
8. For clamping clamps (alloy steel) a device must be used (HAZET 1847), shown in the illustration. Otherwise, it will not be possible to create the required clamping force. Position the device so that the cutting elements of the device are located in the corners (B). In this position, tighten the screw (A) with a torque wrench to 25 N·m and thus tighten the clamp.

8. For clamping clamps (alloy steel) a device must be used (HAZET 1847), shown in the illustration.…


8. For clamping clamps (alloy steel) a device must be used (HAZET 1847), shown in the illustration.…


Warning: The thread of the device must be free-running. If not, lubricate it with MoS₂ grease beforehand.


[The text is based on materials from the website: AUDImanual]
The article was checked by auto expert Nikita Rudakov
This article is available at russian, bulgarian, belarusian, ukrainian, serbian, croatian, romanian, polish, slovak, hungarian

Share information:
Previous articles
Audi A3 Type 8L: Clutch and drive shafts
Next articles

Removal and installation drive shafts
Bleeding air from the clutch hydraulic system
Removal, installation and checking the clutch
Clutch and Drive Shaft Specifications


Similar articles on other Audi car models:
Drive shaft specifications Audi 80 B3 (1986-1991, petrol)
Drive shaft specifications Audi 100 C3 (1982-1990, diesel)
Disassembling the drive shaft and replacing the protective cover Audi A4 B6 (2000-2006)
Checking the drive shaft protective boot Audi A6 C5 (1997-2004)
Checking the drive shaft protective cover Audi A8 D2 (1994-2002)
Replacing the drive shaft ball bearing Audi Q5 Type 8R (2008-2017)
Tripod Drive Shaft (ANY) Audi A2 (1999-2005)
Link to this page in different formats


Visitor comments

No comments yet


How much will 37 + 39 =


A3(8L, 1996-2003) 
  • General information
  • User manual
  • Maintenance
  • Power unit
  • Engine repair
  • Lubrication system
  • Cooling system
  • Supply system
  • Fuel injection system
  • Exhaust system
  • Ignition system
  • Transmission
  • Manual transmission
  • Automatic transmission
  • Clutch and drive shafts
  • Chassis
  • Brake system
  • Front suspension
  • Rear suspension
  • Steering
  • Body
  • Ventilation and heating
  • Exterior (external elements)
  • Interior (internal elements)
  • Doors, covers and windows
  • Electrical equipment
  • Power devices
  • Lighting and appliances
  • Electrical circuits
 
AudiManual.ru © 2017-2026 · Mobile version · Feedback · Sitemap: EN BG BY UA RS HR RO PL SK HU · Site search · News and articles
80 B2 · 80 B3 petrol · 80 B3 · 80 B4 · 100 C3 diesel · 100 C3 petrol · 100 C3 · 100 C4 petrol · 100 C4 · A3 Type 8L · A4 B5 petrol · A4 B5 · A4 B6 petrol · A4 B6 · A4 B7 · A4 B8 · A6 C4 · A6 C5 · A6 C5 Allroad · A8 D2 · Q5 Type 8R · Q7 Typ 4L · Audi A2 ·
This site uses cookies 🍪. Click the button to accept this fact.