
Clutch release bearing, manual transmission housing. 1.8 l engines
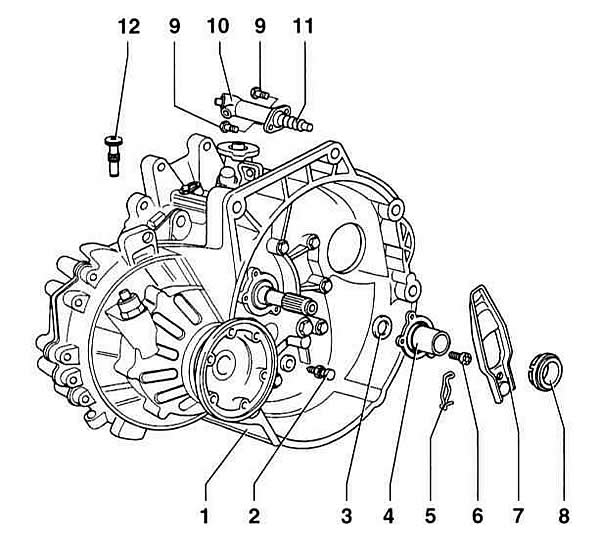
- 1 - Manual transmission
- 2 - ball pin, 25 Nm. Coat with MoS₂ grease.
- 3 - primary shaft sealing ring of the manual transmission. Insert until it stops.
- 4 - guide bushing
The sealing ring on the bushing cannot be replaced separately. Lubricate the area of the clutch release bearing with MoS₂ grease.
- 5 - locking spring. Attached to the clutch release bearing lever.
- 6 - bolt, 20 Nm
- 7 - clutch release bearing lever. Lubricate the area of the clutch release bearing with MoS₂ grease.
- 8 - clutch release bearing. Do not wash the bearing, just wipe it. If the bearing makes noise during operation, replace it.
- 9 - bolt, 20 Nm
- 10 - working cylinder
- 11 - Pusher. Lubricate the end of the pusher with MoS₂ grease.
- 12 - mounting bolt
Fixes the clutch release lever when installing the manual transmission. After installing the manual transmission, unscrew it.
Warning: If there is no mounting bolt, an M8 x 35 bolt can be used.
Clutch release bearing, manual transmission housing. 1.6 l engines
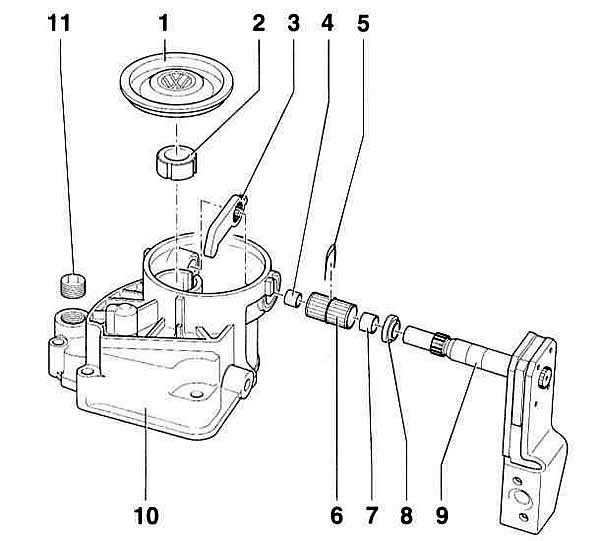
- 1 - lid
Removal: Punch with a sharp mandrel and remove by prying.
Installation: The sealing surfaces must be free of grease. Press the new cover into place around the circumference using a suitable mandrel.
- 2 - clutch release bearing. Can be replaced without removing the manual transmission.
- 3 - clutch release lever
Removal: Remove the locking bracket (5). Remove the shaft (9) from the side. The lever can only be inserted in one position.
- 4 - bushing
- 5 - locking bracket
- 6 - needle bearing
- 7 - bushing
- 8 - sealing ring
- 9 - clutch release shaft
- 10 - manual transmission cover
- 11 - oil filler cap, 25 Nm
Engines except 1.6 l
(Description of works for 1.6 l engines is given below)
Removal
1. Remove the manual transmission, while referring to the subsection Removal and installation of manual transmission.
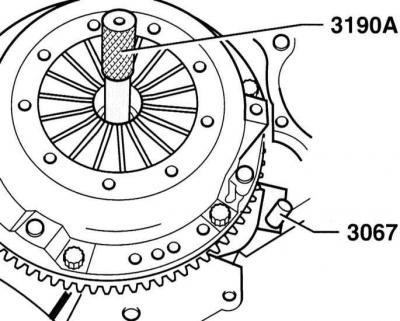
2. To prevent the flywheel from rotating when unscrewing the mounting bolts, it is necessary to hold it with the AUDI–3067 tool or a screwdriver and rod.
Warning: The AUDI–3067 tool is shown in the installation position in the illustration. It must be turned upside down when removing. To install the clutch, a centering mandrel AUDI–3190A or a conventional centering rod, such as HAZET 2174, is required.
3. Loosen the pressure plate mounting bolts crosswise, each by 1–1.5 turns, so that the disk is released.
Warning: If the bolts are loosened immediately, the pressure springs may be damaged.
4. After loosening, the bolts are unscrewed completely.
5. Remove the clutch pressure and driven discs.
Warning: Do not drop the pressure plate and driven disc. Otherwise, after assembly, the clutch may jerk and be difficult to disengage.
6. Wipe the clutch release bearing without rinsing it.
7. Wipe the flywheel with a rag soaked in gasoline.
Examination
When installing used clutch parts, they must be checked first.
8. Check the pressure plate for overheating and scoring.
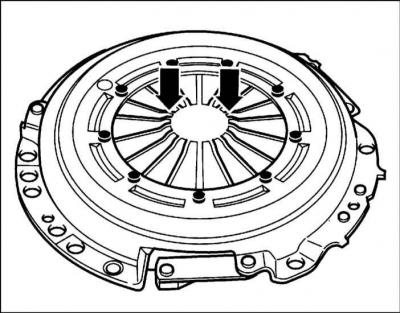
9. Check the pressure springs for damage (indicated by arrows). Wear up to half the thickness of the spring is allowed.
10. Check the spring connections between the pressure plate and the cover for cracks. Check the rivet connections for strength. If there are weak connections or damage, replace the clutch.
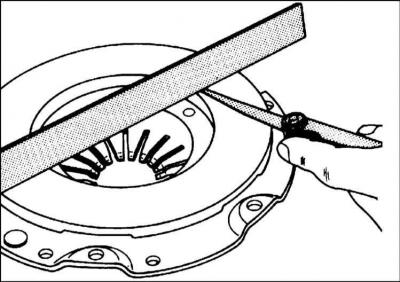
11. Check the adjacent surface of the pressure plate for cracks, overheating and wear. If the pressure plate is deformed up to 0.2 mm inward, it can still be used. The check is carried out with a ruler and feeler gauge.
12. Check the flywheel for overheating cracks and scoring.
13. Replace the clutch disc if it is oily or has mechanical damage with a new one.
14. Check the thickness of the clutch disc friction linings and the presence of cracks in the linings.
15. At the service station, the clutch disc can be checked for runout. The disc's lateral runout should not exceed 0.8 mm (measured at a distance of 2.5 mm from the edge).
Warning: This check is only necessary if the drive is a used drive and there were some defects in its operation. If necessary, the drive can be carefully straightened.
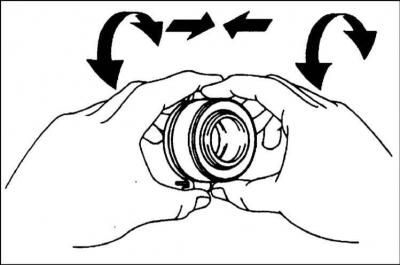
16. Check the clutch release bearing by hand in the installed position. To do this, lightly squeeze the bearing and turn it. The bearing should rotate easily. During operation, damage to the clutch release bearing is determined by the noise when the clutch pedal is pressed. It is recommended to replace the bearing.
Installation
Warning: If new clutch components are being installed, the pressure plate and driven plate must be checked against the parts catalog for compliance to ensure that they are not installed incorrectly.
17. Before installing a new pressure plate, the protective anti-corrosion layer should only be removed from the working side. In other places, the grease should under no circumstances be removed, as otherwise this could lead to a significant reduction in the service life of the clutch.
18. Check the tightness of the centering pins on the flywheel.
19. Clean the splines of the driven disk from rust. Lubricate the splines of the primary shaft of the manual transmission with a thin layer of MoS₂ grease. The service station uses AUDI G 000 100 for this. After this, move the driven disk on the shaft, checking the ease of movement. Be sure to remove excess grease.
20.
Warning: When installing the driven disc, make sure that the spring separator points towards the pressure plate. If a dual mass flywheel clutch is installed, there are no spring separators. In this case, the clutch is installed so that the friction lining is adjacent to the flywheel. The hub should not be adjacent to the flywheel, the short end of the hub points towards the pressure plate.
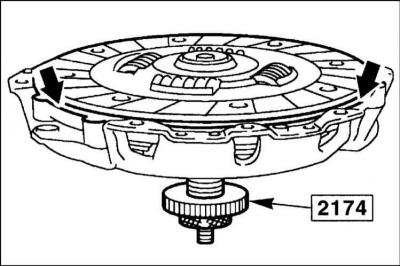
21. Center the driven disc on the pressure plate using a rod, for example, HAZET 2174 or AUDI–3176 (indicated by arrows). If the driven disk is not centered, the primary shaft will not be able to take its working position. An old manual transmission primary shaft can be used as a centering rod.
22. Place the pressure plate on the appropriate centering pins.
Warning: The pressure plate must be completely flush with the flywheel and must not be tilted. Otherwise, the centering pins and holes may be damaged. Only then insert the mounting bolts. Never tighten the pressure plate with bolts, otherwise the centering holes of the pressure plate and the centering pins on the flywheel may be damaged.
23. Screw in the pressure plate mounting bolts and tighten them crosswise, turning them 1–1.5 turns so that the pressure plate is secured. Tightening torque: 20 Nm.
Warning: For versions with Allen screws, tighten to 13 Nm.
24. Remove the centering rod.
25. Install the manual transmission, refer to the subsection Removal and installation of manual transmission.
Engines 1.6 l
Removal
26. Remove the manual transmission, while referring to the subsection Removal and installation of manual transmission.
27. To prevent the flywheel from rotating when unscrewing the mounting bolts, it is necessary to fix it with the AUDI–558 tool or a screwdriver with a mandrel.
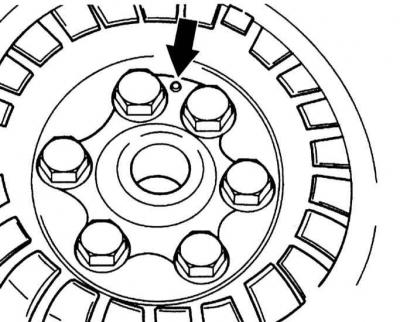
Warning: Mark the flywheel position relative to the pressure plate so that they can be reinstalled in their original position. If the flywheel is installed incorrectly, the TDC marking on the flywheel will be out of position.
28. Loosen the flywheel mounting bolts one by one by 1–1.5 turns.
Warning: If the bolts are loosened immediately, the pressure springs may be damaged.
29. If the bolts come loose immediately, the pressure springs may be damaged.
30. Remove the driven disk.
Warning: Do not drop the pressure plate and driven disc. Otherwise, after assembly, the clutch may jerk and be difficult to disengage.

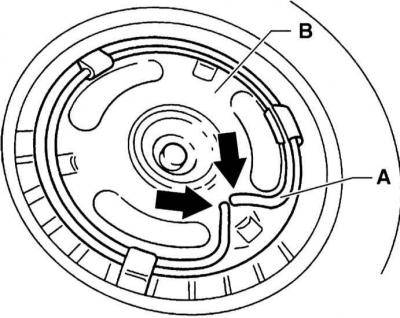
31. Use a screwdriver to pry it out of the holes (indicated by arrows) retaining ring (A) of the clutch release disc (B).
32. Remove the clutch release disc (B).
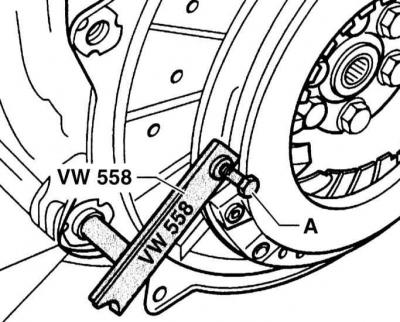
33. Disconnect the pressure plate from the flywheel, for which purpose fix the AUDI 558 tool to the pressure plate with a bolt (A). If the specified tool is not available, the pressure plate can be held with a screwdriver and a mandrel.
34. Remove the pressure plate and intermediate plate.
35. Wipe the flywheel with a rag soaked in gasoline.
Examination
When installing used clutch parts, they must be checked first.
36. Check the rivet connections on the pressure plate. Replace the pressure plate with a new one if the rivet connections are damaged or loose.
37. Check the friction surface of the pressure plate for cracks, overheating and wear. If the pressure plate is deformed up to 0.2 mm inward, it can still be used. The check is carried out with a ruler and feeler gauge.
38. Wipe the friction surfaces of the pressure plate and flywheel free of oil.
39. Replace an oily or worn driven disk with a new one.
Warning: A sign of a damaged clutch release bearing is noise when pressing the clutch pedal while driving. The bearing is located behind the cover on the outside of the manual transmission and can be replaced without removing the manual transmission.
Installation
Warning: If new clutch components are being installed, the pressure plate and driven plate must be checked against the parts catalog for compliance to ensure that they are not installed incorrectly.
40. Before installing a new pressure plate, the protective anti-corrosion layer should only be removed from the contact and friction side. In other areas, the grease should under no circumstances be removed, as this could lead to a significant reduction in the service life of the clutch.
41. Install the pressure plate with the intermediate plate on the crankshaft.
Warning: Pay attention to the installation position of the intermediate plate. Elevation (arrow on the accompanying illustration) points away from the pressure plate. Screw in new mounting bolts and lock the pressure plate as when removing with the AUDI–556 tool or with a screwdriver and mandrel.
42. Tighten the pressure plate with a torque wrench to 60 Nm and then tighten the bolts with a rigid wrench to an angle of 90° (1/4 turn).
Warning: When tightened, the bolts become permanently deformed, so they must be replaced with new ones after each loosening.
43. Insert the clutch release disc and secure it with the retaining ring on the pressure plate. Insert both ends of the wire into the holes of the pressure plate.
44. Clean the splines of the driven disk from rust. Lubricate the splines of the primary shaft of the manual transmission with a thin layer of MoS₂ grease. The service station uses AUDIG 000 100 for this. After this, move the driven disk on the shaft, checking the ease of movement. Be sure to remove excess grease.
45. Check the tightness of the flywheel centering pins. If any pin on the flywheel is not firmly seated, it must be replaced.

46. Check the tightness of the flywheel centering pins. If any pin on the flywheel is not firmly seated, it must be replaced.
Warning: If the flywheel is installed incorrectly, the TDC marking on the flywheel will be in the wrong position.
Warning: The flywheel must be fully seated against the clutch pressure plate before the mounting bolts are inserted.
Warning: Do not skew the flywheel, otherwise the pins and centering holes may be damaged. Never tighten the clutch basket with bolts, otherwise the pins and centering holes may be damaged.
47. If the AUDI 3178 tool was used, remove it.
48. Install the manual transmission, refer to the subsection Removal and installation of manual transmission.
(The full version is posted on the resource «AUDImanual»)