
Engines 1.8 l
Withdrawal
1. Disconnect the negative cable (–) battery with the ignition off.
Warning: As a result, information is erased from the electronic memory units, such as the code of the radio receiver. Without a code, the radio can only be switched on by the manufacturer or an AUDI workshop. Therefore, read the materials of the subsection Checking and replacing the brushes of the generator and voltage regulator.
2. Remove the fan shroud.
3. Disconnect the tachometer sensor connector -1- and rear fog light switch -2-.
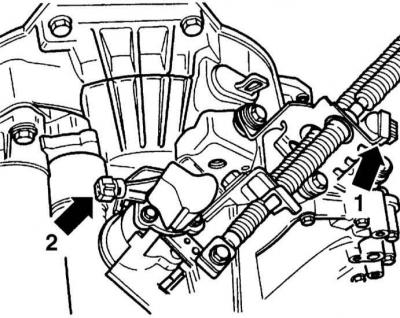
4. Loosen the mounting bolts and disconnect the damper and the manual transmission shift cable (IN).
5. Disconnect the gear selector cable from the control arm (WITH), to do so, lift the foot in the direction of the arrow.
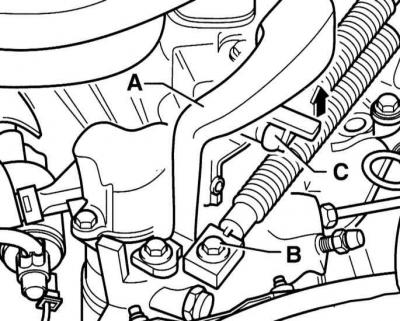
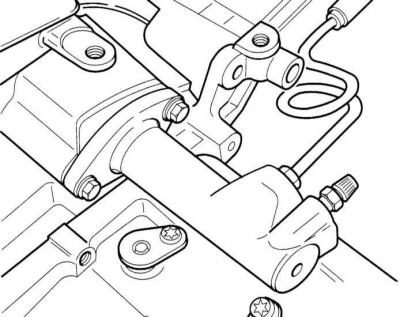
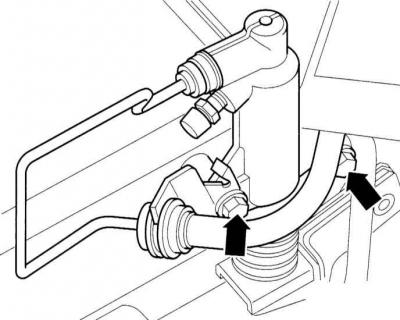
6. Disconnect the slave cylinder hose at the cable support. Loosen the mounting bolts and disconnect the cable support on the manual transmission (indicated by arrows) and take it aside.
7. Unscrew the 2 mounting bolts and disconnect the slave cylinder from the manual transmission and secure with the hydraulic line attached to the side of the body.
Warning: Do not disconnect the hydraulic piping, otherwise the hydraulic system must be bled of air after installation. With the cylinder removed, do not depress the clutch pedal.
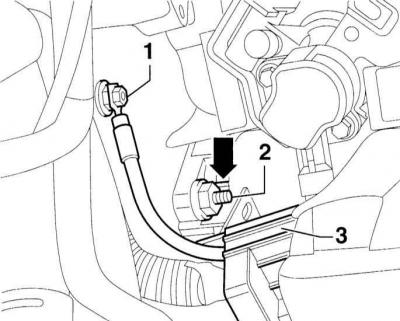
8. Disconnect the earth wire from the upper bolt -1- of the manual transmission/engine connection. Remove bolt -1-.
9. Disconnect the cable holder -3- at the top of the starter (arrow illustration) and take it aside.
10. Unscrew the bolt -2- at the top of the starter.
11. Turn out all bolts of fastening accessible from above between the engine and manual transmission.
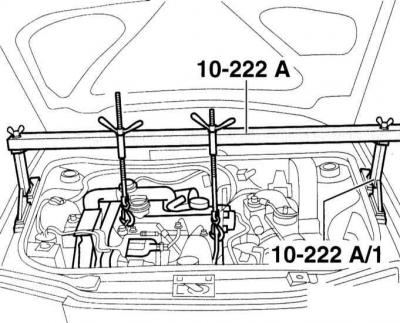
12. Hang the engine. To do this, install a tool, for example, AUDI 10-222A in combination with supports 10-222A / 1.
13. Raise the power unit slightly with the screws.
14. If the specified device is not available, place a pipe over the engine compartment and support it on the side on wooden blocks. Do not lay the pipe on the fenders. Hook the cables to the engine lugs and connect to the screw. Pull the rope.
Warning: There is danger when lifting and placing the vehicle on stands! Therefore, first read the subsection car jacking.
15. Raise and place the car on stands. Remove the bottom cover of the engine compartment, while referring to the subsection Removal and installation of the bottom cover of an impellent compartment.
16. Remove the starter.
17. Unscrew the fastening bolts and remove the holder of the power steering drive wire from the gearbox housing.
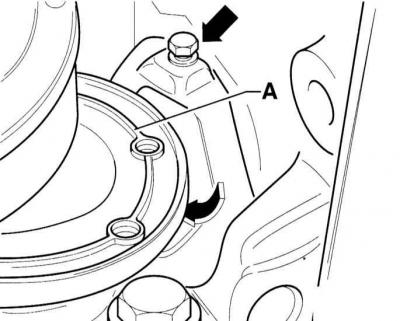
18. Remove, if present, the protective cover of the right drive shaft flange (A).
19. Loosen the mounting bolt (top arrow) small cover behind the right drive shaft and remove the cover.
20. Turn away bolts of fastening of power shafts and disconnect, at the same time address to subsection Removal and installation of power shafts.
21. Suspend the drive shafts on the wire as high as possible, for which turn the steering wheel to the left until it stops.
Warning: Be careful not to damage the paintwork.
22. Disconnect the exhaust system between the catalytic converter and the central muffler, while referring to subsection Replacing the central / additional muffler.
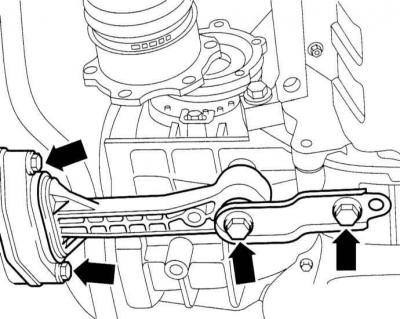
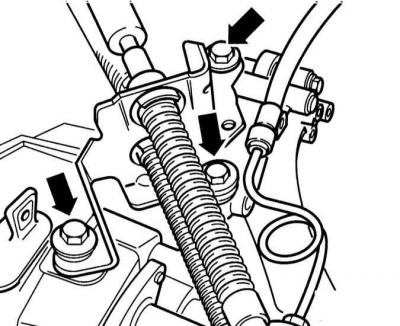
23. Loosen the mounting bolts and disconnect the pendulum support between the body and the side of the engine / manual transmission (arrow illustration).

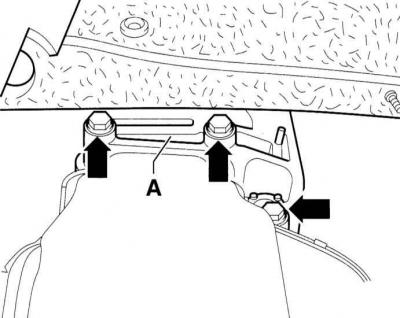
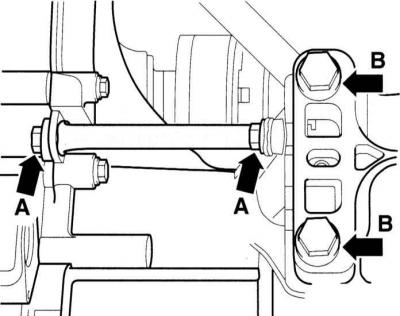
24. Turn away bolts of fastening and disconnect a bar of a support of manual transmission at the left (arrow A in the illustration), then disconnect the manual transmission support (arrow B in illustration).
25. Loosen the gearbox mount bolts (A) on the box and disconnect. To remove mounting bolts (indicated by arrows), lower the engine-manual transmission assembly by means of the spindles so that the bolts are accessible from the left wheel arch side.
Warning: When lowering the machine, be careful not to damage the power steering lines.
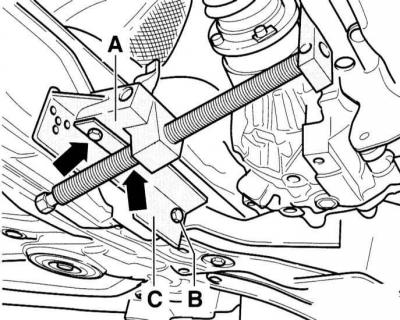
26. Attach special tool (WITH) bolt (IN) at the fastening of the pendulum support from below. Insert wringer (A) and fasten with screws (indicated by arrows). Press the engine-manual gearbox block forward.
Warning: If a special tool is not available, the engine-manual transmission unit can be moved forward with an onboard jack. When doing this, be careful not to damage the power steering pipes.
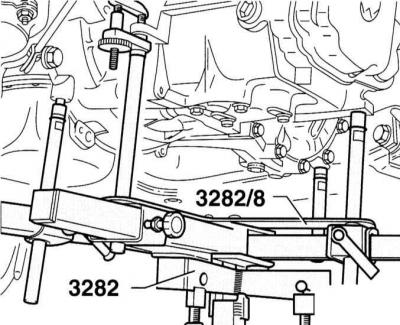
27. Slightly raise the manual transmission with a lift, for example, AUDI 3282. Beforehand, the brackets of the manual transmission supports are set according to the adjustment plate 3282/8. If a manual transmission lift is not available, raise the manual transmission with a garage jack.
Warning: Place a piece of wood between the manual transmission and the jack.
28. Turn out the bottom bolts of fastening between the engine and manual transmission.
29. Press the manual transmission from the guide bushings and carefully pull out.
Warning: When removing the manual transmission, be careful not to damage the hydraulic booster pipeline.
Installation
Warning: If the manual transmission is being replaced, move the speedometer sensor, shift lever and shift lever from the old manual transmission to the new one.
30. Before installing the clutch, check it, while referring to the subsection Removal, installation and clutch check.
31. Clean and lightly lubricate the manual transmission input shaft with MoS2 or AUDI–G 000 100 grease.
Warning: The clutch disc must move easily on the shaft.
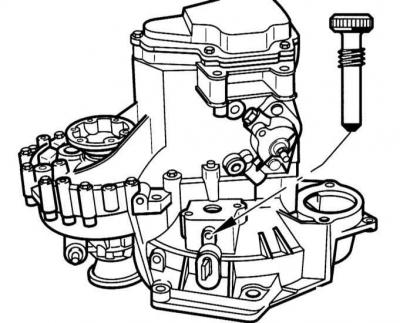
32. Check whether guide bushings are installed in the cylinder block to center the engine / manual transmission block. Insert if necessary.
33. Depress the clutch release lever before installing the manual transmission to the manual transmission housing and fix it with a mounting bolt or M8 x 35 bolt. After installation, unscrew the bolt.
34. Raise the manual transmission and enter its clutch. If at the same time the input shaft of the manual transmission does not enter the clutch disc, turn the input shaft behind the flange by hand. When installing, make sure that the intermediate plate is in the correct position.
35. Turn and remove the special tool or jack.
36. Screw in bolts of fastening of manual transmission and starter. To do this, install a starter.
37. Screw in the bolts of the engine / manual transmission block as far as possible.
38. Remove the M8 x 35 bolt again to secure the clutch release lever to the clutch cover. The hole is closed by a bolt of fastening of a support of draft of a drive.
39. Fasten by hand the left holder at the manual transmission and install the engine / manual transmission in the mounting position using a crane.
40. Tighten the engine/transmission mount by hand with new bolts (IN).
41. Hand-tighten the pendulum support with new bolts.
42. Remove the lifting device for the engine and manual transmission.
43. Align the engine/transmission block by rocking it strongly in different directions.
44. Tighten the engine/transmission assembly and pendulum support to the values given in the Specifications. In this case, first tighten the bolts with a torque wrench and then tighten with a rigid wrench at an angle of 90° (1/4 turn).
Warning: Bolts will permanently deform when tightened. Therefore, after each unscrewing, new bolts are used.
45. Install the drive shafts, while referring to subsection Removal and installation of power shafts.
46. Install the large and small driveshaft covers.
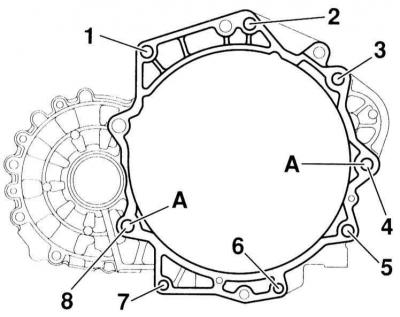
47. Install the left motor holder mounting bolts and tighten with a torque of 50 Nm (in the illustration - the location and tightening torques of the gearbox mounting bolts).
48. Install starter.
49. Bolt the cable support with a torque of 25 Nm to the manual transmission.
50. Fasten the shift cable with a torque of 25 Nm to the gear lever.
51. Connect the selector cable to the shift lever.
52. Attach the counterweight to the shift lever. Tighten the fastening bolts first with a torque wrench to a torque of 20 Nm and then tighten with a hard wrench at an angle of 90° (1/4 turn).
53. Adjust the gear change drive, refer to subsection Shift drive adjustment.
54. Fix the connector at the manual transmission, while referring to the subsection "Withdrawal".
55. Connect the starter connector.
56. Lubricate the end of the hydraulic actuator cylinder rod with MoS2 grease. Reinsert the slave cylinder and secure it with a torque of 20 Nm
57. Press the clutch pedal several times and check operation.
Warning: If hydraulic actuator has opened, bleed air from system.
58. Install downpipe/catalytic converter with new gaskets, refer to subsection Removal and installation of the exhaust system.
59. Fix the holder of the power steering pipeline on the gearbox housing, while referring to the subsection Removal and installation of the power steering pump.
60. Check the oil level in the manual transmission, while referring to the subsection Checking the level of manual transmission oil.
61. Establish the bottom cover of an impellent compartment, thus address to subsection Removal and installation of the bottom cover of an impellent compartment.
62. Establish the case of the air filter, thus address to subsection Removing and installing the air filter housing.
63. Attach the negative cable (–) to the battery.
Warning: Activate the automatic safety power windows, enter the radio code, set the clock, while referring to the subsection Entering the radio code.
Special for 1.6L engines
Warning: Description of work and comments regarding all manual transmissions are given in the subsection for 1.8 liter engines. This subsection describes only differences that apply only to the 1.6L engine. These differences concern, first of all, the switching drive, which for the 1.6 liter engine occurs through rods, and for other engines through cables.
64. Hang the engine with a crane by hooking the engine on the lugs on the cylinder head.
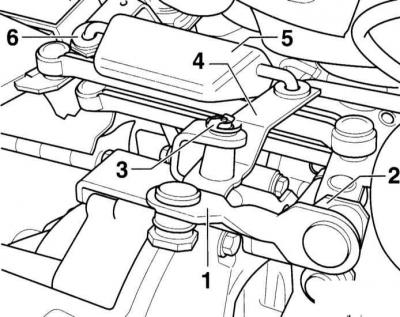
65. Disconnect the front link -1- from the lever -2- with a screwdriver. Remove the lock washer -3-, remove the console -4-.
66. Detach console -4- by turning 90° (1/4 turn) to the right of the damper rod -5-. Deviate draft with a damper upwards and remove from a support of the bearing -6-.
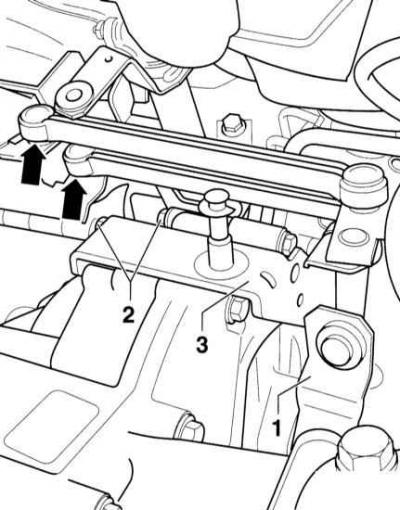
67. Disconnect the long tie rods from the gear selector using a screwdriver (indicated by arrows). Unscrew the bolt and disconnect the front shift lever -1- at the manual transmission.
68. Turn out bolts -2- and remove the console of switching -3- with connecting drafts and the switching lever
69. Disconnect the slave cylinder hose at the support. Remove 2 mounting bolts and disconnect the slave cylinder (indicated by arrows) at the manual transmission and secure with a hose attached to the body with a wire.
Warning: Do not disconnect the hydraulic line, otherwise the clutch will need to be bled after installation. After removing the slave cylinder, do not press the clutch pedal.
Warning: After installing the manual transmission, it is necessary to adjust the shift drive, while referring to the subsection Drive Shaft Disassembly.
Visitor comments