
Table of contents: Removal ↓ Installation ↓
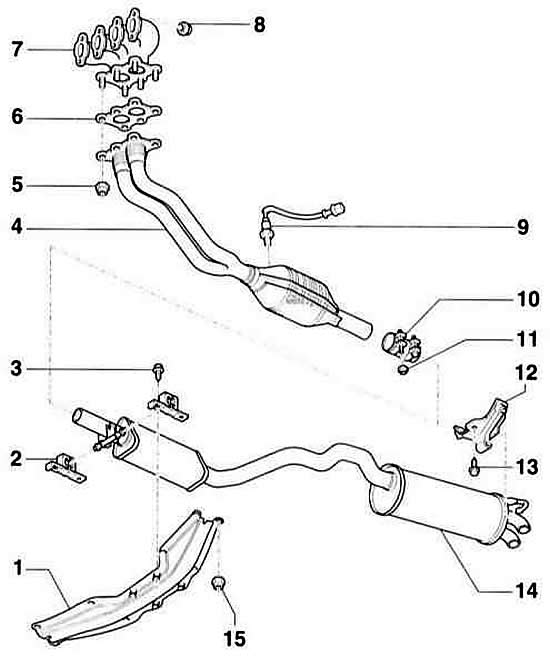
Exhaust system. Engine without turbocharger
On the 1.8L turbocharged engine there are differences at the flange of the exhaust pipe.
- 1 crossbar. With a hole for installing the exhaust system.
- 2 suspension
- 3 bolt, 25 Nm
- 4 downpipe, catalytic converter
- Do not drop, protect from impacts and shocks.
- 5 nut, 40 Nm. Self-locking, a new one must be installed.
- 6 seal. Be sure to replace.
- 7 exhaust manifold
- 8 nut, 25 Nm
- 9 oxygen sensor, 50 Nm
- 10 clamp
Operating position: The bolt connection is located horizontally on the left side of the vehicle.
- 11 nut, 40 Nm
- 12 suspension
- 13 bolt, 25 Nm
- 14 additional and main mufflers. During repairs, they are separated and replaced separately.
- 15 Nut, 25 Nm
Exhaust system. Diesel engine
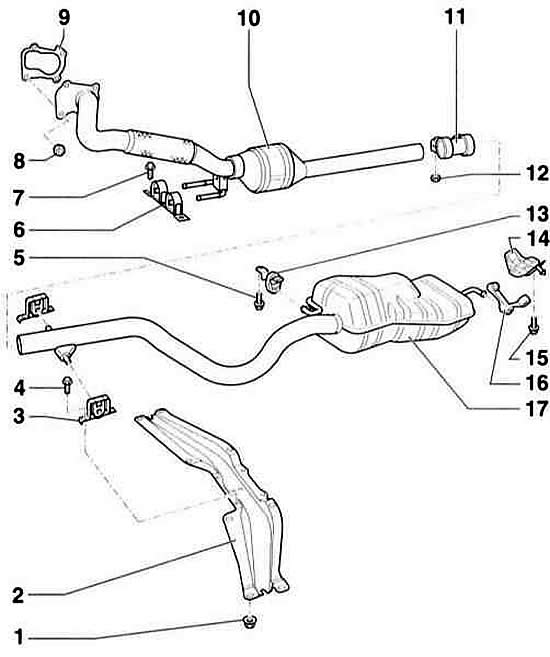
- 1 bolt, 20 Nm
- 2 tunnel bridge. With a hole for installing the exhaust system.
- 3 suspension
- 4 bolt, 25 Nm
- 5 bolt, 25 Nm
- 6 suspension
- 7 bolt, 25 Nm
- 8 nut, 25 Nm. Self-locking, must be replaced.
- 9 seal. Be sure to replace.
- 10 exhaust pipe, catalytic converter. Do not drop, protect from impacts and jolts.
- 11 clamp. Working position: the bolt connection is located horizontally on the left side of the car.
- 12 nut, 40 Nm
- 13 suspension
- 14 suspension
- 15 bolt, 25 Nm
- 16 suspension
- 17 main muffler
Removal
Warning: The exhaust system components can be removed separately. The central and additional mufflers can be separated from each other. They exist as separate parts, refer to the subsection Replacing the central/additional muffler.
Warning: There is a danger when lifting and placing the vehicle on stands! Therefore, please read the subsection first Jacking up a car.
1. Raise and place the vehicle on stands.
2. Spray all exhaust system bolts and nuts with rust remover. Wait for a while.
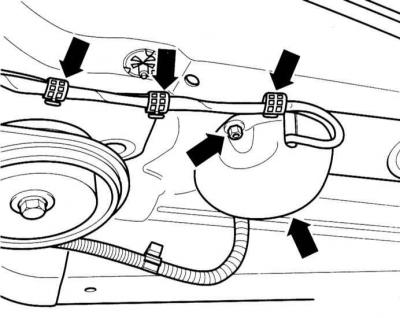
3. Unscrew the plug connection cover of the oxygen sensor next to the catalytic converter (arrow at the bottom of the illustration). Disconnect the electrical wire with clamps (top arrow) at the heat shield. Remove the connector from the cover and disconnect it.
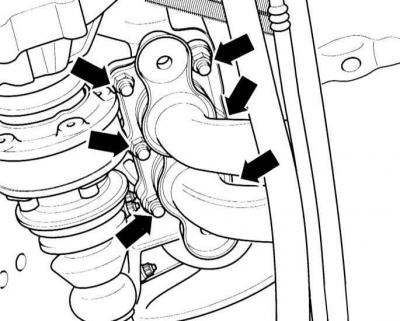
4. Remove the lower bolts securing the intake pipe to the exhaust manifold or turbocharger.
5. Place supports under the exhaust system or suspend it with wire from the bottom of the car so that it does not fall.
Warning: Never allow the exhaust system to fall, as this may damage the ceramic of the catalytic converter. This will require replacement of the catalytic converter.
6. Unscrew the bolts securing the front cross member of the exhaust system to the bottom on both sides.
7. With the help of an assistant, remove the exhaust system from its mountings.
Installation
Warning: Always replace seals, nuts and bolts with new ones. To facilitate subsequent disassembly, it is recommended to coat the exhaust system nuts and bolts with a high-temperature paste, such as Liqui Moly LM–508–ASC, before installing them in place.
8. If the mufflers are not being replaced, the sealing and contact surfaces must be cleaned with sandpaper to remove rust and sealant residue before assembly.
Warning: The turbocharger has a flexible (disconnecting) do not bend the element in the intake pipe at an angle greater than 10°, otherwise it may be damaged.
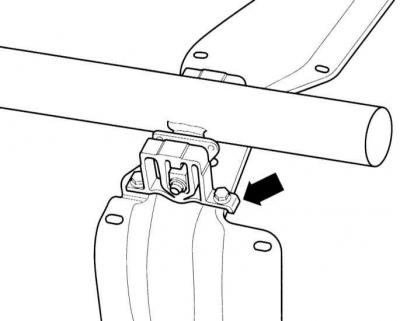
9. Bolt the exhaust system holders to the front crossmember so that the bent side of the holder (arrow on the illustration) looked in the direction of movement.
10. Install the exhaust system with the help of an assistant and hang it at the rear in rubber holders.
11. Secure the front cross member to the underbody of the vehicle with bolts to a torque of 25 Nm.
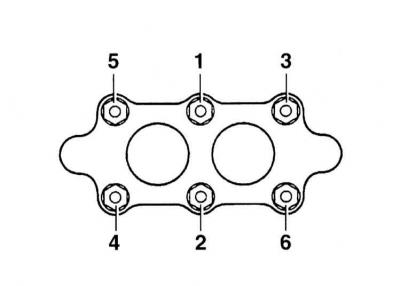
12. Engines without turbocharger: Bolt the downpipe with a new gasket to the exhaust manifold and tighten in a crisscross pattern as shown in the illustration to 40 Nm.
13. Engines with turbocharger: Fasten the inlet pipe with a new sealing gasket to the turbocharger crosswise with a torque of 40 Nm for petrol engines and 25 Nm for diesel engines.
14. Adjust the exhaust system so that it lies in the suspension without tension.
15. Tighten the mounting bolts and nuts to the torque specified in the Specifications.
16. Install the lower engine compartment cover, referring to the subsection Removal and installation the lower engine compartment cover.
17. Place the oxygen sensor cable in the clamps and connect. Screw the plug connection cover onto the bottom.
18. Lower the car onto its wheels.
19. Check the exhaust system for leaks, refer to the relevant subsection Checking the condition of the exhaust system.
(This article was previously published on the resource: «audimanual.ru»)