
Repair Chevrolet Repair Toyota Repair Honda Repair AvtoVAZ Repair Mercedes-Benz Repair BMW Repair Opel
Home  |  Contacts  |  Sitemap  |    
English Русский
Български
Беларускі
Український
Српски
Hrvatski
Română
Polski
Slovenský
Magyar
AudiManual.ru


  • AUDI 80
  • AUDI 100
  • AUDI A3
  • AUDI A4
  • AUDI A6
  • AUDI A8
  • AUDI Q
  • OTHER
  • ARTICLES
Type 8L (1996-2003)

Checking the exhaust system (Audi A3 8L)

  • Home
  • Audi A3
  • Type 8L (1996-2003)
  • Power unit
  • Exhaust system
  • Checking the exhaust system
            0
After each installation of the exhaust system parts, it is necessary to check it to exclude any stress in the system elements that could lead to cracks or noise.

1. The check is performed in a cold state of the exhaust system. The heated system must be cooled to the outside temperature.

Warning: There is a danger when lifting and placing the vehicle on stands! Therefore, please read the subsection first Jacking up a car.


2. Raise and place the vehicle on stands.
2. Raise and place the vehicle on stands.


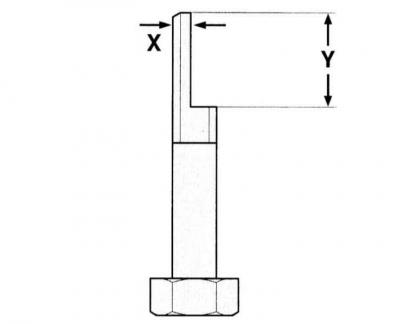
3. To install the exhaust system correctly, it is necessary to make an auxiliary tool from the M10 bolt, see the illustration. Dimensions: x = 4 mm, y = 25 mm.

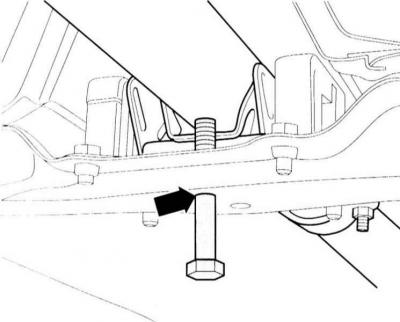
4. Loosen the bolt connection of the clamp between the catalytic converter and the center muffler.
4. Loosen the bolt connection of the clamp between the catalytic converter and the center muffler.


5. Insert the auxiliary tool through the hole (arrow on the illustration) front cross member. The flat points towards the suspension pin.


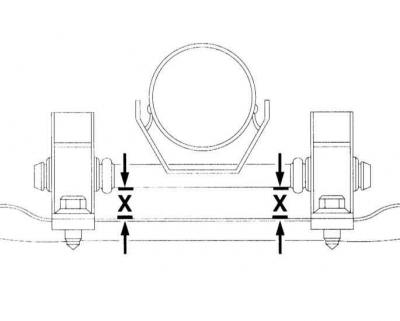
Warning: Using the auxiliary tool, press the muffler in the direction of vehicle movement.

Warning: Using the auxiliary tool, press the muffler in the direction of vehicle movement.


6. Align the muffler horizontally: The cross pin should be parallel to the crossbar, the dimension (X) on the left and right should be the same.

7. Place the last muffler with the end pipe horizontally in relation to the bottom of the car.
7. Place the last muffler with the end pipe horizontally in relation to the bottom of the car.


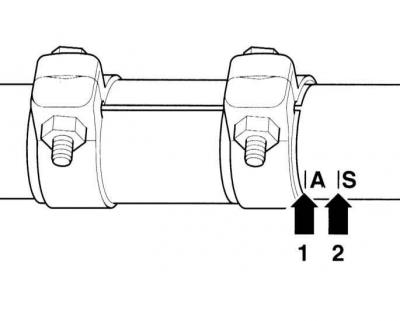
8. Front wheel drive vehicles: Move the end pipe about 5 mm in relation to the corresponding marking mark in the clamp. Marking (A), (arrow 1) applies to all vehicles except 1.6 l.

1.6 l engines with manual transmission: Slide the muffler up to the "S" mark (arrow 2) in the clamp.

S cars with 1.6 l engines and manual transmission.

And the rest of the cars are front-wheel drive.


9. Tighten the clamp to 40 Nm. The bolts should be horizontal and point to the left side of the car.

10. Remove the auxiliary tool from the hole in the cross member.

11. Lower the car onto its wheels.

(The original text of the material can be found on the website «audimanual.ru»)
The article was checked by auto expert Nikita Rudakov
This article is available at russian, bulgarian, belarusian, ukrainian, serbian, croatian, romanian, polish, slovak, hungarian

Share information:
Previous articles
Audi A3 Type 8L: Exhaust system
Next articles

Removal and installation of the exhaust system
Safety precautions to avoid damage to the catalytic converter
Operation of the catalytic converter
Exhaust gas system
Replacement of central/additional muffler
Checking the exhaust system for leaks
Replacing the oxygen sensor


Similar articles on other Audi car models:
Exhaust Gas Recirculation System — Checking the Status Audi 80 B4 (1991-1996)
Checking the suspension and condition of the exhaust system Audi 100 C4 (1990-1994, petrol)
Checking the suspension and condition of the exhaust system Audi A4 B5 (1994-2001, petrol)
Checking the exhaust system Audi A6 C5 (1997-2004)
Checking the exhaust system Audi A8 D2 (1994-2002)
Checking the condition of the exhaust system Audi Q7 Typ 4L (2005-2015, diesel)
Checking the exhaust system for leaks Audi A2 (1999-2005)
Link to this page in different formats


Visitor comments

No comments yet


How much will 47 + 15 =


A3(8L, 1996-2003) 
  • General information
  • User manual
  • Maintenance
  • Power unit
  • Engine repair
  • Lubrication system
  • Cooling system
  • Supply system
  • Fuel injection system
  • Exhaust system
  • Ignition system
  • Transmission
  • Manual transmission
  • Automatic transmission
  • Clutch and drive shafts
  • Chassis
  • Brake system
  • Front suspension
  • Rear suspension
  • Steering
  • Body
  • Ventilation and heating
  • Exterior (external elements)
  • Interior (internal elements)
  • Doors, covers and windows
  • Electrical equipment
  • Power devices
  • Lighting and appliances
  • Electrical circuits
 
AudiManual.ru © 2017-2026 · Mobile version · Feedback · Sitemap: EN BG BY UA RS HR RO PL SK HU · Site search · News and articles
80 B2 · 80 B3 petrol · 80 B3 · 80 B4 · 100 C3 diesel · 100 C3 petrol · 100 C3 · 100 C4 petrol · 100 C4 · A3 Type 8L · A4 B5 petrol · A4 B5 · A4 B6 petrol · A4 B6 · A4 B7 · A4 B8 · A6 C4 · A6 C5 · A6 C5 Allroad · A8 D2 · Q5 Type 8R · Q7 Typ 4L · Audi A2 ·
This site uses cookies 🍪. Click the button to accept this fact.