
Repair Chevrolet Repair Toyota Repair Honda Repair AvtoVAZ Repair Mercedes-Benz Repair BMW Repair Opel
Home  |  Contacts  |  Sitemap  |    
English Русский
Български
Беларускі
Український
Српски
Hrvatski
Română
Polski
Slovenský
Magyar
AudiManual.ru


  • AUDI 80
  • AUDI 100
  • AUDI A3
  • AUDI A4
  • AUDI A6
  • AUDI A8
  • AUDI Q
  • OTHER
  • ARTICLES
B4 (1991-1996) B3 (1986-1991) B3 (1986-1991, petrol) B2 (1979-1986)

Removal, installation, checking of the clutch (Audi 80 B3)

  • Home
  • Audi 80
  • B3 (1986-1991)
  • Transmission
  • Clutch and gearbox
  • Removal, installation, checking of the clutch
            0
Table of contents: Removal ↓ Examination ↓ Installation ↓

Removal


Remove the gearbox.

Loosen the pressure plate mounting bolts sequentially by 1-11/2 turns, removing the load from the pressure plate.

Caution: If the bolts are completely loosened at once, the diaphragm spring may be damaged.
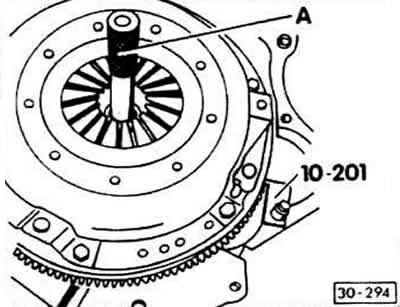

Caution: If the bolts are completely loosened at once, the diaphragm spring may be damaged.


To prevent the flywheel from turning when unscrewing the pressure plate mounting bolts, it must be secured with either the VAG 10-201 tool or a screwdriver.

After removing the load from the pressure plate, unscrew the bolts completely.

Remove the pressure plate and clutch disc.

Caution: When removing the pressure plate and clutch disc, handle them carefully. Do not drop them, otherwise it may be difficult to install the discs back in place.


Remove the clutch release bearing from the front gearbox cover.

Attention: Do not wash the bearing, just wipe it.


Wash the flywheel with a rag soaked in gasoline.

Examination


Check the pressure plate for burns and cracks.
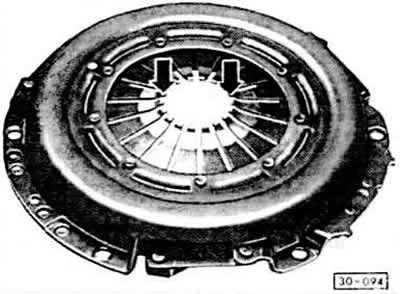
Check the pressure plate for burns and cracks.


Check the pressure spring for cracks -arrows-. Traces of wear along the edges of the pressure spring with a depth of 0.3 mm do not pose a danger.
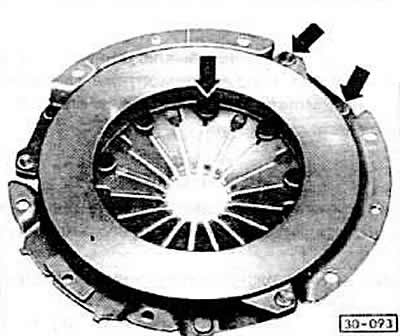


Check the pressure spring for cracks -arrows-. Traces of wear along the edges of the pressure…


Check the connection between the pressure spring and the cover for cracks. Check the reliability of the riveted connections. A clutch that has mechanical damage must be replaced.
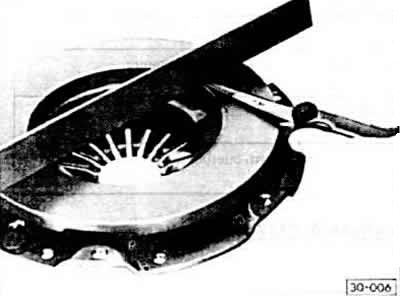
Check the connection between the pressure spring and the cover for cracks. Check the reliability of…


Check the bearing surfaces of the pressure plate for cracks, burns and wear. A pressure plate with deflections up to 0.3 mm deep can be used. The check is performed with a check ruler and feeler gauge.

Check the flywheel for burns and cracks.

A clutch disc with oiling and mechanical damage should be replaced. Check the thickness of the friction linings and the absence of cracks on them.

In specialized workshops, the end runout of friction linings is checked. The runout should not exceed 0.5 mm (when replacing at a distance of 2.5 mm from the outer edge).


Note: This check is carried out if old discs are installed that had defects when engaging the clutch.


The clutch release bearing is checked as follows. The bearing is lightly compressed by hand and rotated. The bearing should rotate freely. Otherwise, it must be replaced.

A defective clutch release bearing can be identified without dismantling it. A sign of a defective bearing is noise in its operation when the clutch pedal is pressed.

Installation


Before installing a new clutch, completely remove the anti-corrosion lubricant from its working surfaces

Check the reliability of the centering pin fastening on the flywheel.

Insert the clutch disc and pressure plate into the flywheel. Install the pressure plate onto the pin. The clutch disc must be centered. Using a mandrel for this purpose (for example HAZET) or the primary shaft of the gearbox.

When installing the clutch drive disc, ensure that the spring separator faces the pressure plate.

Clean the splined connection of the clutch disc from corrosion and coat with a thin layer of Moly paste. In workshops, grease G 000 100 is used. Excess grease must be removed.

Tighten the pressure plate mounting bolts sequentially by 1-11/2 turns until it is secured. Tightening torque: 25 Nm.

When completing the work, remove the centering mandrel.

Install the gearbox.
The article was checked by auto expert Elisey Ermolaev
This article is available at russian, bulgarian, belarusian, ukrainian, serbian, croatian, romanian, polish, slovak, hungarian

Share information:
Previous articles
Audi 80 B3: Clutch and gearbox
Next articles

Possible clutch malfunctions
Clutch drive
Clutch device
Bleeding air from the system
Gear shifter
Automatic transmission. General information
Checking the oil level in an automatic transmission


Similar articles on other Audi car models:
Checking the clutch Audi 100 C4 (1990-1994, petrol)
Removal, installation and checking the clutch Audi A3 Type 8L (1996-2003)
Checking the clutch Audi A4 B5 (1994-2001, petrol)
Checking the oil level and filling Audi A6 C5 (1997-2004)
Checking the exhaust system Audi A8 D2 (1994-2002)
Checking the operation of the master and slave clutch cylinders Audi Q5 Type 8R (2008-2017)
Checking the keyed and riveted connections of the clutch Audi A2 (1999-2005)
Link to this page in different formats


Visitor comments

No comments yet


How much will 11 + 36 =


80(B4, 1991-1996) 
  • General information
  • User manual
  • Maintenance
  • Troubleshooting
  • Power unit
  • Engine
  • Cooling system
  • Heating and ventilation
  • Petrol injection
  • Diesel fuel system
  • Fuel system
  • Exhaust systems
  • Ignition system
  • Transmission
  • Clutch
  • Car gearbox
  • Chassis
  • Brake system
  • Suspension and steering wheel
  • Body
  • Body and trim
  • Electrical equipment
  • Electrical system
  • Electrical circuits
 
80(B3, 1986-1991) 
  • General information
  • Repair characteristics
  • Maintenance
  • Power unit
  • Gasoline engine
  • Diesel engine
  • Engine lubrication system
  • Fuel system (gasoline)
  • Injection system (gasoline)
  • Fuel system (diesel)
  • Ignition system
  • Cooling system
  • Heater
  • Exhaust system
  • Transmission
  • Clutch and gearbox
  • Chassis
  • Steering
  • Brake system
  • Car suspension
  • Body
  • Body elements
  • Electrical equipment
  • Power devices
  • Lighting and appliances
  • Electrical circuits
 
80(B3, 1986-1991, petrol) 
  • General information
  • User manual
  • Maintenance
  • Power unit
  • Engine 4-cylinder
  • Engine 5-cylinder
  • Cooling system
  • Fuel and exhaust systems
  • Ignition system
  • Transmission
  • Clutch
  • Mechanical transmission
  • Automatic transmission
  • Drive shafts
  • Chassis
  • Brake system
  • Suspension
  • Steering
  • Body
  • Exterior
  • Interior
  • Electrical equipment
  • Equipment and devices
  • Electrical circuits
 
80(B2, 1979-1986) 
  • General information
  • User manual
  • Power unit
  • Engine FZ
  • Engine EP, YP, YZ, DT, DS, DZ
  • Transmission
  • Clutch
  • 4 speed gearbox
  • 5 speed gearbox
  • Front wheel drive
  • Chassis
  • Front suspension
  • Rear suspension
  • Steering
  • Brake system
  • Electrical equipment
  • Equipment and devices
  • Electrical circuits
 
AudiManual.ru © 2017-2026 · Mobile version · Feedback · Sitemap: EN BG BY UA RS HR RO PL SK HU · Site search · News and articles
80 B2 · 80 B3 petrol · 80 B3 · 80 B4 · 100 C3 diesel · 100 C3 petrol · 100 C3 · 100 C4 petrol · 100 C4 · A3 Type 8L · A4 B5 petrol · A4 B5 · A4 B6 petrol · A4 B6 · A4 B7 · A4 B8 · A6 C4 · A6 C5 · A6 C5 Allroad · A8 D2 · Q5 Type 8R · Q7 Typ 4L · Audi A2 ·
This site uses cookies 🍪. Click the button to accept this fact.