
Table of contents: Visual inspection of gearbox… ↓ Visual inspection of the main… ↓ Checking the oil level in a manual… ↓ Checking the oil level in the main… ↓ Checking the oil level ↓ Checking the oil condition ↓
Raise and secure the vehicle securely on stands.
Turn the steering wheel to the right or left until it stops and turn the front wheel.
Using a lamp, inspect the rubber CV joint boots, squeezing them to open the folds. Check for cracks that could allow grease to leak out, or water and dirt to get in. Also check the condition of the mounting clamps, inspect the inner CV joint boots, and the other side of the casing. If there is any damage, the boot should be replaced immediately (see fig. 1.26)
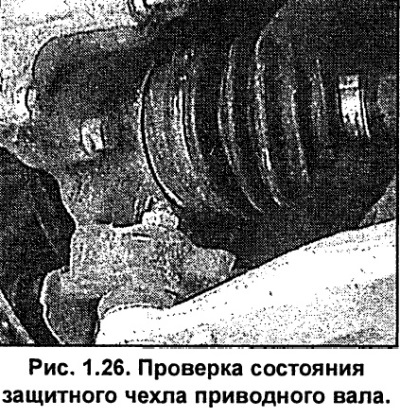
Also check the general condition of the constant velocity joints by holding the drive shaft and trying to turn the wheel. Try again by holding the inner constant velocity joint and turning the drive shaft. Any noticeable play indicates wear in the joint, wear in the shaft grooves, or a loose drive shaft nut.
Lower the car.
Visual inspection of gearbox tightness
Gearbox oil leaks may occur in the following places:
- at the junction of the gearbox housing with the cylinder block;
- at the junction of the drive shaft to the gearbox;
- around the oil drain plug;
- around the oil filler cap.
To locate the oil leak, follow these steps:
- clean the gearbox housing;
- cover possible leaks with a thin layer of chalk or talc;
- take a test drive of about 30 km;
- raise the car on a lift or place it over an inspection pit and determine the location of the oil leak by the leaks;
- fix the leak and fill the gearbox with oil.
Visual inspection of the main reverse gear on A6 quattro vehicles
1.5 liters of transmission oil of GL5 CEET 90 specification is poured into the main reverse gear (MIL-L 2105 B). Oil change is not provided.
Oil leaks may be observed from the oil filler plug side (see fig. 1.27).
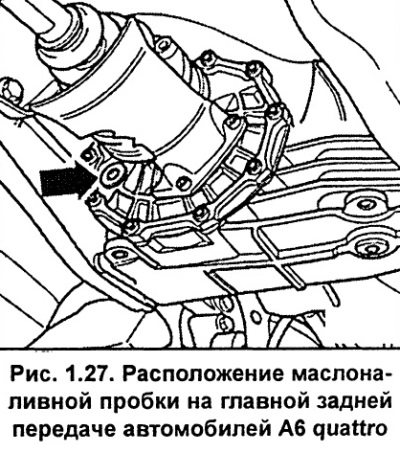
The oil level should be at the lower edge of the oil filler hole. The threaded plug should be tightened to a torque of 35 Nm.
Checking the oil level in a manual transmission
Changing the oil in the manual transmission is not provided. The oil level must be checked as part of the maintenance.
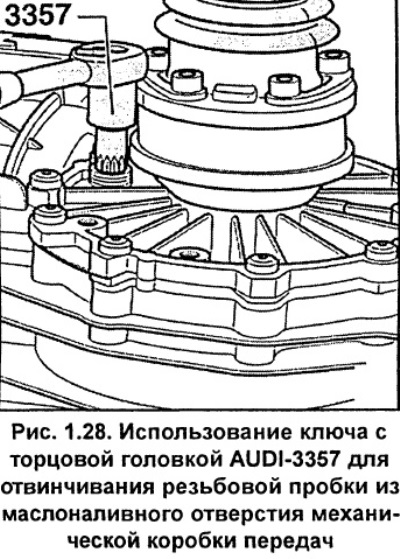
To unscrew the threaded plug, depending on the vehicle version, you must use a 17 mm Allen key or a head for bolts with an internal hexagon, for example, HAZET 2567-16 or AUDI-3357.
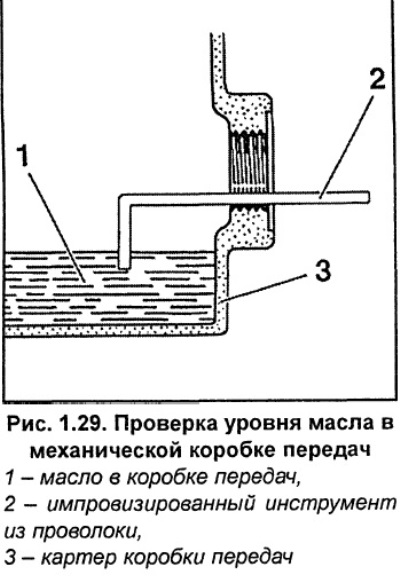
To measure the oil level, you need to use a steel wire, one end of which is bent at an angle of 90° by 10 mm.
The manual gearbox uses synthetic transmission oil SAE 75 W 90 according to the AUDI G 052 911 A specification:
- Front wheel drive - 2.25 l
- Front-wheel drive / 2.5-I-TDI - 2.25 l
- All-wheel drive depending on the model - 2.3-3.6 l
Examination
Raise the vehicle on a lift or place it over an inspection pit.
Remove the lower engine compartment splash shield.
The oil filler plug is located in the gearbox in front of the left drive shaft and may be covered by a heat shield. If present, unscrew the heat shield.
Unscrew the threaded plug from the oil filler hole (see fig. 1.28).
Front-wheel drive vehicles, except vehicles with 2.5-I-TDI engine. Using a bent wire as a dipstick, check the gearbox oil level (see fig. 1.29). When checking, hold the wire horizontally, the bent end of the wire should be directed strictly downwards. Remove the wire and measure the oil level on the wire. The oil level should be 7 mm below the edge of the oil filler hole.
All-wheel drive vehicles with a 5-speed gearbox, as well as vehicles with a 2.5-I-TDI engine. The oil level should be at the lower edge of the oil filler hole.
All-wheel drive vehicles with 6-speed gearbox.The oil level should be 1 mm below the edge of the oil filler hole.
If the oil level is below the required level, check the gearbox for leaks.
If necessary, top up the oil and tighten the plug to 25 Nm. On vehicles with 2.5-I-TDI/2.7-1/4.2-1 engines, tighten the plug to 40 Nm.
If available, install a heat shield.
Checking the oil level in the main gear of automatic transmissions
The main gear of automatic transmissions uses synthetic transmission oil SAE 75 W 90 according to the AUDI specification G 052 145, and on the 01J gearbox according to the AUDI specification G 052 190:
- 4-speed automatic transmission 01 N - 0.75 l
- 5-speed automatic transmission 01V - 0.8 l
- 5-speed automatic transmission 01 L - 1.3 L
Gearbox Multitronic 0J..1.4 l On a 5-speed automatic gearbox, when installing the threaded plug, it is necessary to use a new sealing ring.
Oil change and level check in automatic transmission are not provided.
Checking the oil level
Take a short drive to warm up the automatic transmission fluid to 60°C.
Raise the vehicle on a lift or place it over an inspection pit.
Remove the lower engine compartment splash shield.
4-speed automatic transmission.Unscrew the threaded plug from the oil filler hole (see fig. 1.30). Check the oil level, which should be at the lower edge of the oil filler hole. Screw in the threaded plug and tighten it to a torque of 25 Nm.

5-speed automatic transmission.If present, remove the heat shield. Unscrew the threaded plug from the oil filler hole (see fig. 1.31). Check the oil level, which should be at the lower edge of the oil filler hole. Screw in the threaded plug with a new sealing ring and tighten it to a torque of 35 Nm. If available, install a heat shield.

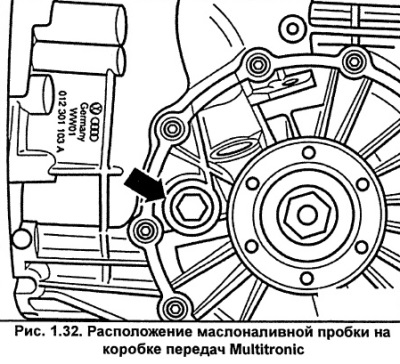
Multitronic gearbox.If present, remove the heat shield. Unscrew the threaded plug from the oil filler hole (see fig. 1.32). Check the oil level, which should be 8.5 mm below the edge of the oil filler hole. Screw in the threaded plug and tighten it to a torque of 20 Nm. If available, install a heat shield.
Install the lower engine compartment splash shield.
Checking the oil condition
When checking the automatic transmission fluid level, also check the condition of the oil. To make it easier to check the condition of the oil, compare the color, smell, and viscosity of the oil with new oil.
If the oil in the gearbox is dark or almost black with a burnt smell, it means that the friction linings of the gearbox are worn out.
If the oil in the gearbox is milky, it means that water has entered it. This can happen when the car is constantly used for short trips. If the color of the oil does not change after a long trip, it is necessary to change the oil.
If the oil is dark brown and sticky, it may be due to overheating of the gearbox or too high oil level in the gearbox. If changing the oil does not help, the car must be brought to a specialized AUDI workshop.
If, when checking the oil level in the automatic transmission, there are dirt particles or metal shavings in the oil, it is necessary to carry out diagnostics or repair of the automatic transmission at a specialized AUDI service station.
(The original text is available on the website: «AUDIMANUAL.ru»)