
Table of contents: Removal ↓ 4-cylinder engine ↓ 6-cylinder engine ↓ All engines ↓ Examination ↓ Installation ↓
Spark plugs are replaced during scheduled maintenance.
Spark plugs and the entire ignition system as a whole are selected for this engine, and this helps to reduce the amount of harmful substances in the exhaust gases. To avoid engine failures, reduced power, poor throttle response, increased content of harmful substances in the exhaust gases and interference with radio reception, only spark plugs recommended by Volkswagen for this engine should be used. Particularly important characteristics of the spark plugs are the number of electrodes, the glow number and, in some cases, the ability not to interfere with radio reception.
Correct functioning of spark plugs is one of the most important conditions for efficient engine operation. It is necessary that only the prescribed type of spark plugs are installed on the engine. If the engine is in good condition, cleaning the spark plugs is a rare operation.
Installing new spark plugs after a short mileage (about 1000 km), it is advisable to unscrew them, marking the cylinder number, and carefully inspect the condition of the insulators. With the correct heat range and optimal mixture composition and ignition advance angle, the insulator will be light brown, brown or light gray. Multi-colored deposits on the insulator and electrodes indicate the presence of a large number of additives in the fuel or motor oil.
Sometimes it may turn out that all the spark plugs of the same brand in different cylinders have different colored insulators. There may be several reasons. As a rule, the fuel-air mixture and anti-knock additives are distributed unevenly across the cylinders.
There are engines with different compression ratios for each cylinder. And between engines of the same model, the compression ratio sometimes differs by a whole unit. Due to deviations from technological processes, materials, etc., there is also a large spread in actual heat ratings among spark plugs of the same brand. With a large difference in the condition of the spark plugs, it is sometimes necessary to install spark plugs with different heat ratings even in one engine. In order to always have a reserve in heat rating under different operating conditions, it is advisable to have two sets of spark plugs and install colder ones in the summer and "hot" ones in the winter.
Removal
To unscrew the spark plugs, you need to use a 16 mm wrench, for example, HAZET 900 A KF, HAZET 4766-1 or spark plug wrench 3122B from AUDI.
Replace spark plugs on a cold or warm engine. If you unscrew the spark plugs on a hot engine, you can damage the spark plug threads in the cylinder head.
Turn off the ignition.
4-cylinder engine
Replacing spark plugs on an 8-cylinder engine and a 2.7 L engine is done in a similar manner.
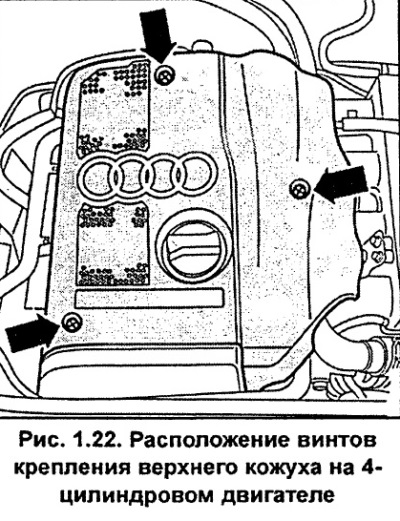
Unscrew the screws and remove the upper engine cover (see fig. 1.22).
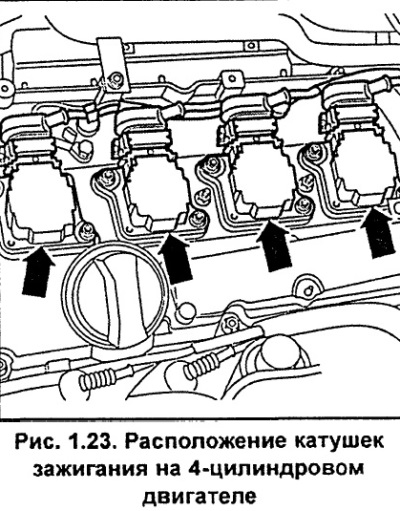
Disconnect the electrical connectors from the ignition coils (see fig. 1.23).
Unscrew the ground bus from the cylinder head.
Unscrew the two mounting bolts and remove the ignition coils by pulling them up off the spark plugs (see fig. 1.23).
6-cylinder engine
Unscrew, remove from the bracket and move to the side the expansion tank together with the hoses connected to it.
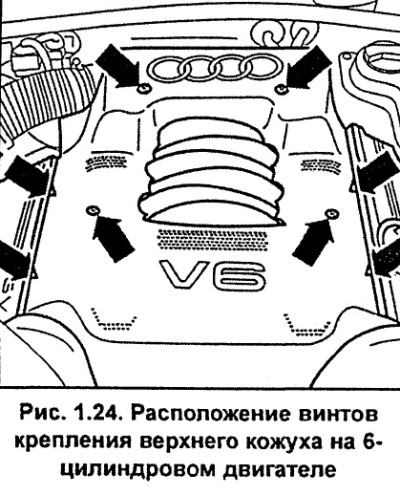
Unscrew the screws and remove the upper engine cover (see fig. 1.24).
To make installation easier, label the spark plug wires with numbers 1 through 4.
Disconnect the spark plug electrical connectors. Use special pliers for this, for example, HAZET 1849-1.
All engines
Using a 16 mm spanner, such as HAZET 900AKF, unscrew the spark plugs.
Examination
Visual inspection of the working part of the spark plugs can show the condition of the engine. If the nose of the spark plug insulator is clean and white, without any deposits, this indicates that the mixture is too lean. This also indicates that the plug is too hot, i.e. the heat from the central electrode is slowly removed. If this is the case, it is necessary to adjust the fuel mixture or replace the plug.
If the nose of the insulator is covered with a black coating, this indicates that the mixture is too rich. If the coating is black and oily, this indicates engine wear and the need for inspection and repair. If the nose of the insulator is covered with a light brown coating, the mixture composition is optimal and the engine is in good condition.
The spark plug gap is very important because if the gap is too big or too small, the spark size changes, which reduces the efficiency of the engine. The gap must always meet the technical requirements.
The gap is checked using a feeler gauge, for example, HAZET2147 MS (see fig. 1.25). AUDI A6 cars use spark plugs with three ground electrodes.
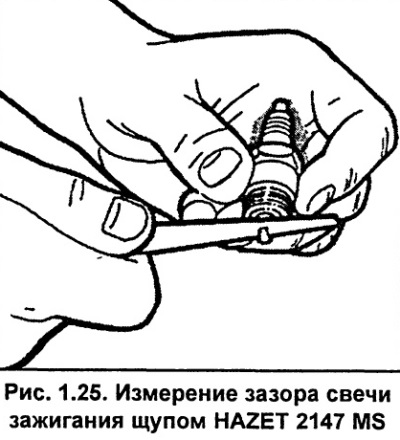
The gap between the spark plug electrodes is 1.0±0.1 mm.
New spark plugs have the correct gap between the spark plug electrodes. The gap can only be checked, not adjusted. If the gap is not as required, the spark plug must be replaced.
Installation
Before installing the spark plug into the engine, check that the threads are clean and all threads are intact.
Screw in the spark plugs, being careful not to tilt them, and tighten to a torque of 30 Nm.
4-cylinder engine. If damaged, replace the seals between the ignition coils and the cylinder head. Install the ignition coils on the spark plugs and secure each with two bolts, tightening them to a torque of 10 Nm. Connect the electrical connectors to the ignition coils. Screw the ground bus to the cylinder head.
6-cylinder engine. Connect the wires to the spark plugs according to the markings made earlier. Install and secure the expansion tank.
Install and bolt the upper engine cover.
(The text is based on materials from the website audimanual.ru)