
Table of contents: Execution order ↓ Examination ↓
Every 60,000 km
Warning: Replace spark plugs only when the engine is cold or slightly warm. If the spark plugs are removed when the engine is hot, the threads of the light metal cylinder head may be damaged.
Execution order
1. Before you begin, prepare all the necessary tools. Some spark plug manufacturers supply special tools for measuring the spark plug gap.
To carry out the work you will need:
- Spark plug wrench 16 mm, for example, HAZET 900AKF. AUDI service stations use spark plug wrench 3122B for this.
- Additionally, it is recommended to purchase special pliers, for example, HAZET 1849, which make it easier to unscrew the spark plugs. AUDI uses the 3277A assembly key for this.
- 4 spark plugs. The required spark plugs are listed in the Specifications.
2. The best way to replace spark plugs is to buy new ones in advance, adjust their gap, and replace each one in turn. When buying spark plugs, it is very important to choose the ones that are designed for your car's engine. Information about them can be found in the Specifications to Chapter Engine electrical systems.
3. With new spark plugs on hand, allow the engine to cool completely before removing the old ones. During this time, you can inspect the new spark plugs for defects and check the spark plug gaps.
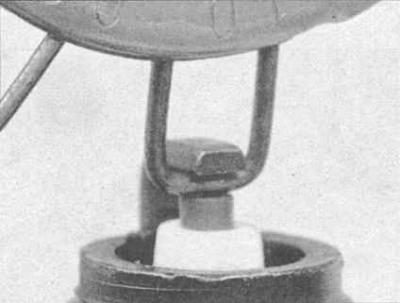
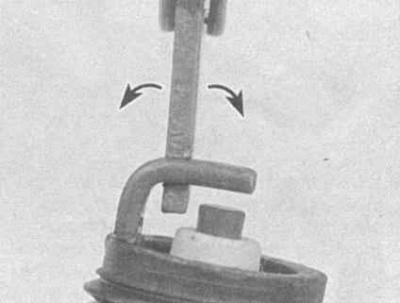
4. The spark plug gap is checked by inserting a gauge of the correct thickness between the electrodes at the end of the spark plug. The gap should be as specified in the Specifications. The wire should just touch each of the electrodes. If the gap is not correct, slightly bend the curved part of the electrode with a knurled adjuster until the correct gap is achieved.
Warning: When adjusting the gap of a new spark plug, bend only the base of the ground electrode, not the end. If the ground electrode is offset from the center electrode, use a notched adjuster to align them. Check the porcelain insulator for cracks, indicating that the spark plug should be replaced.
5. Turn off the ignition.
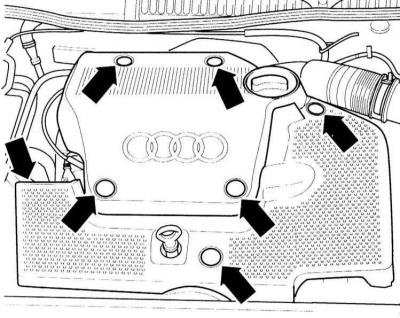
6. 1.6L Engine: Loosen the mounting bolts and remove the engine cover.
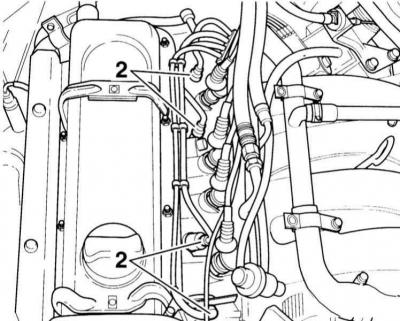
7. Engines up to 125 hp: Disconnect the spark plug connectors –2–. Note: The illustration shows the engine of another vehicle.
8. Blow out the spark plug wells, if possible with compressed air, to prevent dirt from getting into the spark plug holes after removing the spark plugs.
9. Engine 1.8 l/150 hp: Loosen the mounting bolts and remove the engine cover.
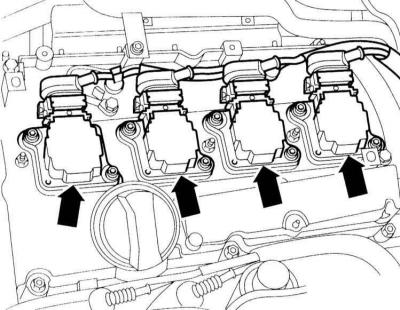
10. Disconnect the ignition coil plug connections by pulling the locking clips upwards.
11. Unscrew the bolts securing the ignition coils to the cylinder head and remove them upwards from the spark plugs.
Warning: Visually inspect the seals between the ignition coils and the cylinder head. Replace the parts if damaged.
All engines:
12. Remove the spark plugs with the appropriate spark plug wrench. Make sure that the spark plug wrench is not tilted, which can destroy the ceramic insulator. Use the appropriate head, for example, HAZET 900AKF. AUDI service stations use the 3122B spark plug wrench for this.
Examination
13. Compare the removed spark plug with those shown in the pictures in Chapter 5, this will give you useful information about the general condition of the engine.
14. Check the interelectrode gap with a feeler gauge. The AUDI A3 uses spark plugs with three ground electrodes. The required gap value is given in the Specifications.
Warning: New spark plugs usually have the correct spark gap.
If the spark plug thread is damaged, it must be replaced. There is a suitable tool and repair kit for this, in particular BERU. Using a special drill, the old threaded hole can be drilled. The cylinder head does not need to be removed for this. After this, a new thread can be cut in the cylinder head and the spark plug can be screwed in using a special threaded insert. The threaded inserts sit securely and hermetically.
15. To set the distance between the contacts, bend the corresponding ground electrode. To do this, tap the side of the ground electrode. When bending, rest a small screwdriver on the edge of the thread. Do not lean on the central electrode under any circumstances, as it can be damaged.
16. Apply a small amount of copper anti-seize compound to the threads of the new spark plug. Install the spark plug into the cylinder head and screw it in finger-tight until it stops, then tighten it with the socket of a spark plug wrench. If possible, use a torque wrench to tighten the spark plug to ensure that it is installed correctly. The tightening torque for the spark plugs is included in the Specifications.
Warning: To prevent the spark plug from being screwed in incorrectly, place a small piece of rubber hose or plastic tubing on the spark plug stem. The flexible tubing will act as a universal joint, aligning the spark plug with the spark plug socket, and if the spark plug starts to become warped, the hose will slide on it, preventing the threads from being stripped.
17. Before connecting the high-voltage (HV) wire to the spark plug, carefully inspect it.
18. Connect the wire to the new spark plug installed, again using a twisting motion and holding the connector until it is fully seated on the spark plug.
19. Repeat the above procedure for the remaining spark plugs in sequence to avoid incorrectly connecting the spark plug wires.
20. Engine 1.8 l 150 hp: Install the ignition coils and tighten to 10 N·m. Connect the connectors.
21. Install and screw on the lid.
The article was copied from the website audimanual.ru