
Table of contents: TO No.36 ↓ Removal spark plugs ↓ Carbon deposits on spark plugs ↓ Gap between electrodes ↓
TO No.36
The maintenance plan provides for replacement of spark plugs every 30,000 km. This interval seems realistic to us and should not be extended. It is necessary to carefully monitor the serviceability of the ignition system, especially on cars equipped with a catalytic converter.
Removal spark plugs
Remove the spark plugs and place them in the order of the cylinders so that the condition of the spark plug can be used to draw conclusions about the condition of the corresponding cylinder.
If the spark plugs are difficult to remove, do not use force, otherwise the threads in the light alloy head may strip.
Warm up the engine and now remove the spark plugs.
When installing, do not screw cold spark plugs into a hot engine, otherwise it will be difficult to unscrew them later.
Spark plugs should be tightened to 20 Nm. If you don't have a torque wrench at hand:
Screw in the spark plug until the sealing ring is seated - in this case, it can no longer be turned either by hand or with a spark plug wrench without applying force.
Now, if you have installed new spark plugs, tighten them with the spark plug wrench about another quarter turn.
If you are installing used spark plugs, it will be enough if you turn the spark plug wrench by about 15°.
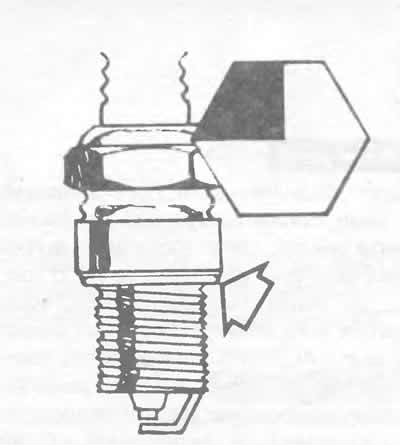
Spark plugs should be tightened to a torque of 20 Nm. If you do not have a torque wrench at hand: screw in the spark plug until the sealing ring (arrow) makes contact, when it can no longer be turned by hand or with the spark plug wrench without applying force. Now, if you have installed new spark plugs, tighten them with the spark plug wrench by about a quarter of a turn. If you are installing spark plugs that have already been used, it will be sufficient to turn the spark plug wrench by another 15°.
Carbon deposits on spark plugs
Spark plugs are, in a sense, witnesses to combustion in the engine. The appearance of spark plugs (carbon deposits) allows you to determine whether the engine is operating optimally.
The engine should be thoroughly warmed up on a country road or highway beforehand. Checking after a short distance may lead to incorrect conclusions. Look at the tip of the insulator cone with the middle electrode and side electrodes.
The tip of the insulator cone is grey or brownish in colour: the injection system is well adjusted, the engine runs economically.
Heavy deposits: This may be due to additives in the engine oil or fuel, or increased oil consumption. It may be time to change the brand of oil or fuel.
Black sooty deposits: spark plug does not reach self-cleaning temperature due to frequent short-distance driving, incorrect heat range
The tip of the insulator cone is whitish: the ignition timing is too early, the electronic ignition timing control or the knock sensor is not functioning.
Traces of melting on the middle and side electrodes: glow ignition caused by deposits in the combustion chamber, overheated injectors, incorrect ignition timing, knocked ignition timing, faulty knock sensor or engine overheating.
The insulator cone is broken, in the initial stage it is visible as a thin crack: detonating combustion due to bad fuel, incorrectly adjusted ignition, incorrect ignition timing, faulty knock sensor, insufficient engine cooling or lean mixture due to unaccounted air.
Oil layer on the electrodes and inner surface of the spark plug: damaged piston rings, valve guides or valve stem seals.
If the spark plugs do not show these signs, but the engine still starts slowly or runs rough, the spark plugs may still be the culprit. Invisible cracks in the ceramic insulator can fill with condensed fuel during a cold start, causing a spark leak. The spark plugs may fail to operate, although a spark is visible when the plugs are removed.
Gap between electrodes
The mixture of fuel and air, as well as combustion products, have a corrosive effect on the metal electrodes of the spark plugs. And the high voltage during a spark breaks through, tears out metal particles, which is why the gap between the electrodes increases during operation. The following values of the gap between the spark plug electrodes are acceptable:
- 4- and 5-cylinder engines: 0.7-0.9 mm:
- 6-cylinder engines: 0.9-1.1 mm.
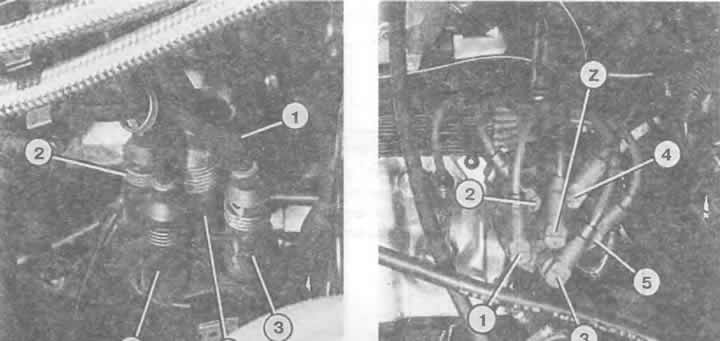
The high-voltage wires of the ignition distributor are connected to the spark plugs according to the firing order. The numbers indicate which cylinder (counting method: front to back) the appropriate wire must be connected. On the left is a 4 - cylinder engine, on the right is a 5 - cylinder engine.
[The article was copied from the website «AudiManual»]