
Table of contents: Air removal sequence: ↓ Execution order ↓
Special tool required:
- Open-end wrench for unscrewing the air bleed nipple.
- Transparent plastic hose with an internal diameter of 6 mm and a container for collecting brake fluid.
Warning: Do not reuse used brake fluid.
Warning: Observe safety precautions when working with brake fluid, and refer to the subsection Brake fluid.
Brake fluid absorbs moisture through the pores of the brake hoses and the reservoir ventilation hole. As a result, the boiling point of the fluid decreases during operation. Under heavy load on the brakes, this can even lead to vaporization, which reduces the effectiveness of the brakes.
Brake fluid should be replaced every 2 years, preferably in spring. If you frequently drive in mountainous areas, the fluid should be replaced more often.
At the service station, air from the brake system is usually removed using a special device. However, this can be done without using the specified device. In this case, the brake system is bled using the brake pedal. This requires the participation of an assistant.
Warning: If the fluid level drops sharply during the process of bleeding the brake system, air will be sucked in and enter the ABS pump. In this case, the air must be removed at a service station using a special device. When replacing any brake hose, the air from the system must also be removed at a service station. Until this is done, the car cannot be used.
Air removal sequence:
1. Rear right support
2. Rear left support
3. Front right support
4. Front left support
Execution order
1. Mark the brake fluid level on the reservoir with a felt-tip pen. After replacing the fluid, restore the previous level. This will prevent the system from overfilling with fluid when replacing the brake pads.
2. Unscrew the brake fluid reservoir cap.
Warning: It is not possible to suck the brake fluid out of the reservoir using just a bottle, as there is a rigidly mounted mesh in the filler pipe.
3. Vehicles with manual transmission: Since the clutch drive operates on brake fluid, bleed the air from the clutch drive, referring to the subsection Bleeding air from the clutch hydraulic system.
Warning: When bleeding the clutch slave cylinder, at least 100 cm³ (0.1 l) of brake fluid must be removed to replace the fluid with new fluid.
4. Fill the reservoir with new brake fluid up to the MAX mark.
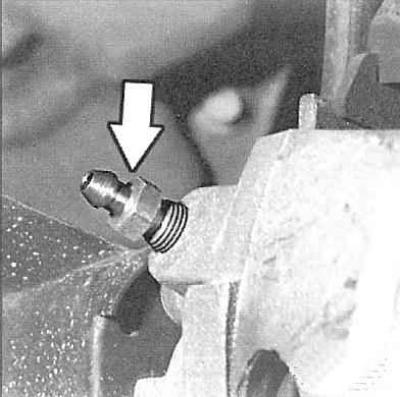
5. Carefully open the bleed nipples without unscrewing them. It is recommended to spray the nipples with a rust remover 2 hours before bleeding. If the nipples do not unscrew, it is recommended to have this operation performed at a service station.
6. Attach a clean transparent hose to the nipple of the right rear caliper and place a suitable container underneath. To access the nipple, you must either remove the wheel or lift the car or install it over an inspection pit.
7. Set the manual transmission to neutral, apply the parking brake. Start the engine and let it idle.
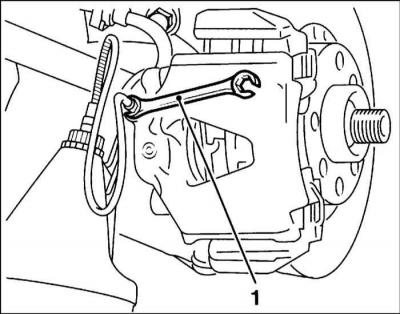
8. Ask an assistant to press the brake pedal several times, creating pressure in the system. Keep the pedal pressed. Using a spanner 1, open the bleed nipple on the right rear caliper. Close the nipple when the pedal hits the floor. Remove your foot from the pedal.
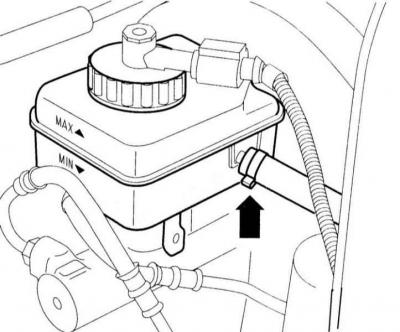
9. Cars with manual transmission: With the engine running, pump out the brake fluid until it reaches the level of the clutch drive connection pipe (arrow) in the reservoir. Do not allow the fluid level to drop too much, otherwise air may enter the system through the reservoir. Be sure to add only new fluid to the system.
10. Close the nipple.
11. Cars with manual transmission: Since the clutch drive operates on brake fluid, remove air from the drive, while referring to the subsection Bleeding air from the clutch hydraulic system.
Warning: To replace the brake fluid in the clutch drive, at least 100 cm³ (0.1 l) must be pumped out of the drive hydraulic cylinder.
12. Fill the reservoir with new brake fluid up to the MAX mark.
13. Pump out the old brake fluid from the other calipers in the following order: rear right, rear left, front right, front left.
Warning: The brake fluid that drains must be clean and free of air bubbles. Approximately 250 cm³ of fluid must be removed from each caliper.
14. Press the brake pedal and check the free play. It should not exceed 1/3 of the pedal travel.
15. Fill the brake fluid reservoir to the previously existing level.
16. Screw the cap onto the reservoir.
Attention, please perform a reliability check:
- Are the brake lines and hoses secured?
- Are the brake hoses in the holders?
- Are the air bleed nipples tightened?
- Is there enough fluid in the system?
17. With the engine running, check the tightness of the system. To do this, press the brake pedal about 10 times with a force of 200 - 300 N (equivalent to 20 - 30 kg). The brake pedal should not go back. Check all connections for tightness.
18. Finally, check the brakes on a road with light traffic. To do this, you need to make at least one strong braking, checking the ABS operation (a sign of ABS operation is pulsation of the brake pedal when braking).
Warning: Watch out for traffic behind you. The ABS system works best on unpaved roads.
Warning: Do not dispose of brake fluid with household waste or anywhere else. Local authorities should provide information on brake fluid collection points.