
Table of contents: Checking the strut/shock absorber ↓ Checking the condition of the… ↓ Checking the steering play ↓ Checking the tie rod ends and ball… ↓
Warning: Steering and suspension components should be inspected regularly. Worn or damaged steering and suspension components can cause excessive and dangerous tire wear, poor ride and handling, and poor fuel economy.
Checking the strut/shock absorber
1. Park the car on a level surface, turn off the engine and apply the parking brake. Check the tire pressure.
2. Press on one corner of the car, then release it, paying attention to the movement of the body. It should stop rocking and return to its original position after one or two pumps.
3. If the vehicle continues to rock or does not return to its original position, a worn or loose suspension strut or shock absorber may be the cause.
4. Repeat the above procedure for each of the three remaining corners of the car.
5. Jack up the vehicle and support it securely on supports.
6. Inspect the struts/shocks for signs of hydraulic fluid leakage. A light film of fluid is not cause for concern. If a leak is found, make sure that the fluid is coming from the strut/shock and not from somewhere else. If it is a strut/shock leak, replace the struts or shocks as a pair on the same axle (or all four).
7. Check the installation and integrity of the struts/shock absorbers. Check the upper strut mounts for damage and signs of wear. If any are found, replace the struts or shock absorbers.
8. If struts or shock absorbers need replacing, refer to Chapter 10 for instructions. Always replace both components on the same axle, otherwise the safety of the vehicle may be compromised. If possible, try to replace all four components as a set.
Checking the condition of the steering and suspension system
9. Inspect the steering system components for damage and deformation. Look for signs of fluid leaks, damaged gaskets, boots, and fittings.
10. Clean the lower end of the steering knuckle. Have an assistant grab the lower edge of the wheel and rock it while you watch the ball joints that connect the steering knuckle to the control arm move. Inspect the ball joint boots for tears. If you find play or torn or leaking boots, the ball joint(s) should be replaced.
11. grasp each front wheel at the front and rear edges and try to turn it with the front edge in and the rear edge out to check for play in the steering gear. If play is found, check for loose steering gear mounts and tie rod joints. If they are loose, tighten them. If the tie rods are loose, the tie rod joints may be worn out (first check the tightness of the nuts).
Checking the steering play
12. Set the steering wheel to the center position.
13. Move the steering wheel from side to side while watching the front wheels. The steering wheel can have a maximum play of 25 mm.
14. If there is more play in the steering wheel, you should check the steering rods, steering gear and play in the front suspension bearings.
15. Move the steering rods vigorously by hand. The ball joints should not have any play, otherwise replace the joints or steering rods.
Checking the tie rod ends and ball joints
Safety Note
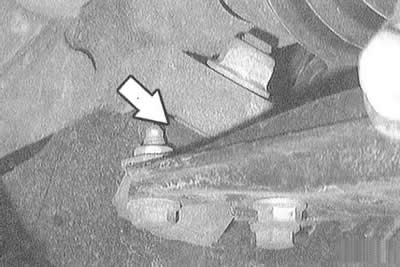
16. Use a lamp to shine a light on the lower ball joint boots on the left and right and check for damage.
17. Shine a light on the tie rod end boot (arrow on the accompanying illustration) left and right and check for damage.
18. If there is damage to the dust boots, for safety reasons the corresponding joint with the dust boot should be replaced. Contamination destroys the joint.
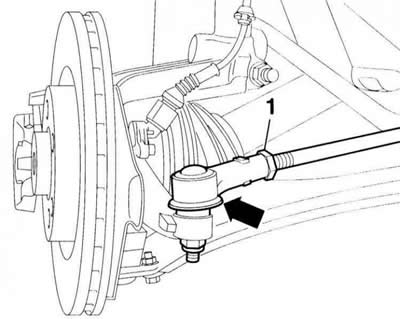
19. Move the steering rods vigorously in different directions by hand. The joint should not have any play. Otherwise, the steering rod end must be replaced.
20. Check the tightness of the lock nut –1– of the steering rod ends and the joint mounting nut without turning it. The tightening torque should be 50 Nm.
21. Check the protective covers on the steering gear and replace them with new ones if necessary.
(The original article is available on the online resource: Audimanual.ru)