Repair Chevrolet Repair Toyota Repair Honda Repair AvtoVAZ Repair Mercedes-Benz Repair BMW Repair Opel
Home  |  Contacts  |  Sitemap  |    
English Русский
Български
Беларускі
Український
Српски
Hrvatski
Română
Polski
Slovenský
Magyar
AudiManual.ru


  • AUDI 80
  • AUDI 100
  • AUDI A3
  • AUDI A4
  • AUDI A6
  • AUDI A8
  • AUDI Q
  • OTHER
  • ARTICLES
Type 8L (1996-2003)

Checking the condition, adjusting and replacing windshield wipers (Audi A3 8L)

  • Home
  • Audi A3
  • Type 8L (1996-2003)
  • General information
  • Maintenance
  • Checking the condition, adjusting and replacing windshield wipers
            0
Table of contents: Checking the condition of the… ↓ Examination ↓
1. Over time, road film builds up on windshield wipers, reducing their effectiveness, so wipers should be washed regularly in a mild cleaning solution.

Checking the condition of the brushes and the initial position of the wiper arm


2. Wiper blade assemblies should be inspected regularly. If inspection reveals hardened or cracked rubber on the blades, replace the blades. If inspection reveals nothing unusual, wet the windshield, turn on the wipers, let them run for a while, and turn them off. Uneven marks from the blades on the glass or streaks on clean glass indicate that the blades should be replaced.

3. If the wipers do not clean the windshield well enough, the following reasons may be the cause.
  • When your car goes through an automatic car wash, wax particles get on your windshield. These particles can be removed by adding a wax-dissolving detergent to your windshield washer fluid.
  • Filling the reservoir with a glass cleaner with wax-dissolving properties can significantly improve the performance of the windshield wipers. Grease-dissolving cleaners are not able to completely clean the glass.
  • Damage to the brushes can also be the cause of poor glass cleaning; the brushes should be replaced.
  • The angle of installation of the windshield wiper arms does not correspond to the required one.

4. During operation of the windscreen wiper mechanism, the mounting nuts may become loose, so they should be checked and, if necessary, tightened each time the wipers are checked.


Examination


Examination


Examination


5. Turn the windshield wipers on and off, which will reset them to their original position.

Windshield:


Check the distance between the brush and the lower edge of the windshield when the wiper is switched off. The distance should be on the driver's side a = 15 - 25 mm, on the front passenger side b = 17 - 27 mm. Markings -1- are located at these locations.

Rear window:


When the windshield wiper is turned off, the brush should lie horizontally at the upper edge of the wiper stopping plane.

Checking the wiper arm angle


Warning: Check the wiper arm angle when the glass cleaning efficiency is low or when there is noise from the wiper blades.


6. Turn the windshield wipers on and off, the windshield wiper arms will return to their original position. Remove the windshield wiper blades.


6. Turn the windshield wipers on and off, the windshield wiper arms will return to their original…


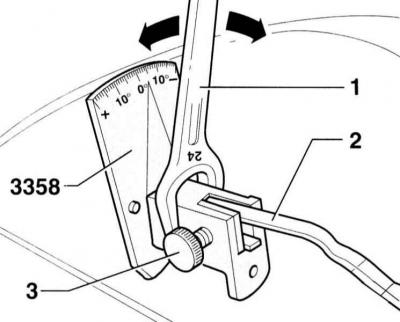
7. Insert windscreen wiper arm 1 into the HAZET 4851–1 or AUDI 3358 tool and secure with the bolt.

Checking and adjusting the angle of the windshield wiper arm


  • 1 wrench
  • 2 wiper arm
  • 3 tool AUDI 3358

8. if adjustment is necessary, carefully turn the AUDI 3358 tool with spanner 1 until the pointer on the scale is at the required value of ±2°.

Nominal values of the wiper arm tilt angles.
  • Driver side: -9°
  • Front passenger side -3°
  • Rear wiper: 0 – 2°

9. Remove the AUDI 3358 tool, install and secure the wiper blades.

10. Install the blade and check the operation of the wiper.

[This publication is borrowed from the resource «audimanual»]
The article was checked by auto expert Nikita Rudakov
This article is available at russian, bulgarian, belarusian, ukrainian, serbian, croatian, romanian, polish, slovak, hungarian

Share information:
Previous articles
Audi A3 Type 8L: Maintenance
Next articles

Lubrication of door latches and lock cylinder
Checking the condition of the protective covers of the drive…
Checking the condition of suspension and steering components
Visual inspection of the gearbox for leaks
Visual inspection of the seat belt and airbag unit
Checking battery condition, care and charging
Checking the transmission oil level of the manual transmission
Replacing the cabin air filter


Similar articles on other Audi car models:
Rear Brake Shoes — Checking and Replacing Audi 80 B3 (1986-1991, petrol)
Checking windshield wipers and washers Audi 100 C4 (1990-1994, petrol)
Checking the condition, adjusting and replacing windshield wiper… Audi A4 B6 (2000-2006)
Checking the condition of the poly V-belt Audi A6 C5 (1997-2004)
Checking the condition of the poly V-belt Audi A8 D2 (1994-2002)
Replacing the coolant, checking and adjusting its level,… Audi Q7 Typ 4L (2005-2015, diesel)
Poly V-belt — checking condition (petrol engines) Audi A2 (1999-2005)
Link to this page in different formats


Visitor comments

No comments yet


How much will 26 + 40 =


A3(8L, 1996-2003) 
  • General information
  • User manual
  • Maintenance
  • Power unit
  • Engine repair
  • Lubrication system
  • Cooling system
  • Supply system
  • Fuel injection system
  • Exhaust system
  • Ignition system
  • Transmission
  • Manual transmission
  • Automatic transmission
  • Clutch and drive shafts
  • Chassis
  • Brake system
  • Front suspension
  • Rear suspension
  • Steering
  • Body
  • Ventilation and heating
  • Exterior (external elements)
  • Interior (internal elements)
  • Doors, covers and windows
  • Electrical equipment
  • Power devices
  • Lighting and appliances
  • Electrical circuits
 
AudiManual.ru © 2017-2026 · Mobile version · Feedback · Sitemap: EN BG BY UA RS HR RO PL SK HU · Site search · News and articles
80 B2 · 80 B3 petrol · 80 B3 · 80 B4 · 100 C3 diesel · 100 C3 petrol · 100 C3 · 100 C4 petrol · 100 C4 · A3 Type 8L · A4 B5 petrol · A4 B5 · A4 B6 petrol · A4 B6 · A4 B7 · A4 B8 · A6 C4 · A6 C5 · A6 C5 Allroad · A8 D2 · Q5 Type 8R · Q7 Typ 4L · Audi A2 ·
This site uses cookies 🍪. Click the button to accept this fact.