Repair Chevrolet Repair Toyota Repair Honda Repair AvtoVAZ Repair Mercedes-Benz Repair BMW Repair Opel
Home  |  Contacts  |  Sitemap  |    
English Русский
Български
Беларускі
Український
Српски
Hrvatski
Română
Polski
Slovenský
Magyar
AudiManual.ru


  • AUDI 80
  • AUDI 100
  • AUDI A3
  • AUDI A4
  • AUDI A6
  • AUDI A8
  • AUDI Q
  • OTHER
  • ARTICLES
C4 (1990-1994) C4 (1990-1994, petrol) C3 (1982-1990) C3 (1982-1990, petrol) C3 (1982-1990, diesel)

Checking windshield wipers and washers (Audi 100 C4)

  • Home
  • Audi 100
  • C4 (1990-1994, petrol)
  • Electrical equipment
  • Equipment and devices
  • Checking windshield wipers and washers
            0
Table of contents: Constantly checking ↓ Replacing windshield wiper blades ↓ Replacing the rubber wiper blade ↓

Constantly checking


Turn on the ignition.

Do the wipers work at both speeds and do they return to the park position when turned off?

Does the intermittent mode work, as well as the automatic glass washing and cleaning system?

Cleaning fluid is supplied to the glass by an intensive cleaning system (special equipment) when you press the button?

Rear window cleaner version "Universal" (Avant): does the rear wiper work during the entire time when the wiper switch is pressed forward?

Does the windshield wiper switch to intermittent mode?

Does it turn off when you press the switch again?

Does water flow from the windshield washer jets the entire time the wiper switch is pulled in?

Left: The radio/light warning buzzer (arrow) is located on the right rear of the instrument…

Left: The radio/light warning buzzer (arrow) is located on the right rear of the instrument cluster. It is shown here with the cluster removed.

Right: Removing the cigarette lighter from the front: Remove the cover of the heating switch as described in the chapter "Lighting". Loosen the screw at the bottom right of the cigarette lighter (2). Pull the cigarette lighter (1) downwards out of the lock (arrow) and remove.


Left: To remove the wiper blade (1) from the wiper arm (2), pull down the small lever (arrow) until…

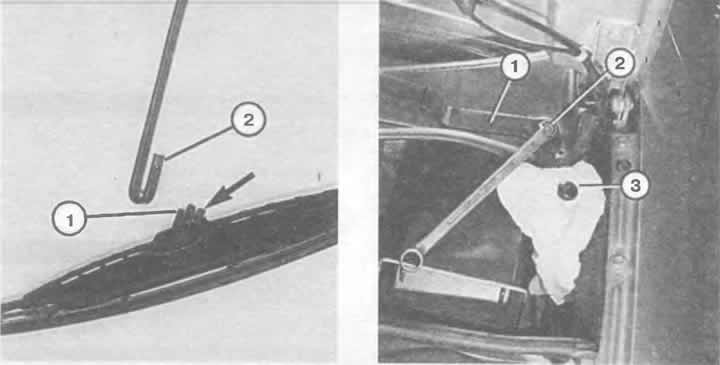
Left: To remove the wiper blade (1) from the wiper arm (2), pull down the small lever (arrow) until the retainer comes out of the recess on the wiper arm.

Right: The wiper arm (1) can be removed from the wiper shaft after removing (pushing back) the protective cap (3) and loosening its mounting nut (2). You will have to tug it slightly from side to side to loosen the spline engagement.


Replacing windshield wiper blades


Windscreen wiper rubber bands last for about six months. After that, you can decide whether to replace the entire wiper blade or, which is cheaper, just the rubber band. In either case, you will need to remove the blade from the wiper arm.

Fold the wiper arm upward.

Press down the plastic retainer on the middle axis of the windshield wiper blade. At the same time, pull the blade off the windshield wiper arm.

When installing, insert the brush onto the wiper arm until the lock engages.

Replacing the rubber wiper blade


If the metal arm of the windshield wiper blade is still in good condition, replacing the rubber band of the blade is quite sufficient.

Purchase a rubber wiper blade from a parts store or workshop using the available sample.

Bend the fastening brackets around the rubber band at one end of the brush.

Remove the old rubber band and install the metal plates inserted on both sides onto the new band. Make sure that the bend points downwards (towards the glass).

Insert a new rubber band and tighten the fastening clips.

Removing the wiper arm

Open the hood.

Pry off the black protective cap at the front of the lever axle and unscrew the hex nut underneath. Remove the washer.

Using sharp movements, remove the lever from the fine-spline connection of the windshield wiper shaft.

When installing, screw the wiper arms so that the left arm is 10 mm from the bottom edge of the glass (if you look from above).

The right lever should be installed so that it reaches the edge of the black surface at the bottom of the windshield.


It is necessary to make sure that the wiper motor is in its original position.

Tighten the hex nuts to 16 Nm.
The article was checked by auto expert Nikita Rudakov
This article is available at russian, bulgarian, belarusian, ukrainian, serbian, croatian, romanian, polish, slovak, hungarian

Share information:
Previous articles
Audi 100 C4: Equipment and devices
Next articles

Rear window heating
Cigarette lighter
Lighting and radio cut-off buzzer
Checking switches
Windscreen wiper motor
List of windshield wiper malfunctions
Rear window wiper
List of faults of the rear window wiper


Similar articles on other Audi car models:
Hazard warning lights, windscreen wipers and washers Audi 80 B3 (1986-1991, petrol)
Checking the condition, adjusting and replacing windshield wipers Audi A3 Type 8L (1996-2003)
Checking windshield wipers and washers Audi A4 B5 (1994-2001, petrol)
Checking windshield washers Audi A6 C4 (1994-1997)
Glass cleaners and washers Audi A8 D2 (1994-2002)
Servicing windshield wipers and washer fluid nozzles Audi Q7 Typ 4L (2005-2015, diesel)
Engine — Checking Oil Level Audi A2 (1999-2005)
Link to this page in different formats


Visitor comments

No comments yet


How much will 42 + 21 =


100(C4, 1990-1994) 
  • General information
  • User manual
  • Power unit
  • Engine repair
  • Ignition system
  • Fuel system (gasoline)
  • Fuel system (diesel)
  • Lubrication system
  • Cooling system
  • Exhaust system
  • Transmission
  • Clutch
  • Car gearbox
  • Drive shafts
  • Chassis
  • Car suspension
  • Steering
  • Wheels and tires
  • Brake system
  • Body
  • Ventilation and heating
  • Body repair
  • Electrical equipment
  • Power devices
  • Lighting and appliances
  • Electrical circuits
 
100(C4, 1990-1994, petrol) 
  • General information
  • Operation and maintenance
  • Power unit
  • Engine repair
  • Exhaust system
  • Cooling system
  • Supply system
  • Air filter
  • Mono-Motronic injection system
  • Digifant injection system
  • KE-III-Jetronic and KE-Motronic
  • MPI and MPFI injection system
  • Transmission
  • Clutch
  • Car gearbox
  • Chassis
  • Suspension and steering
  • Brake system
  • Wheels and tires
  • Body
  • Exterior
  • Interior
  • Electrical equipment
  • Fuses and relays
  • Power devices
  • Ignition system
  • Lighting and signaling
  • Equipment and devices
  • Electrical circuits
 
100(C3, 1982-1990) 
  • General information
  • User manual
  • Maintenance
  • Specifications
  • Power unit
  • Engines 4-cylinder
  • Engines 5-cylinder
  • Diesel engine
  • Cooling system
  • Power system (carburetor)
  • Power system (injector)
  • Fuel system (diesel)
  • Transistor ignition system
  • Electronic ignition system
  • Transmission
  • Clutch
  • 4 speed gearbox 014
  • 5 speed gearbox 013 and 093
  • 5 speed gearbox 016 and 012
  • Shift mechanism KP 016
  • Automatic transmission
  • Front wheel drive
  • Chassis
  • Front suspension
  • Rear suspension
  • Steering
  • Brake system
  • Body
  • Body elements
  • Electrical equipment
  • Lighting and appliances
  • Power devices
  • Electrical circuits
 
100(C3, 1982-1990, petrol) 
  • General information
  • Maintenance and operation
  • 4 cylinder engine
  • Engine repair
  • Cooling and lubrication system
  • Supply system
  • Ignition system
  • 5 cylinder engine
  • Engine repair
  • Cooling and lubrication system
  • Supply system
  • Ignition system
  • Transmission
  • Clutch and drive shafts
  • 4 speed gearbox 014
  • 5 speed gearbox 013 and 093
  • 5 speed gearbox 016 and 012
  • Automatic gearbox
  • Chassis
  • Steering
  • Front suspension
  • Rear suspension
  • Brake system
  • Body
  • Body elements
  • Doors, locks and windows
  • Body repair
  • Electrical equipment
  • Equipment and devices
  • Power devices
  • Electrical circuits
 
100(C3, 1982-1990, diesel) 
  • General information
  • User manual
  • Maintenance
  • Troubleshooting
  • Power unit
  • Engine in a car
  • Engine removed
  • Cooling system
  • Fuel system
  • Exhaust system
  • Starting and charging
  • Preheating
  • Transmission
  • Clutch
  • Mechanical gearbox
  • Automatic gearbox
  • Drive shafts
  • Chassis
  • Brake system
  • Suspension
  • Steering
  • Body
  • Exterior
  • Interior
  • Electrical equipment
  • Equipment and devices
  • Electrical circuits
 
AudiManual.ru © 2017-2026 · Mobile version · Feedback · Sitemap: EN BG BY UA RS HR RO PL SK HU · Site search · News and articles
80 B2 · 80 B3 petrol · 80 B3 · 80 B4 · 100 C3 diesel · 100 C3 petrol · 100 C3 · 100 C4 petrol · 100 C4 · A3 Type 8L · A4 B5 petrol · A4 B5 · A4 B6 petrol · A4 B6 · A4 B7 · A4 B8 · A6 C4 · A6 C5 · A6 C5 Allroad · A8 D2 · Q5 Type 8R · Q7 Typ 4L · Audi A2 ·
This site uses cookies 🍪. Click the button to accept this fact.