
Repair Chevrolet Repair Toyota Repair Honda Repair AvtoVAZ Repair Mercedes-Benz Repair BMW Repair Opel
Home  |  Contacts  |  Sitemap  |    
English Русский
Български
Беларускі
Український
Српски
Hrvatski
Română
Polski
Slovenský
Magyar
AudiManual.ru


  • AUDI 80
  • AUDI 100
  • AUDI A3
  • AUDI A4
  • AUDI A6
  • AUDI A8
  • AUDI Q
  • OTHER
  • ARTICLES
B4 (1991-1996) B3 (1986-1991) B3 (1986-1991, petrol) B2 (1979-1986)

Rear Brake Shoes — Checking and Replacing (Audi 80 B3)

  • Home
  • Audi 80
  • B3 (1986-1991, petrol)
  • Chassis
  • Brake system
  • Rear Brake Shoes — Checking and Replacing
            0
Rear Brake Shoes — Checking and Replacing


1. The thickness of the rear drum brake linings can be checked without removing the brake drums. Remove the rubber plug located above the handbrake cable entry on the drum brake shield (photo). Check the thickness of the friction material remaining on the brake shoes. If it is close to the minimum given in the Specifications, carry out a more thorough check by removing the brake drum.
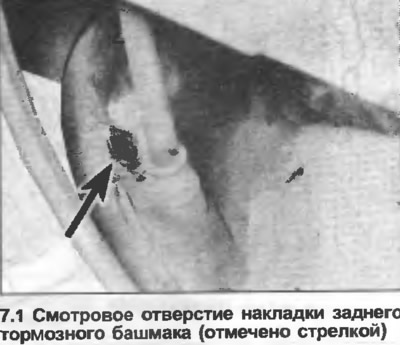
1. The thickness of the rear drum brake linings can be checked without removing the brake drums.…


2. Block the front wheels, then jack up the rear of the car and support it on axle stands. Remove the rear wheels, release the parking brake.

3. Remove the cover in the center of the brake drum.

4. Remove the pin and remove the locking ring.

5. Unscrew the nut and remove the thrust washer.

6. Remove the brake drum, making sure that the outer wheel bearing does not fall out. If the brake drum is stuck on the shoes, insert a small screwdriver through the hole under the wheel bolt and press the wedge.


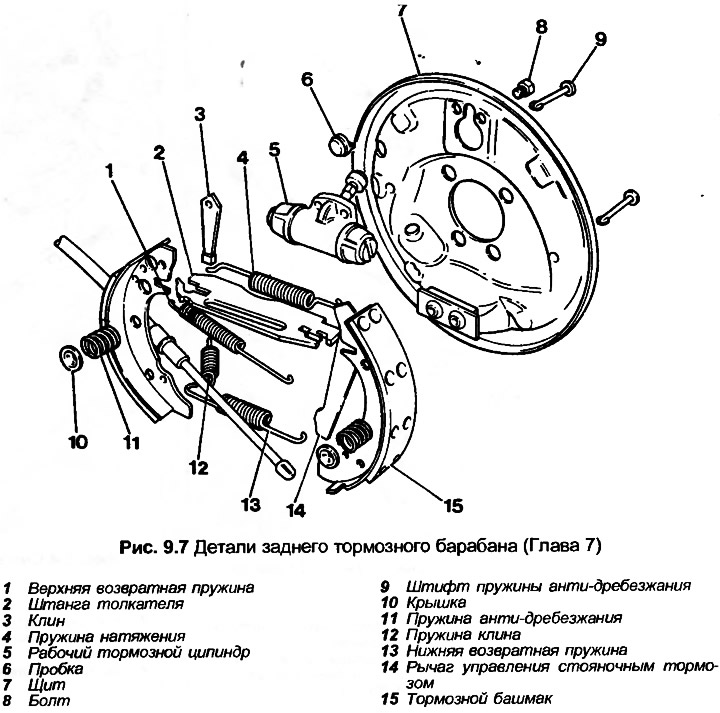
7. Note the position of the brake shoes and springs (photo).
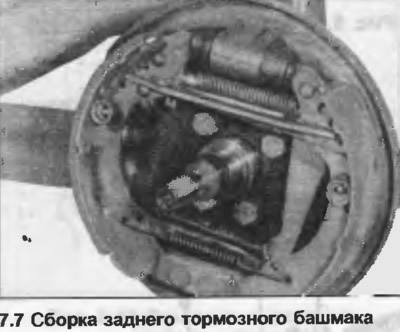
7. Note the position of the brake shoes and springs (photo).


8. Use pliers to press the spring holder covers, turn them 90° and remove them together with the springs (photo).
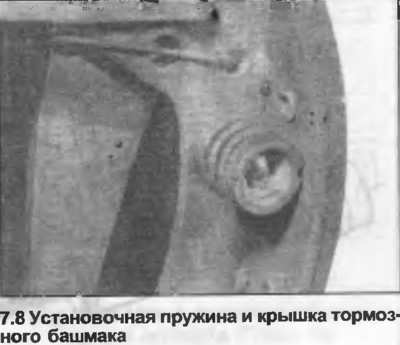
8. Use pliers to press the spring holder covers, turn them 90° and remove them together with the…


9. Disconnect the lower return spring from the shoes (photo).
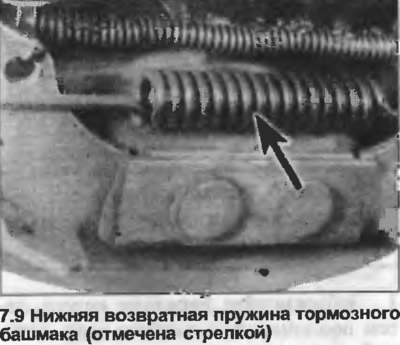
9. Disconnect the lower return spring from the shoes (photo).


10. Separate the base of the shoes from the anchor, then release the top from the wheel cylinder and rotate until the rear of the shoes appears.


11. Disconnect the handbrake cable, then clamp the base of the shoes in a vice.

12. Disconnect the upper return spring and wedge spring.

13. Separate the secondary brake shoe from the primary brake shoe and push rod.

14. Disconnect the tension spring and remove the push rod from the primary brake shoe, together with the wedge.

15. Clean the brake drum, brake shoes and shield from dust. Clean the drum from rust.

16. Measure the brake shoe lining thickness. If it is worn to the specified minimum, replace all four rear brake shoes.

17. Clean the drum brake shield. If there are signs of grease loss from the hub bearings, the seal must be replaced, following Section 10. If brake fluid is leaking from the wheel cylinder, it must be reconditioned or replaced as described in Chapter 8. Do not touch the brake pedal until the brake shoes are removed. Secure the pistons of the wheel cylinder with a rubber band.

18. Apply grease to the contact surfaces of the parking brake lever and push rod.

19. Clamp the push rod in a vice, then place the tension spring on the push rod and primary brake shoe, and place the shoe groove on the push rod.

20. Place a wedge between the shoe and the push rod.

21. Position the parking brake lever on the secondary brake shoe in the push rod, install the upper return spring.

22. Connect the handbrake cable to the parking brake lever, turn the shoes up. Place the top of the shoes on the pistons of the working brake cylinder (photo).
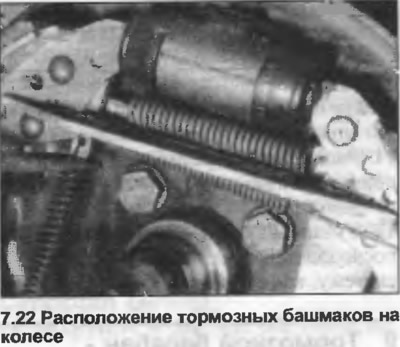
22. Connect the handbrake cable to the parking brake lever, turn the shoes up. Place the top of the…


23. Install the lower return spring onto the shoes, then lift the base onto the anchor.


24. Install the spring onto the wedge and primary brake shoe.

25. Install the retaining springs and covers.
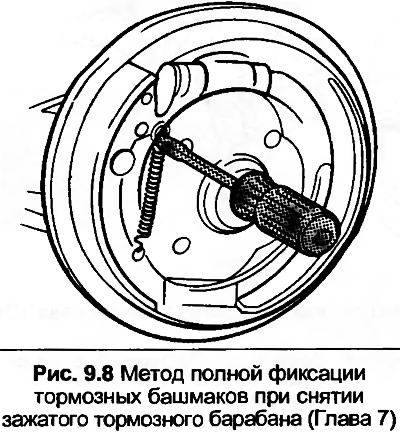
25. Install the retaining springs and covers.


26. Press the wedge up to create maximum shoe clearance.

27. Install the brake drum, adjust the wheel bearings as described in Section 10.

28. Press the brake pedal once to adjust the rear brakes.
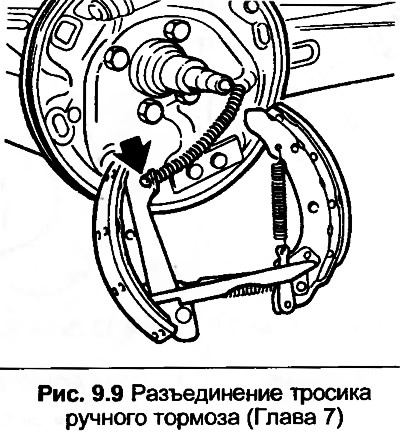
28. Press the brake pedal once to adjust the rear brakes.


29. Repeat the procedure on the remaining rear brake, then lower the car to the ground.
The article was checked by auto expert Timur Bazhenov
This article is available at russian, bulgarian, belarusian, ukrainian, serbian, croatian, romanian, polish, slovak, hungarian

Share information:
Previous articles
Audi 80 B3: Brake system
Next articles

Brake discs — inspection, removal and installation
Front Brake Caliper — Overhaul
Front Brake Caliper — Removal and Installation
Front brake pads — inspection, removal and installation
Rear wheel cylinder — removal, overhaul and installation
Brake drum — inspection and restoration
Rear brake pads — checking, removal and installation
Rear Brake Caliper — Removal and Installation


Similar articles on other Audi car models:
Rear Brake Disc Pads — Checking and Replacing Audi 100 C3 (1982-1990, diesel)
Checking the brake system Audi A3 Type 8L (1996-2003)
Checking and replacing the brake light switch Audi A4 B6 (2000-2006, petrol)
Replacing rear brake pads Audi A6 C5 (1997-2004)
Replacing rear brake pads Audi A8 D2 (1994-2002)
Replacing the rear brake caliper Audi Q5 Type 8R (2008-2017)
Brake mechanism with floating caliper, rear brake disc Audi A2 (1999-2005)
Link to this page in different formats


Visitor comments

Ser написал(а) 12.04.2025 в 10:08:
Первое что нужно сделать после замены колодок, поднять ручник на три щелчка, натянуть трос ручника до соприкосновения колодок с барабаном, отпустить ручник, обязательно проверить что клин находится в верхнем положении если этого не сделать то при первом нажатии на тормоз клин уйдет вниз и никакого автоматического развода колодок в дальнейшем не будет и ручник вскоре перестанет держать, прокачать тормоза и снова убедится что клин находится вверху, по мере износа колодок клин будет опускаться вниз тем самым разводя колодки, таким образом и ручник всегда будет держать и тормоза будут работать.
ответить цитировать


How much will 36 + 32 =


80(B4, 1991-1996) 
  • General information
  • User manual
  • Maintenance
  • Troubleshooting
  • Power unit
  • Engine
  • Cooling system
  • Heating and ventilation
  • Petrol injection
  • Diesel fuel system
  • Fuel system
  • Exhaust systems
  • Ignition system
  • Transmission
  • Clutch
  • Car gearbox
  • Chassis
  • Brake system
  • Suspension and steering wheel
  • Body
  • Body and trim
  • Electrical equipment
  • Electrical system
  • Electrical circuits
 
80(B3, 1986-1991) 
  • General information
  • Repair characteristics
  • Maintenance
  • Power unit
  • Gasoline engine
  • Diesel engine
  • Engine lubrication system
  • Fuel system (gasoline)
  • Injection system (gasoline)
  • Fuel system (diesel)
  • Ignition system
  • Cooling system
  • Heater
  • Exhaust system
  • Transmission
  • Clutch and gearbox
  • Chassis
  • Steering
  • Brake system
  • Car suspension
  • Body
  • Body elements
  • Electrical equipment
  • Power devices
  • Lighting and appliances
  • Electrical circuits
 
80(B3, 1986-1991, petrol) 
  • General information
  • User manual
  • Maintenance
  • Power unit
  • Engine 4-cylinder
  • Engine 5-cylinder
  • Cooling system
  • Fuel and exhaust systems
  • Ignition system
  • Transmission
  • Clutch
  • Mechanical transmission
  • Automatic transmission
  • Drive shafts
  • Chassis
  • Brake system
  • Suspension
  • Steering
  • Body
  • Exterior
  • Interior
  • Electrical equipment
  • Equipment and devices
  • Electrical circuits
 
80(B2, 1979-1986) 
  • General information
  • User manual
  • Power unit
  • Engine FZ
  • Engine EP, YP, YZ, DT, DS, DZ
  • Transmission
  • Clutch
  • 4 speed gearbox
  • 5 speed gearbox
  • Front wheel drive
  • Chassis
  • Front suspension
  • Rear suspension
  • Steering
  • Brake system
  • Electrical equipment
  • Equipment and devices
  • Electrical circuits
 
AudiManual.ru © 2017-2026 · Mobile version · Feedback · Sitemap: EN BG BY UA RS HR RO PL SK HU · Site search · News and articles
80 B2 · 80 B3 petrol · 80 B3 · 80 B4 · 100 C3 diesel · 100 C3 petrol · 100 C3 · 100 C4 petrol · 100 C4 · A3 Type 8L · A4 B5 petrol · A4 B5 · A4 B6 petrol · A4 B6 · A4 B7 · A4 B8 · A6 C4 · A6 C5 · A6 C5 Allroad · A8 D2 · Q5 Type 8R · Q7 Typ 4L · Audi A2 ·
This site uses cookies 🍪. Click the button to accept this fact.