



When the brake pedal is pressed, the spring presses the drive rod (push rod) of the switch in the on direction. This closes the contacts in the switch and the electrical circuit of the brake light. When the brake pedal is released, the pedal neck pushes the drive rod to its original position and the brake light goes out. In addition, the combination switch transmits the corresponding signals to the control device of the anti-lock system, so the correct operation and adjustment of the switch are of great importance.
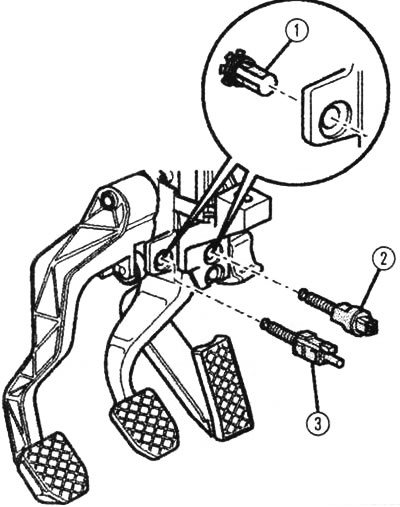
Switch on the pedal bracket: 1 - clamp, 2 - brake light switch F and brake pedal position sensor F47, 3 - clutch pedal position sensor F36.
1. Remove the cover in the driver's footwell.
2. Remove the connector from the brake light switch.
3. Use a piece of wire or a paper clip to short-circuit the contacts in the connector.
4. If the brake lights come on after this, the switch is faulty. Replace the switch. This switch can only be installed once, i.e. if the switch has been removed, it must be replaced. To unfasten and remove the switch, turn it slightly to the left.
5. Using your hand, pull the plunger completely out of the switch to be installed.
6. When installing the switch, the pedals must be in the original position.
7. Insert the switch into the receiving holes of the bracket. Locking protrusions 1 and 2 are inserted into the recesses intended for them.
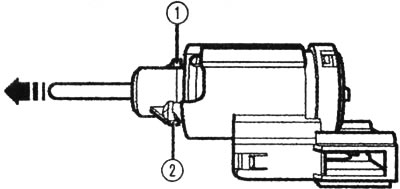
Brake light switch
8. The pusher is installed automatically when the switch is inserted.
9. Fix the switch in the bracket by turning it 45' to the right (clockwise). In this case, a tight fit of the switch must be ensured.
10. Connect the connector to the switch.
11. Check the operation of the switch. The brake light should light up even when the pedal is pressed lightly.
12. If everything is OK, install the cover in the footwell.