
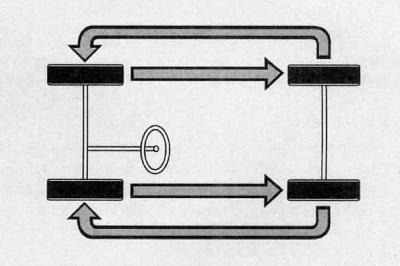
Wheel rotation diagram
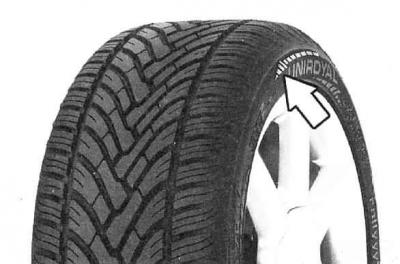
A tire that only allows movement in the direction indicated by the arrow
Execution order
1. Rotation can be done when signs of uneven tread wear appear. However, remember that if you successfully rotate all four wheels, you will eventually have to replace all tires at the same time.
Since this procedure requires raising the vehicle off the ground and removing the wheels, check the operation of the brakes at the same time.
Warning: Even if you do not intend to rotate the wheels, at least check that the wheel mounting bolts are tight.
2. If the front tires wear out faster, it is recommended to swap the front and rear tires. This will equalize the service life of all four tires.
3. Please refer to the information in the subsection Jacking and towing for proper lifting of the car and changing of the wheel.
4. The vehicle should be winched or supported on jack stands so that all four wheels are off the ground. Make sure the vehicle is securely supported!
Notes on safety precautions
Do not replace any tire separately. It is necessary to replace the tires on one axle as a set. Tires with a greater tread depth are installed on the front wheels. The front and rear wheels must have tires of the same size and type, and for all-wheel drive vehicles, also of the same manufacturer and tread design. Tires that have worked for more than 6 years should only be used in the event of an accident, and care must be taken when driving the car. When replacing and removing tubeless tires, be sure to change the valve.
5. In the case of using tyres with a tread pattern that only allows movement in a certain direction, which is indicated by an arrow on the side of the tyre, the specified direction must be observed. This is the only way to ensure the necessary driving properties of the vehicle, namely aquaplaning, road holding, low noise levels and low wear. If the spare wheel has to be installed with the opposite direction of rotation due to an accident, such use should only be temporary, since achieving the above-mentioned driving properties of the vehicle is then impossible. This applies especially to driving on wet roads. Therefore, it is recommended to match the driving speed to the road conditions and reinstall the tyre in accordance with the specified direction of rotation.
Spare wheel
6. The spare wheel can be installed on either the front or rear axle.
7. The spare tire is intended for short-term use only and should be replaced with a regular tire as soon as possible.
8. After installing the spare wheel, the pressure in its tyre should be 4.2 bar.
9. With the spare wheel installed, the speed must not exceed 80 km/h. Maximum acceleration of the vehicle, intensive braking and sharp turns must be avoided.
10. When installing a spare wheel, the ground clearance under the corresponding axle is reduced by approximately 30 mm.
11. Spare wheels from other types of vehicles should not be used.
12. It is not permitted to install two or more spare wheels.
Wheel replacement
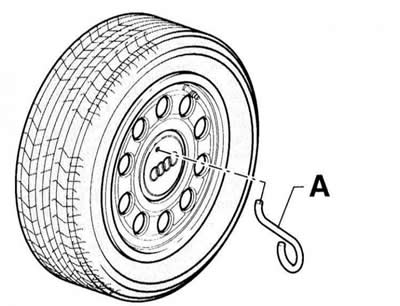
13. Remove the decorative wheel cover. To do this, use the pry bar and wire clip from the tool kit. The wire clip is installed on the hole in the cover or on the edge. Pass the pry bar through the clip and, pulling the pry bar away from the wheel, remove the cover.
14. With the vehicle on the ground, apply the handbrake and loosen the wheel mounting bolts.
15. Raise the appropriate side of the vehicle and secure it on stands.
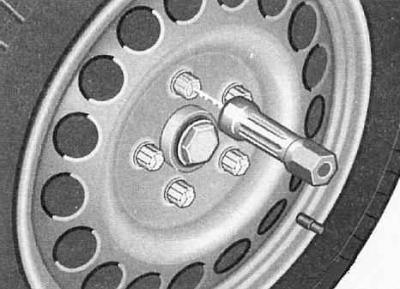
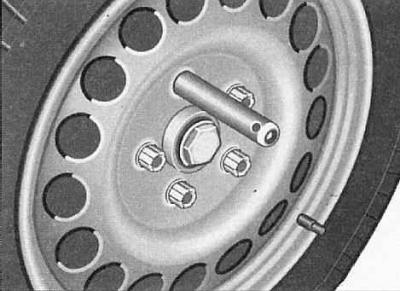
16. Remove the upper wheel mounting bolt and screw in the mounting pin in its place. Using the mounting pin makes it easier to install the spare wheel.
Warning: Light alloy wheels are protected against corrosion by a clear varnish. Be careful not to damage the varnish coating. If the coating is damaged, apply a coat of varnish to the wheel.
17. To prevent the wheel disks from "sticking" to the hub, before installing the wheel, apply a thin layer of grease to the hub flange that centers the wheel disk.
18. Galvanized wheel bolts can only be used on stamped steel wheels.
19. Light alloy wheels are secured only with chromed wheel bolts, which have a conical rotating washer. This washer, installed under the bolt head, protects the surface of the wheel when tightening the bolts.
20. Do not lubricate the threads of the wheel mounting bolts before screwing them in.
21. Standard wheel mounting bolts have dimensions M14 x 1.5 x 27.5. Head size under the key is 17 mm.
22. Tighten the wheel mounting bolts evenly in several stages in a diagonal sequence.
23. The tightening torque of the wheel mounting bolts is 120 Nm.
Anti-skid chains
24. Chains should only be installed on the front wheels, including all-wheel drive vehicles.
25. Anti-skid chains may only be installed on tyres of size 195/65 R 15. For technical reasons, the installation of anti-skid chains on the emergency wheel is not permitted.
26. Only fine mesh chains with a protrusion of no more than 15 mm should be used (including locking links).
27. When installing anti-skid chains, remove full-size wheel caps and decorative rim rings. For safety reasons, wheel bolts should be protected with special caps.
28. Before driving on a snow-free section of the road, you must remove the anti-skid chains. They impair the vehicle's performance, increase tire wear, and quickly deteriorate themselves.
The original article is posted on the resource AudiManual