Repair Chevrolet Repair Toyota Repair Honda Repair AvtoVAZ Repair Mercedes-Benz Repair BMW Repair Opel
Home  |  Contacts  |  Sitemap  |    
English Русский
Български
Беларускі
Український
Српски
Hrvatski
Română
Polski
Slovenský
Magyar
AudiManual.ru


  • AUDI 80
  • AUDI 100
  • AUDI A3
  • AUDI A4
  • AUDI A6
  • AUDI A8
  • AUDI Q
  • OTHER
  • ARTICLES
Q7 Typ 4L (2005-2015, diesel) Q5 Type 8R (2008-2017)

Removal the lower cover of the drive chains (Audi Q5-8R)

  • Home
  • Audi Q
  • Q5 Type 8R (2008-2017)
  • Power unit
  • Petrol engine 3.2 l
  • Removal the lower cover of the drive chains
            0
Gearbox removed. Disconnect battery. Remove driven disk. Remove protective covers of camshaft chains on left and right. Remove oil filter housing. Remove generator. Unscrew bolts "arrows" on left and right and remove bracket for electrical connectors. Ignore "Pos. 1...4".

Gearbox removed. Disconnect battery. Remove driven disk. Remove protective covers of camshaft…


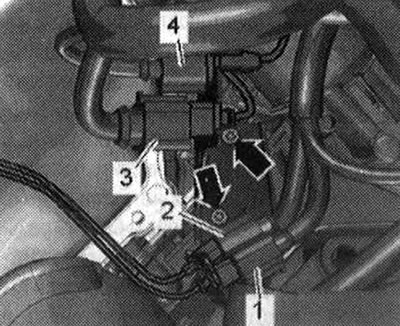
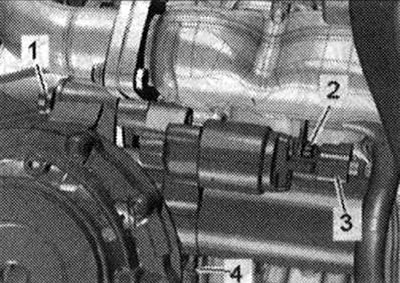
Disconnect electrical connector "3" of the starter, move the lock back and press the stopper down. Unscrew nut "2" of the electrical wire and remove the starter. "Pos. 1, 4" do not take into account.

Disconnect electrical connector «3» of the starter, move the lock back and press the stopper down.…


Unscrew the "arrow" bolts. Unscrew the "1...10" bolts and remove the lower chain drive cover. Press the crankshaft seal from the gearbox side out of the lower chain drive cover.

Installation


Replace the gaskets, O-rings and O-rings. Remove the right upper fitted bushing from the cylinder block. File the edges of the centering bushings as shown in the figure.


Replace the gaskets, O-rings and O-rings. Remove the right upper fitted bushing from the cylinder…


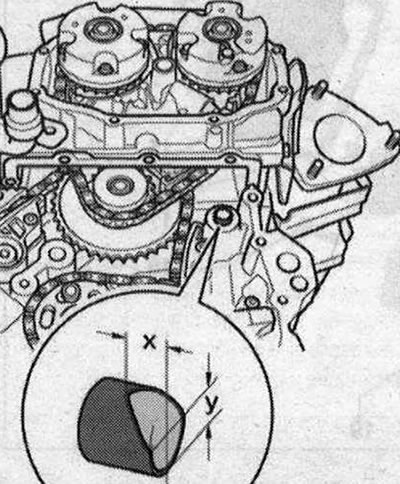
Size "x" = 6.5 mm. Size "y" = 8 mm.

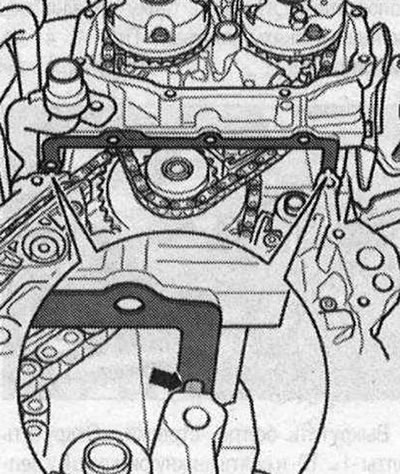
Install the bushing on the cylinder block so that the turned side faces upwards. This bevel makes it easier to install the lower chain cover with the cylinder block installed. Close the open engine parts. Remove any remaining sealant from the chain cover, cylinder block and cylinder head, for example with a rotating brush attachment with plastic bristles. Clean the mounting surfaces; there should be no oil or grease on them. Be sure to clean the threaded holes for fixing the power unit in the cylinder block before assembling the gearbox with a tap. Clean the "arrow" holes in the cylinder head gaskets from old sealant.

Install the bushing on the cylinder block so that the turned side faces upwards. This bevel makes…


When the cylinder head is installed, the holes in its gasket are only half visible. Slightly bend the ends of the cylinder head gasket, do not twist. A broken cylinder head gasket should be replaced. Slightly bend the ends of the cylinder head gasket down so much "arrow" so that it becomes possible to clean the upper seating surface of the gasket and the cylinder head.


When the cylinder head is installed, the holes in its gasket are only half visible. Slightly bend…


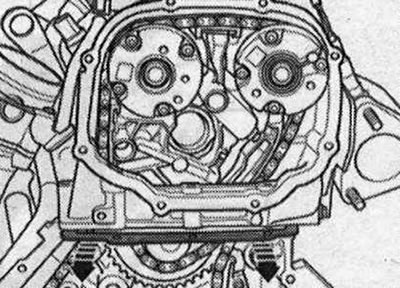
Clean the cylinder head gaskets from below and above, they must be degreased. Consider the expiration date of the sealant. Cut off the tube tip at the front mark (hole diameter approx.2mm). The sealant must be applied to several parts of the engine, as described below. Apply a thin layer of sealant to the landing surfaces on the top and bottom of the cylinder head gaskets, to do this, slightly bend the gaskets down again "arrows". To apply the sealant to the surface between the cylinder head and the gasket, use a flat object: for example, a plate probe. Fill the cleaned arrow holes of cylinder head gaskets with sealant. Risk of blockage of the lubrication system channels if there is an excess of sealant. The sealant roller must not be thicker than the specified size. Apply sealant rollers "1...4" on the clean seating surfaces of the lower cover of the drive chains, as shown in the figure.

Clean the cylinder head gaskets from below and above, they must be degreased. Consider the…


The groove of the seating surface must be filled with sealant. The beads of sealant must protrude above the seating surface by 1.5...2.0 mm. Bead of sealant "2" should be applied as shown in the figure, even if the groove is interrupted. The minimum curing time of the sealant is only about 5 minutes after application. Insert the gaskets "arrows" into the grooves of the lower cover of the drive chains. Install the lower cover of the chain drives, while moving the cover from below diagonally to the seating surface of the cylinder block and cylinder head. When installing, be careful not to damage the cylinder head gaskets. Tighten the bolts of the lower cover of the timing chain drive. Installation in the reverse order: install the starter. Install the generator. Install the oil filter housing. Install the protective covers of the timing chains on the left and right. Install the crankshaft oil seal.
The article was checked by auto expert Timur Bazhenov
This article is available at russian, bulgarian, belarusian, ukrainian, serbian, croatian, romanian, polish, slovak, hungarian

Share information:
Previous articles
Audi Q Q5 Type 8R: Petrol engine 3.2 l
Next articles

Overview of drive chain covers
Pistons and connecting rods
Cylinder block from the gearbox side
Cylinder block from the belt pulley side
Camshaft chain drives
Removal the camshaft drive chains
Timing chain
Auxiliary drive chain


Similar articles on other Audi car models:
Flywheel/drive disc — removal, inspection and installation Audi 80 B3 (1986-1991, petrol)
Toothed drive belt — removal, inspection and installation Audi 100 C3 (1982-1990, diesel)
Removal and installation the lower engine compartment cover Audi A3 Type 8L (1996-2003)
Removal and installation the upper engine cover / lower engine… Audi A4 B6 (2000-2006)
Camshaft Drive Chains — Removal and Installation Audi A6 C5 Allroad (1999-2005)
Checking the drive shaft protective cover Audi A8 D2 (1994-2002)
Removal and installation the crankshaft belt drive pulley Audi A2 (1999-2005)
Link to this page in different formats


Visitor comments

No comments yet


How much will 29 + 21 =


Q7 4L(2005-2015, diesel) 
  • General information
  • Operating instructions
  • Maintenance
  • Power unit
  • Diesels 3.0 l (BUG, BUN, CAS)
  • Diesels 3.0 l (CATA, CCMA)
  • Diesels 3.0 l (CJGA/CJGC)
  • Diesels 4.2 l (BTR, CCFA/CCFC)
  • Cooling system
  • Fuel and exhaust system
  • Engine management system
  • Starting and charging
  • Transmission
  • Automatic gearbox
  • Drive shafts
  • Chassis
  • Brake system
  • Front suspension
  • Rear suspension
  • Steering system
  • Body
  • Air conditioner
  • Exterior
  • Interior
  • Electrical equipment
  • Equipment and devices
  • Electrical circuits
 
Q5 8R(2008-2017) 
  • General information
  • User manual
  • Power unit
  • Petrol engine 2.0 l
  • Petrol engine 3.2 l
  • Fuel system (petrol)
  • Diesel 2.0 liter (CA)
  • Diesel 2.0 liter (CG/CJ/CM)
  • Diesel engine 3.0 l
  • Fuel system (diesel)
  • Transmission
  • Manual gearbox 0B1
  • Manual gearbox 0B2
  • Automatic gearbox 0B5
  • Automatic gearbox 0B6
  • Chassis
  • Front suspension
  • Rear suspension
  • Brake system
  • Steering
  • Body
  • Exterior
  • Interior
  • Doors, locks and windows
  • Safety system
  • Ventilation and heating
  • Electrical equipment
  • Power devices
  • Equipment and devices
  • Lighting and alarm
  • Audio system
  • Electrical circuits
 
AudiManual.ru © 2017-2026 · Mobile version · Feedback · Sitemap: EN BG BY UA RS HR RO PL SK HU · Site search · News and articles
80 B2 · 80 B3 petrol · 80 B3 · 80 B4 · 100 C3 diesel · 100 C3 petrol · 100 C3 · 100 C4 petrol · 100 C4 · A3 Type 8L · A4 B5 petrol · A4 B5 · A4 B6 petrol · A4 B6 · A4 B7 · A4 B8 · A6 C4 · A6 C5 · A6 C5 Allroad · A8 D2 · Q5 Type 8R · Q7 Typ 4L · Audi A2 ·
This site uses cookies 🍪. Click the button to accept this fact.