
Car doors, locks and windows Audi Q5 (8R)

Front door
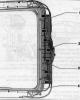
Front door 1. Door; 2. Door opening limiter; 3. Bolt. 25 Nm; 4. Cover. Place on the locating pin; 5. Locating pin. 30 Nm; 6. Door upper hinge; 7/9. Bolt. 32...
Front door 1. Door; 2. Door opening limiter; 3. Bolt. 25 Nm; 4. Cover. Place on the locating pin; 5. Locating pin. 30 Nm; 6. Door upper hinge; 7/9. Bolt. 32...

Front door seal
Removing the Inner Door Seal 1. Internal door seal. Remove the glass frame trim. Disconnect the door stop from the A-pillar. It is placed on the edge of the...
Removing the Inner Door Seal 1. Internal door seal. Remove the glass frame trim. Disconnect the door stop from the A-pillar. It is placed on the edge of the...

Window lift motor, front door window lift
Window lift motor, window lifter 1. Door; 2. Window regulator. The door glass has been removed; 3. Door glass; 4. Nut. 6 Nm; 5. Gasket; 6. Bolt. 3 pcs. 3.5 Nm;...
Window lift motor, window lifter 1. Door; 2. Window regulator. The door glass has been removed; 3. Door glass; 4. Nut. 6 Nm; 5. Gasket; 6. Bolt. 3 pcs. 3.5 Nm;...

Removing the front door interior panel trim
Removing the inner door panel trim 1. Overlay. Remove the door trim. Remove the electrical harness. wires -4- from bracket -5-. Disconnect the bushing -2- of...
Removing the inner door panel trim 1. Overlay. Remove the door trim. Remove the electrical harness. wires -4- from bracket -5-. Disconnect the bushing -2- of...

Removing the front door window regulator
Removing the window regulator 1. Lower window mount; 2. Window regulator. Removal: Remove the door trim. Remove the loudspeaker. The power window motor has...
Removing the window regulator 1. Lower window mount; 2. Window regulator. Removal: Remove the door trim. Remove the loudspeaker. The power window motor has...

Installation diagram of the outside handle and front door lock
Installation diagram of the external handle and door lock 1. External door handle; 2. Bolt. 2.5 Nm; 3. Front lining; 4. Bottom lining; 5. Front passenger door...
Installation diagram of the external handle and door lock 1. External door handle; 2. Bolt. 2.5 Nm; 3. Front lining; 4. Bottom lining; 5. Front passenger door...

Front door outside handle
External door handle 1. External door handle; 2. Bolt. 2.5 Nm; 3. Front lining; 4. Door; 5. Bottom lining; 6. Housing instead of a lock cylinder for the front...
External door handle 1. External door handle; 2. Bolt. 2.5 Nm; 3. Front lining; 4. Door; 5. Bottom lining; 6. Housing instead of a lock cylinder for the front...

Front Door Lock and Mounting Lock Bracket
Door lock and mounting lock bracket 1. A bracket with a finger for the lock latch; 2. Bolt. 25 Nm; 3. Bolt. 19 Nm; 4. Door lock drive cable; 5. Door lock. Risk...
Door lock and mounting lock bracket 1. A bracket with a finger for the lock latch; 2. Bolt. 25 Nm; 3. Bolt. 19 Nm; 4. Door lock drive cable; 5. Door lock. Risk...

Removing the front door lock drive cable
Removing the door lock drive cable Remove the door trim. Remove the door trim. Turn the drive cable on lever -1 - 90" in -direction of arrow A- and remove it...
Removing the door lock drive cable Remove the door trim. Remove the door trim. Turn the drive cable on lever -1 - 90" in -direction of arrow A- and remove it...

Removing the front door interior handle drive cable
Removing the inner door handle drive cable Remove the lock cylinder. Remove the door trim. Remove the door trim. Remove the door lock trim. Unscrew bolts...
Removing the inner door handle drive cable Remove the lock cylinder. Remove the door trim. Remove the door trim. Remove the door lock trim. Unscrew bolts...

Central lock repair
Note. The central locking has an electric drive unit. The door actuators are built into the door lock and are equipped with 2 electric motors. The actuators...
Note. The central locking has an electric drive unit. The door actuators are built into the door lock and are equipped with 2 electric motors. The actuators...

Removing the front door control unit
Removing front door control unit-J386-/-J387- Remove the door trim. Disconnect el. connectors -1- and -2- by pulling the fuse and pressing the latches down....
Removing front door control unit-J386-/-J387- Remove the door trim. Disconnect el. connectors -1- and -2- by pulling the fuse and pressing the latches down....

Removing the electric motor for opening the fuel tank hatch
Removing the electric motor for opening the fuel hatch. tank -V 155- 1. Cable pull for emergency opening; 2. Fuel filler flap opening motor -V155-. Removal:...
Removing the electric motor for opening the fuel hatch. tank -V 155- 1. Cable pull for emergency opening; 2. Fuel filler flap opening motor -V155-. Removal:...

Element for emergency opening of the gas tank flap
Element for emergency opening of the gas tank flap 1. Fuel tank flap opening motor -V155-; 2. Convenience system central control unit -J393-; 3. Cable pull for...
Element for emergency opening of the gas tank flap 1. Fuel tank flap opening motor -V155-; 2. Convenience system central control unit -J393-; 3. Cable pull for...

Backdoor
Backdoor 1. Door; 2. Bolt. 8 Nm; 3. Door opening limiter; 4. Cover. Place on the locating pin; 5. Locating pin. 30 Nm; 6. Upper door hinge; 7. Bolt. 32 Nm; 8....
Backdoor 1. Door; 2. Bolt. 8 Nm; 3. Door opening limiter; 4. Cover. Place on the locating pin; 5. Locating pin. 30 Nm; 6. Upper door hinge; 7. Bolt. 32 Nm; 8....

Rear door seal
Removing the Inner Door Seal 1. Internal door seal. Remove the glass frame trim. Disconnect the door stop from the B pillar. It is attached to the edge of the...
Removing the Inner Door Seal 1. Internal door seal. Remove the glass frame trim. Disconnect the door stop from the B pillar. It is attached to the edge of the...

Window lift motor, rear door window lift
Window lift motor, window lifter 1. Door; 2. Window regulator; 3. Clamp; 4. Door glass; 5. Nut. 6 Nm; 6. Electric window lift motor; 7. Bolt. 3 pcs. 3.5 Nm...
Window lift motor, window lifter 1. Door; 2. Window regulator; 3. Clamp; 4. Door glass; 5. Nut. 6 Nm; 6. Electric window lift motor; 7. Bolt. 3 pcs. 3.5 Nm...

Rear door outside handle and door lock installation diagram
Installation diagram of the external handle and door lock 1. External door handle. Before installation, install pads on the front and back of the outer door...
Installation diagram of the external handle and door lock 1. External door handle. Before installation, install pads on the front and back of the outer door...

Removing the rear door outside door handle
Removing the outside door handle Move the door seal to one side and remove the protective film over the opening -arrow A-. Unscrew the clamping bolt -4-...
Removing the outside door handle Move the door seal to one side and remove the protective film over the opening -arrow A-. Unscrew the clamping bolt -4-...

Rear door lock and lock shackle
Door lock and lock shackle 1. A bracket with a finger for the lock latch; 2. Bolt. 25 Nm; 3. Bolt. 19 Nm; 4. Door lock drive cable; 5. Door lock. Risk of...
Door lock and lock shackle 1. A bracket with a finger for the lock latch; 2. Bolt. 25 Nm; 3. Bolt. 19 Nm; 4. Door lock drive cable; 5. Door lock. Risk of...

Standardization of sliding/lifting sunroof
Note. After replacing the glass section, motor, sunroof mechanism parts or sunshade, it is necessary to initialize the corresponding drive. On new replaced...
Note. After replacing the glass section, motor, sunroof mechanism parts or sunshade, it is necessary to initialize the corresponding drive. On new replaced...

Tilt-and-slide sunroof
Tilt-and-slide sunroof 1. Hatch panel motor; 2. Mounting frame; 3. Rocker mechanism guide; 4. Fairing; 5. External seal; 6/9. Bolt. 4.5 Nm; 7. Back glass...
Tilt-and-slide sunroof 1. Hatch panel motor; 2. Mounting frame; 3. Rocker mechanism guide; 4. Fairing; 5. External seal; 6/9. Bolt. 4.5 Nm; 7. Back glass...

Height adjustment of the front and rear sections of the hatch
Height adjustment of front and rear sections The front section is adjustable only from the front, and the rear section is only adjustable from the back. To...
Height adjustment of front and rear sections The front section is adjustable only from the front, and the rear section is only adjustable from the back. To...

Replacing the seals of the rear section of the hatch
Replacing front and rear seals Remove the corresponding seal for the rear glass cover -1-. 1. Front cover 2. Front seal 3. Back cover 4. Inner seal Remove any...
Replacing front and rear seals Remove the corresponding seal for the rear glass cover -1-. 1. Front cover 2. Front seal 3. Back cover 4. Inner seal Remove any...

Removing the hatch fairing
Fully open the front section. Using a screwdriver, disconnect the bracket -1 - above the support bracket -2- of the fairing -3-. Using a screwdriver, detach...
Fully open the front section. Using a screwdriver, disconnect the bracket -1 - above the support bracket -2- of the fairing -3-. Using a screwdriver, detach...

Removing the sliding sunroof control unit
Removing the sliding sunroof control unit -J245- Remove sunroof position adjuster -E139-. Disconnect all connections from the sliding sunroof control unit...
Removing the sliding sunroof control unit -J245- Remove sunroof position adjuster -E139-. Disconnect all connections from the sliding sunroof control unit...

Removing the sunroof curtain
Fully open the sunroof. Removing the rear glass cover. Unscrew the bolt -3- of the cover -2- (2 Nm). Using a screwdriver, open the lock -arrow, covers -2-4-...
Fully open the sunroof. Removing the rear glass cover. Unscrew the bolt -3- of the cover -2- (2 Nm). Using a screwdriver, open the lock -arrow, covers -2-4-...

Hatch frame parts and components
Hatch frame parts and components 1. Bolt. 8 N·m. When installing, follow the screwing sequence; 2. Used sliding sunroof -J245-; 3. Mounting frame. Removal:...
Hatch frame parts and components 1. Bolt. 8 N·m. When installing, follow the screwing sequence; 2. Used sliding sunroof -J245-; 3. Mounting frame. Removal:...
Removing the rear engine panel and the sunroof curtain drive cable
Remove the ceiling lining. Remove the sunroof sunshade motor. Remove the sunroof curtain. Unscrew bolts -arrows- for cable covers -1- and -3- (2 Nm). Remove...
Remove the ceiling lining. Remove the sunroof sunshade motor. Remove the sunroof curtain. Unscrew bolts -arrows- for cable covers -1- and -3- (2 Nm). Remove...

Removing the sunroof motor front panel
Remove the frame. Remove the sunroof drive motor. Unscrew the screws -arrows- (2 Nm). Remove covers -1 and 3- for rear cover cables -4-. Remove the ends of the...
Remove the frame. Remove the sunroof drive motor. Unscrew the screws -arrows- (2 Nm). Remove covers -1 and 3- for rear cover cables -4-. Remove the ends of the...

Removing the rocker guide and the sunroof glass cover cable
Removing the front glass cover. Removing the rear glass cover. Remove the mounting frame. Removing the electric motor of the roof mechanism. Remove the cover...
Removing the front glass cover. Removing the rear glass cover. Remove the mounting frame. Removing the electric motor of the roof mechanism. Remove the cover...

Clean the sunroof drain hose
For cleaning, it is recommended to use a tool made from an old speedometer drive cable (length approximately 2300 mm). 1. Front drainage hoses run along...
For cleaning, it is recommended to use a tool made from an old speedometer drive cable (length approximately 2300 mm). 1. Front drainage hoses run along...
This section is available on russian, bulgarian, belarusian, ukrainian, serbian, croatian, romanian, polish, slovak, hungarian
Similar sections of other Audi car models:
Body: Doors, locks and windows Audi 100 C3 (1982-1990, petrol)
Body: Doors, covers and windows Audi A3 Type 8L (1996-2003)
Body: Doors, locks and windows Audi A4 B5 (1994-2001)
Body: Doors, locks and windows Audi A6 C5 Allroad (1999-2005)
Body: Doors, locks and windows Audi A2 (1999-2005)
Body: Doors, locks and windows Audi 100 C3 (1982-1990, petrol)
Body: Doors, covers and windows Audi A3 Type 8L (1996-2003)
Body: Doors, locks and windows Audi A4 B5 (1994-2001)
Body: Doors, locks and windows Audi A6 C5 Allroad (1999-2005)
Body: Doors, locks and windows Audi A2 (1999-2005)
Share information:
- General information
- User manual
- Power unit
- Petrol engine 2.0 l
- Petrol engine 3.2 l
- Fuel system (petrol)
- Diesel 2.0 liter (CA)
- Diesel 2.0 liter (CG/CJ/CM)
- Diesel engine 3.0 l
- Fuel system (diesel)
- Transmission
- Manual gearbox 0B1
- Manual gearbox 0B2
- Automatic gearbox 0B5
- Automatic gearbox 0B6
- Chassis
- Front suspension
- Rear suspension
- Brake system
- Steering
- Body
- Exterior
- Interior
- Doors, locks and windows
- Safety system
- Ventilation and heating
- Electrical equipment
- Power devices
- Equipment and devices
- Lighting and alarm
- Audio system
- Electrical circuits
AudiManual.ru © 2017-2024 · Mobile version · Feedback · Sitemap: EN BG BY UA RS HR RO PL SK HU · Site search · News and articles
80 B2 · 80 B3 petrol · 80 B3 · 80 B4 · 100 C3 diesel · 100 C3 petrol · 100 C3 · 100 C4 petrol · 100 C4 · A3 Type 8L · A4 B5 petrol · A4 B5 · A4 B6 petrol · A4 B6 · A6 C4 · A6 C5 · A6 C5 Allroad · A8 D2 · Q5 Type 8R · Audi A2 ·
80 B2 · 80 B3 petrol · 80 B3 · 80 B4 · 100 C3 diesel · 100 C3 petrol · 100 C3 · 100 C4 petrol · 100 C4 · A3 Type 8L · A4 B5 petrol · A4 B5 · A4 B6 petrol · A4 B6 · A6 C4 · A6 C5 · A6 C5 Allroad · A8 D2 · Q5 Type 8R · Audi A2 ·