
Repair Chevrolet Repair Toyota Repair Honda Repair AvtoVAZ Repair Mercedes-Benz Repair BMW Repair Opel
Home  |  Contacts  |  Sitemap  |    
English Русский
Български
Беларускі
Український
Српски
Hrvatski
Română
Polski
Slovenský
Magyar
AudiManual.ru


  • AUDI 80
  • AUDI 100
  • AUDI A3
  • AUDI A4
  • AUDI A6
  • AUDI A8
  • AUDI Q
  • OTHER
  • ARTICLES
Q7 Typ 4L (2005-2015, diesel) Q5 Type 8R (2008-2017)

Front door (Audi Q5-8R)

  • Home
  • Audi Q
  • Q5 Type 8R (2008-2017)
  • Body
  • Doors, locks and windows
  • Front door
            0
Table of contents: Removal the door ↓ Adjusting the door position ↓ Gap sizes ↓ All ↓ Adjustment relative to the center of… ↓ Adjustment with the lock bracket ↓
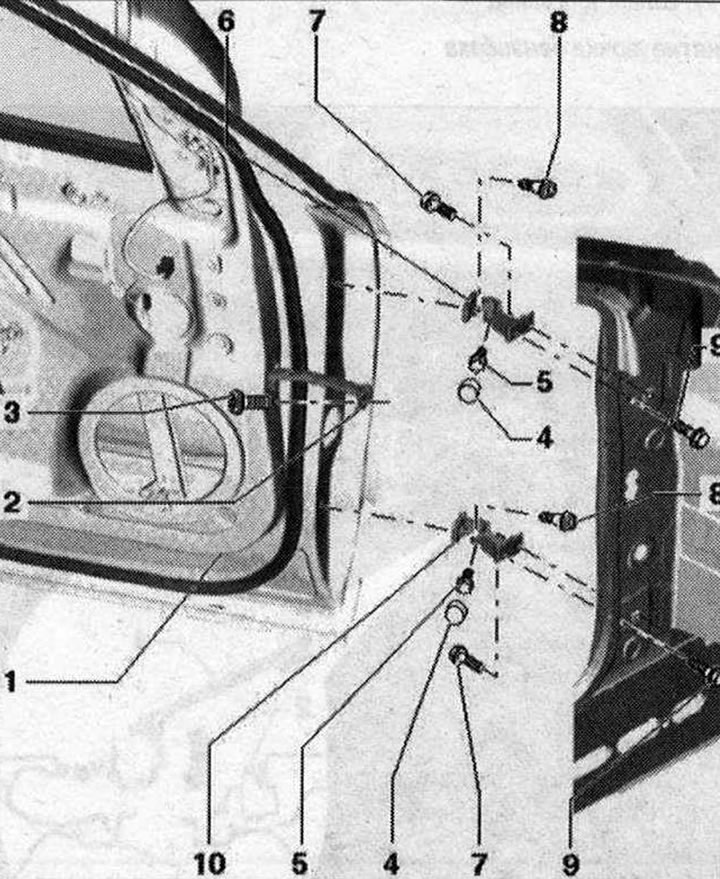
Front door 1. Door; 2. Door opening limiter; 3. Bolt 25 Nm; 4. Cover. Place on the mounting pin; 5.…

Front door 1. Door; 2. Door opening limiter; 3. Bolt 25 Nm; 4. Cover. Place on the mounting pin; 5. Dowel pin. 30 Nm; 6. Upper Door Hinge; 7/9. Bolt. 32 Nm; 8. Bolt. 45 Nm. The bolt is a so-called centering bolt, so adjusting the door with this bolt is usually not required. If adjustment with these bolts is necessary, they can be replaced with 1 of the same length and strength; 10. Lower door hinge


Removal the door
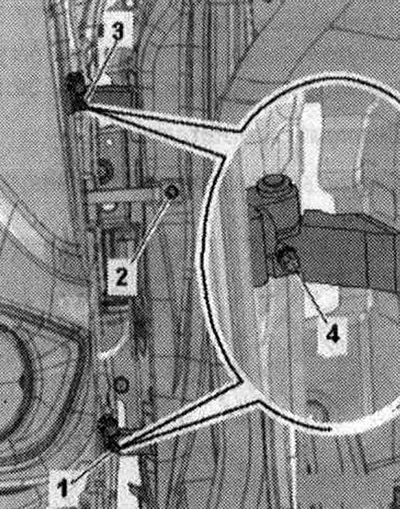


Removal the door


Disconnect the plug connector to the A-pillar. Unscrew bolt "2" of the door opening limiter. Remove caps "1" and "3" from the mounting pins. Unscrew the mounting pins "4" from the upper and lower hinges.


Protect the paintwork, surfaces near the door or side from damage. Carefully lift the door up and remove it from the door hinges.

Once the door has been installed, no adjustment is required.
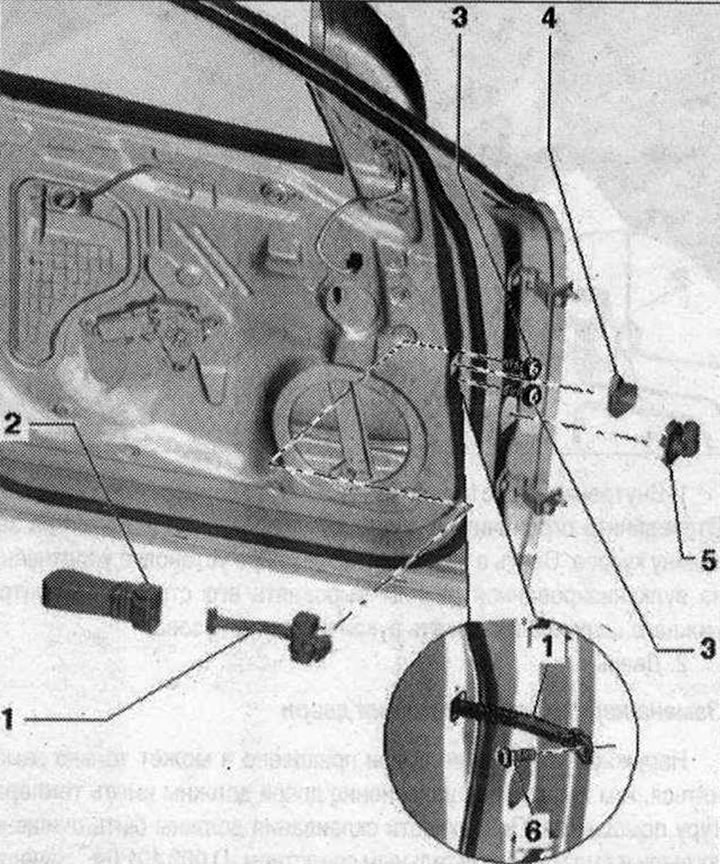
Removal the door opening limiter 1. Door opening limiter; 2. Rubber tip; 3. Bolt 8 Nm; 4. Overlay;…

Removal the door opening limiter 1. Door opening limiter; 2. Rubber tip; 3. Bolt 8 Nm; 4. Overlay; 5. Nozzle; 6. Bolt. 25 Nm


Bring the door glass to the "closed" position. Remove the door trim. Remove the lower speaker. Unscrew the "arrow" bolt of the door opening limiter.
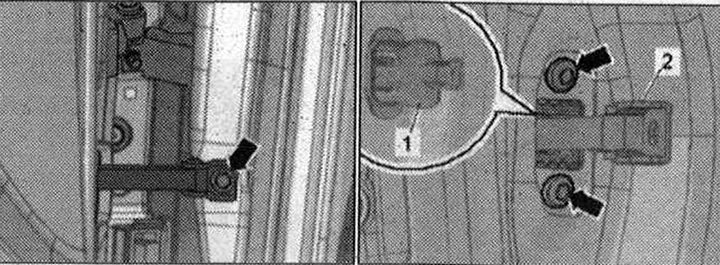
Bring the door glass to the «closed» position. Remove the door trim. Remove the lower speaker.…


Bring the door glass to the «closed» position. Remove the door trim. Remove the lower speaker.…


Pull off the seal "1" of the door opening limiter in the door opening. Unscrew the bolts "arrows" and remove the door opening limiter "2" in the inward direction.


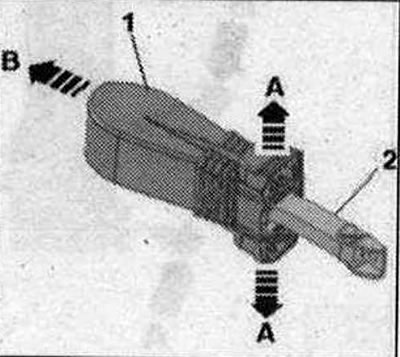
Move the rubber bushing "1" from the door opening limiter slightly towards arrow A-.

Remove the rubber bushing from the door opening limiter "2" "arrow B".

Install the lower speaker. Install the door trim.

Adjusting the door position
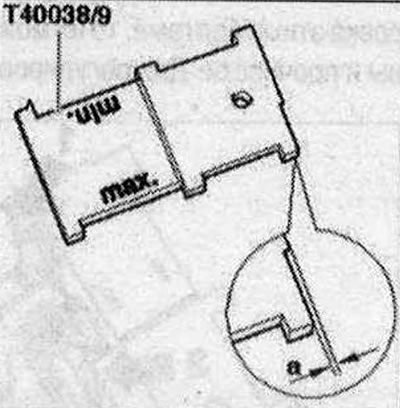


Adjusting the door position


The "min" and "max" marks are used to check the lateral adjustment. The notch in the center of the template is used to adjust the height. The 0.4 mm offset is used to check the distance of the front door to the fender or the rear door to the front door. The 0.6 mm offset is used to check the distance of the "B" pillar panels from the rear door to the front door.

Gap sizes


All dimensions are given in "mm". All dimensional tolerances are + 0.5 mm. The parallelism of the joint should not exceed 0.5 mm.
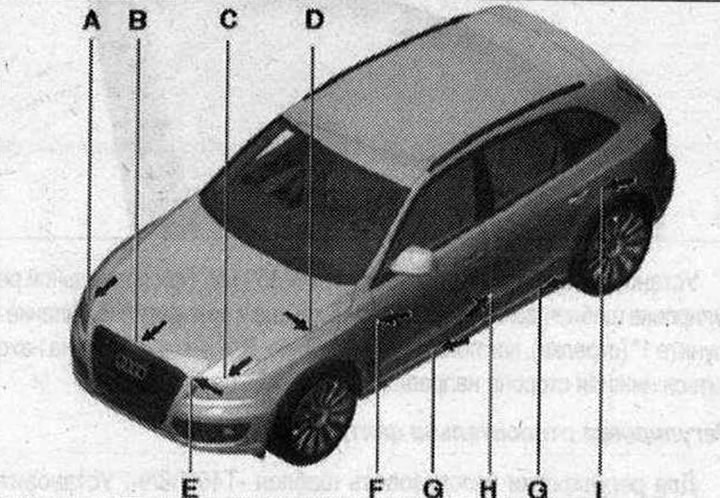
All dimensions are given in «mm». All dimensional tolerances are + 0.5 mm. The parallelism of the…


Size F = 3.5 mm. Size H = 4.5 mm. Size I = 3.5 mm


Driver's side: Remove the driver's side dash trim. Remove the lower A-pillar trim. Remove the driver's side relay board mount.

Front passenger side: Remove the glove box.

All


Remove the A-pillar connector.

Longitudinal adjustment
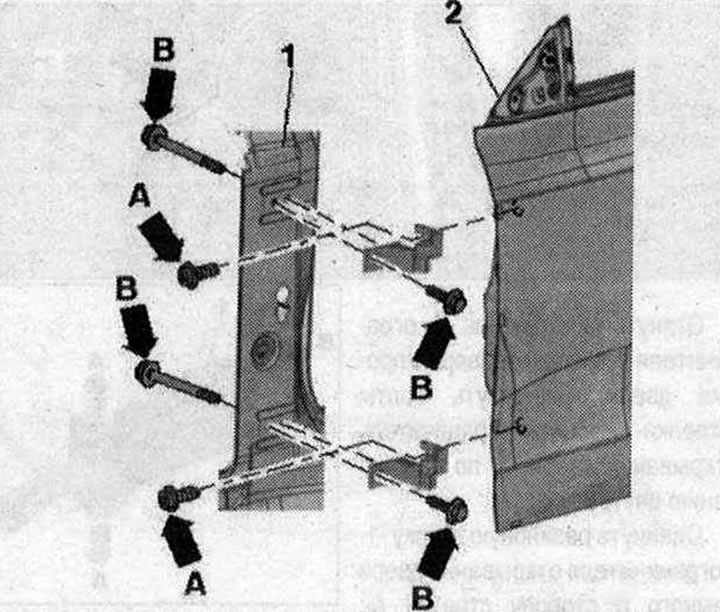
Longitudinal adjustment


Loosen the bolts "arrows B" at the top and bottom of the hinge and on the pillar A "pos. 1". Align the door "2" in the longitudinal direction. Tighten the screws "arrows B". The hinge bolts on the door side are centering bolts, so adjusting the door with these bolts is usually not required. If adjustment with these bolts is necessary, they can be replaced with bolts of the same length and strength. Use the template "T40038/9" for adjustment.
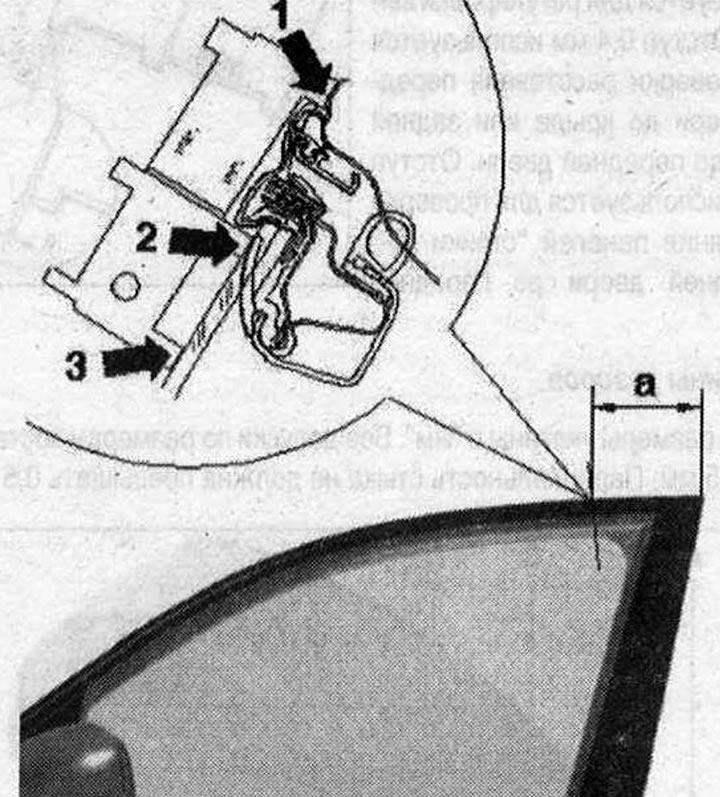
Loosen the bolts «arrows B» at the top and bottom of the hinge and on the pillar A «pos. 1». Align…


Install the template at a distance of "a" = 150 mm. When adjusted correctly, the template should fit against the roof and the decorative strip at "point 1" (arrows), as shown in the figure. At "point 2" the lower side of the glass guide should be inside the groove.


Adjustment relative to the center of the car


Use template "T40038/9" for adjustment. Set the template at distance "a" = 150. Unscrew bolts "arrows A" at the top and bottom of the hinge. Align door "2" in the longitudinal direction. Tighten screws "arrows A". For position "min", "points "1" and "3" should be adjacent. There should be no gap at "point "2". For position "max", "points "2" and "3" should be adjacent. There should be no gap at "point "1".

Adjustment with the lock bracket
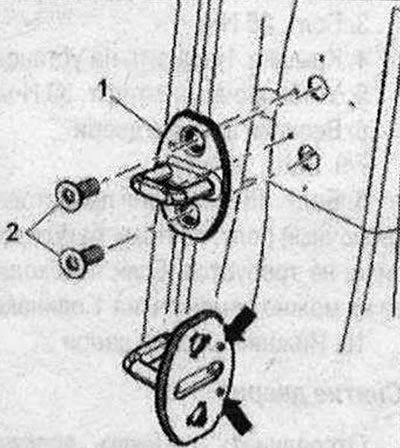


Adjustment with the lock bracket


Loosen bolts "2". Move lock bracket "1" so that the door is flush with the body contour. Adjustment using the lock bracket is performed only relative to the center of the car. Do not adjust the door height using the lock bracket, as this will damage the door lock. Loosen bolts "2". Move lock bracket "1" so that the door is flush with the body contour. When adjusted correctly, the lock bracket should enter the door lock at the center. Tighten bolts "2".

(The original material is located on the website «AudiManual.ru»)
The article was checked by auto expert Timur Bazhenov
This article is available at russian, bulgarian, belarusian, ukrainian, serbian, croatian, romanian, polish, slovak, hungarian

Share information:
Previous articles
Audi Q Q5 Type 8R: Doors, locks and windows
Next articles

Front door door Seals
Window lift motor, front door window lift
Removal the front door inner panel trim
Removal the front door window regulator


Similar articles on other Audi car models:
Front Fender and Door Moldings — Removal and Installation Audi 80 B4 (1991-1996)
Front door details Audi 100 C3 (1982-1990, petrol)
Removal and installation the front door and adjusting element… Audi A3 Type 8L (1996-2003)
Front door — outside door handle and door lock Audi A4 B8 (2007-2015)
Front door window lifts Audi A6 C5 (1997-2004)
Front door speakers Audi A8 D2 (1994-2002)
Removal and installation the front door mounting bracket Audi A2 (1999-2005)
Link to this page in different formats


Visitor comments

No comments yet


How much will 39 + 11 =


Q7 4L(2005-2015, diesel) 
  • General information
  • Operating instructions
  • Maintenance
  • Power unit
  • Diesels 3.0 l (BUG, BUN, CAS)
  • Diesels 3.0 l (CATA, CCMA)
  • Diesels 3.0 l (CJGA/CJGC)
  • Diesels 4.2 l (BTR, CCFA/CCFC)
  • Cooling system
  • Fuel and exhaust system
  • Engine management system
  • Starting and charging
  • Transmission
  • Automatic gearbox
  • Drive shafts
  • Chassis
  • Brake system
  • Front suspension
  • Rear suspension
  • Steering system
  • Body
  • Air conditioner
  • Exterior
  • Interior
  • Electrical equipment
  • Equipment and devices
  • Electrical circuits
 
Q5 8R(2008-2017) 
  • General information
  • User manual
  • Power unit
  • Petrol engine 2.0 l
  • Petrol engine 3.2 l
  • Fuel system (petrol)
  • Diesel 2.0 liter (CA)
  • Diesel 2.0 liter (CG/CJ/CM)
  • Diesel engine 3.0 l
  • Fuel system (diesel)
  • Transmission
  • Manual gearbox 0B1
  • Manual gearbox 0B2
  • Automatic gearbox 0B5
  • Automatic gearbox 0B6
  • Chassis
  • Front suspension
  • Rear suspension
  • Brake system
  • Steering
  • Body
  • Exterior
  • Interior
  • Doors, locks and windows
  • Safety system
  • Ventilation and heating
  • Electrical equipment
  • Power devices
  • Equipment and devices
  • Lighting and alarm
  • Audio system
  • Electrical circuits
 
AudiManual.ru © 2017-2026 · Mobile version · Feedback · Sitemap: EN BG BY UA RS HR RO PL SK HU · Site search · News and articles
80 B2 · 80 B3 petrol · 80 B3 · 80 B4 · 100 C3 diesel · 100 C3 petrol · 100 C3 · 100 C4 petrol · 100 C4 · A3 Type 8L · A4 B5 petrol · A4 B5 · A4 B6 petrol · A4 B6 · A4 B7 · A4 B8 · A6 C4 · A6 C5 · A6 C5 Allroad · A8 D2 · Q5 Type 8R · Q7 Typ 4L · Audi A2 ·
This site uses cookies 🍪. Click the button to accept this fact.