Repair Chevrolet Repair Toyota Repair Honda Repair AvtoVAZ Repair Mercedes-Benz Repair BMW Repair Opel
Home  |  Contacts  |  Sitemap  |    
English Русский
Български
Беларускі
Український
Српски
Hrvatski
Română
Polski
Slovenský
Magyar
AudiManual.ru


  • AUDI 80
  • AUDI 100
  • AUDI A3
  • AUDI A4
  • AUDI A6
  • AUDI A8
  • AUDI Q
  • OTHER
  • ARTICLES
Q7 Typ 4L (2005-2015, diesel) Q5 Type 8R (2008-2017)

Replacing the rear hatch section seals (Audi Q5-8R)

  • Home
  • Audi Q
  • Q5 Type 8R (2008-2017)
  • Body
  • Doors, locks and windows
  • Replacing the rear hatch section seals
            0
Table of contents: Replacing front and rear seals ↓ Replacing the outer seal ↓ Replacing the inner seal ↓

Replacing front and rear seals
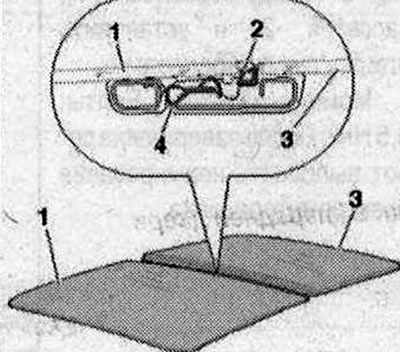


Replacing front and rear seals


Remove the corresponding seal of the rear glass cover "1".
  • 1. Front cover
  • 2. Front seal
  • 3. Back cover
  • 4. Inner seal

Remove any remaining adhesive with the adhesive remover "VAS 6349". The surface to be bonded on the rear section must be free of dust and degreased. Clean the bonding surfaces around the perimeter with a cleaner "D 009 401 04". Wipe the bonding surfaces of the rear glass cover with a primer cloth. Observe the drying time. Remove the protective film of the new seal and press the seal at both ends. Distribute the excess length of the seal evenly. Press the seal evenly with the roller for rolling the insulating film "3356". Installing the rear glass cover. Replace the seal on the sides. Remove the side seal "2" from the profile of the rear glass cover "1".
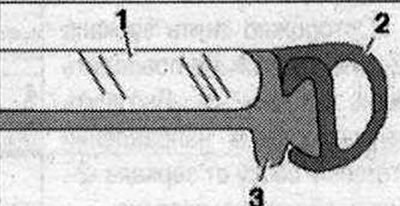
Remove any remaining adhesive with the adhesive remover «VAS 6349». The surface to be bonded on the…


Remove any remaining adhesive with the adhesive remover "VAS 6349". The surface to be glued on the rear section must be free of dust and degreased. Clean the gluing surfaces around the perimeter with a cleaner "D 009 401 04". Wipe the bonding surfaces of the rear glass cover with a primer cloth. Remove the protective film from the adhesive tape of the new seal.


Press the seal "2" with the clamp "1" to the glass cover "3". Press the seal from both ends.

Press the seal "2" into the glass cover profile, if necessary, evenly pull out the excess seal. Evenly press the seal with the roller for rolling the insulating film "3356". Installing the rear glass cover.
Press the seal «2» into the glass cover profile, if necessary, evenly pull out the excess seal.…


Replacing the outer seal


Replacing the outer seal


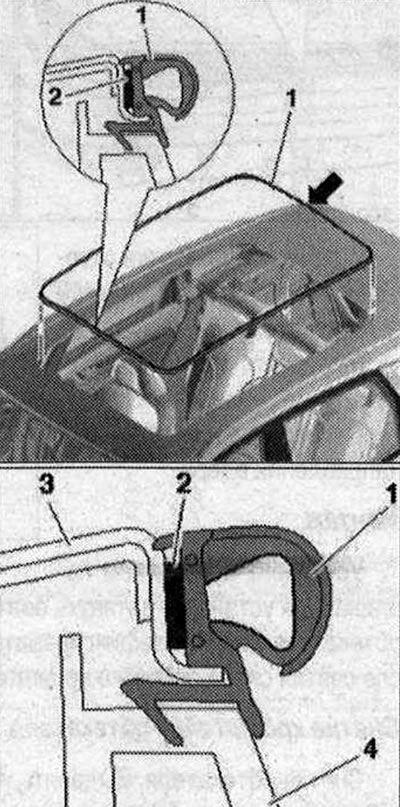
Be sure to replace the seal after replacing the sunroof.

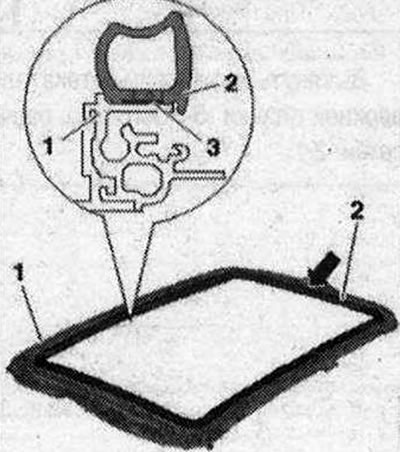
Removing the seal: The sunroof frame has been removed. To remove, pull the seal "1" around the opening in the roof.

Installing the seal: Remove any adhesive residue if necessary. The surfaces to be bonded must be free of dust and degreased. Clean the surface to be bonded with solvent "D 009 401 04". Wipe the bonding surfaces of the mounting frame with a primer cloth. Direct the joint of the seal "1" to the center of the rear cutout in the roof "arrow". Remove the protective film from the adhesive tape "2" on the side of the joint.


Place the seal on the flange and press it down at the same time until it is rounded. Remove the protective film from the adhesive tape in parts and press the seal down. Distribute the excess length of the seal down evenly. Press the seal down evenly with a roller in a double pass.

Replacing the inner seal


Replacing the inner seal


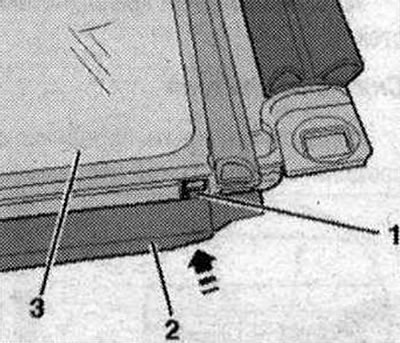
Removing the front glass cover. Removing the rear glass cover. Remove the inner seal "2" from the mounting frame "1". Remove any remaining adhesive with the adhesive remover "VAS 6349". The surfaces to be bonded must be free of dust and degreased. Clean the bonding surfaces along the perimeter with a cleaner "D 009 401 04". Wipe the bonding surfaces of the mounting frame with a primer cloth. Apply the inner seal "2" with the joint to the center of the cutout in the roof to the bonding surfaces of the mounting frame -1. Remove the protective film from the adhesive tape "3" of the new inner seal in sections and press. Distribute the excess length of the inner seal evenly. Press the inner seal evenly with a double pass using the insulating film roller "3356".

Installing the rear glass cover. Installing the front glass cover.
The article was checked by auto expert Timur Bazhenov
This article is available at russian, bulgarian, belarusian, ukrainian, serbian, croatian, romanian, polish, slovak, hungarian

Share information:
Previous articles
Audi Q Q5 Type 8R: Doors, locks and windows
Next articles

Height adjustment of the front and rear sections of the hatch
Lift and slide hatch
Standardization of sliding/lifting hatch
Rear door lock and lock bracket
Removal the sunroof fairing
Removal the sliding sunroof control unit
Removal the sunroof curtain
Details and assemblies of the hatch frame


Similar articles on other Audi car models:
Front and rear crankshaft seals — replacement Audi 80 B3 (1986-1991, petrol)
Rear Brake Disc Pads — Checking and Replacing Audi 100 C3 (1982-1990, diesel)
Electric windows and rear view mirrors Audi A3 Type 8L (1996-2003)
Rear door — replacing seals Audi A4 B8 (2007-2015)
Replacing rear brake pads Audi A6 C5 (1997-2004)
Replacing rear brake pads Audi A8 D2 (1994-2002)
Replacing valve stem seals Audi A2 (1999-2005)
Link to this page in different formats


Visitor comments

No comments yet


How much will 47 + 18 =


Q7 4L(2005-2015, diesel) 
  • General information
  • Operating instructions
  • Maintenance
  • Power unit
  • Diesels 3.0 l (BUG, BUN, CAS)
  • Diesels 3.0 l (CATA, CCMA)
  • Diesels 3.0 l (CJGA/CJGC)
  • Diesels 4.2 l (BTR, CCFA/CCFC)
  • Cooling system
  • Fuel and exhaust system
  • Engine management system
  • Starting and charging
  • Transmission
  • Automatic gearbox
  • Drive shafts
  • Chassis
  • Brake system
  • Front suspension
  • Rear suspension
  • Steering system
  • Body
  • Air conditioner
  • Exterior
  • Interior
  • Electrical equipment
  • Equipment and devices
  • Electrical circuits
 
Q5 8R(2008-2017) 
  • General information
  • User manual
  • Power unit
  • Petrol engine 2.0 l
  • Petrol engine 3.2 l
  • Fuel system (petrol)
  • Diesel 2.0 liter (CA)
  • Diesel 2.0 liter (CG/CJ/CM)
  • Diesel engine 3.0 l
  • Fuel system (diesel)
  • Transmission
  • Manual gearbox 0B1
  • Manual gearbox 0B2
  • Automatic gearbox 0B5
  • Automatic gearbox 0B6
  • Chassis
  • Front suspension
  • Rear suspension
  • Brake system
  • Steering
  • Body
  • Exterior
  • Interior
  • Doors, locks and windows
  • Safety system
  • Ventilation and heating
  • Electrical equipment
  • Power devices
  • Equipment and devices
  • Lighting and alarm
  • Audio system
  • Electrical circuits
 
AudiManual.ru © 2017-2026 · Mobile version · Feedback · Sitemap: EN BG BY UA RS HR RO PL SK HU · Site search · News and articles
80 B2 · 80 B3 petrol · 80 B3 · 80 B4 · 100 C3 diesel · 100 C3 petrol · 100 C3 · 100 C4 petrol · 100 C4 · A3 Type 8L · A4 B5 petrol · A4 B5 · A4 B6 petrol · A4 B6 · A4 B7 · A4 B8 · A6 C4 · A6 C5 · A6 C5 Allroad · A8 D2 · Q5 Type 8R · Q7 Typ 4L · Audi A2 ·
This site uses cookies 🍪. Click the button to accept this fact.