
Table of contents: Raising/lowering windows ↓ Comfortable opening/closing ↓ Pivoting glass1) ↓ Rear view mirrors ↓ Interior mirror ↓ Exterior mirrors ↓ Heated mirrors* ↓ Adjusting the position of the… ↓
When the ignition is on, the windows can be lowered and raised using an electric drive.
The switches are located in the driver's door armrest.
In addition, there are additional switches in the front passenger door and the rear doors to control the corresponding windows.
The windows operate for about ten minutes after the ignition is switched off. However, they are immediately switched off when one of the front doors is opened.
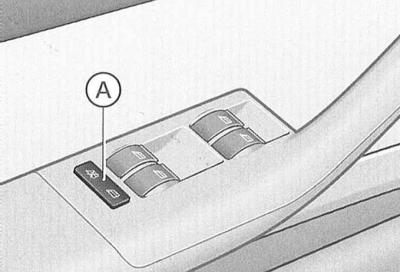
Locking switch (A) you can de-energize the rear door window lifts.
On the rear door side, the windows can only be used with the switch recessed.
When the rear door windows are off, the symbol in the locking switch lights up.
Raising/lowering windows
When the window lift switch is pressed briefly, the glass automatically and completely lowers, and when briefly raised, it rises to the extreme position. By pressing the switch again, the glass can be stopped in any intermediate position.
The automatic window lift system only works when the ignition is on.
Warning: The automatic window up/down function is disabled after disconnecting and then reconnecting the battery.
To restore the functionality of the window lifts after connecting the battery, do the following:
By continuously pressing the window lift switch, bring the glass to the uppermost position.
Release the switch and press again, holding the switch for approximately one second with the window closed.
The automation has been restored to working order.
Comfortable opening/closing
When unlocking/locking the vehicle from the driver's or front passenger's door, the windows can be opened/closed as follows:
Turn and hold the key in the unlock position - the windows open. When the key is returned to its original position, the opening process immediately stops.
Turn and hold the key in the lock position - the windows close. When the key is returned to its original position, the closing process immediately stops.
Convenient unlocking/locking also works via radio remote control*. Refer to subsection Keys, body locks with single control and security alarm.
Warning: Be careful when lifting the windows!
Warning: Inattention or lack of control when using power windows may result in injury.
That's why:
- if necessary, de-energize using the interlock switch (refer to the above illustration) rear door window lifters;
- when leaving the vehicle, always remove the ignition key;
- when closing the car comfortably, make sure the windows are raised; this is especially important when closing the windows using a radio remote control*.
Pivoting glass1)
The rear windows can be opened by turning to the side and installed in two fixed positions.
Opening

Grasp the corresponding surface of the hinge and move it in the direction indicated by the arrow to the first locked position (refer to illustration).
Push the hinge all the way out to open the window completely. In this position, the hinge is flush with the pillar.
Closing
Move the hinge away from the pillar and pull it past the first fixed position inward. The hinge should rest against the pillar.
Rear view mirrors
Before you start driving, set your rear view mirrors correctly so that you can see behind you at all times.
Interior mirror
Manual mirror dimming
When the mirror is in its normal position, the lever on its bottom side should be facing forward.
This lever can be used to darken the mirror:
- The lever in the forward position is the normal position.
- The lever in the rear position is the darkening position.
Auto dimming*
Adjust the position of the mirror with your hand.
When the ignition is on, the interior mirror automatically darkens depending on the amount of light falling on it (for example, the light from behind the headlights).
When the interior light or reverse gear is turned on, the mirror returns to its original position (no darkening).
Exterior mirrors
Note on the use of convex and aspherical* exterior mirrors
Convex and aspherical mirrors increase the viewing sector. However, they reduce the image of objects. Therefore, such mirrors are only conditionally suitable for assessing the distance to vehicles moving behind.
Automatically dimming exterior mirrors*
The outside mirrors dim automatically along with the inside mirror.
When the ignition is on, the mirrors automatically darken depending on the amount of light falling on them (for example, the light from behind the headlights).
When the interior lighting or reverse gear is turned on, the mirrors return to their original position (no darkening).
Warning: Correct automatic dimming of the exterior mirrors is only possible when the light falling on the interior mirror is not obstructed (for example, objects located on the trunk lid).
Heated mirrors*
The reflective surface of the outside mirrors is heated when the ignition is on, depending on the outside temperature.
Adjusting the position of the outside mirrors
(2-door vehicles only)
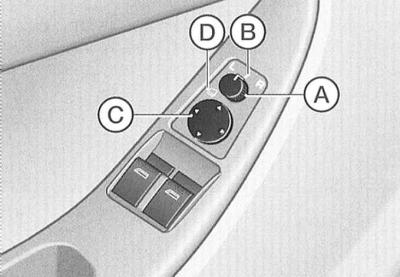
The multi-position switch (A) is used to switch the electric drive to the driver/front passenger outside mirror or to fold the mirrors1).
The electrically adjustable exterior mirrors can only be adjusted when the ignition is on by pressing the large button C.
The reflective surface of the mirror shifts when you press the corresponding side of the arrow button.
Into neutral position
- L driver's mirror
- R front passenger mirror
- D folding both outside mirrors1)
1) Only for certain export versions.
4-door cars

- About neutral position
- L driver's mirror
- R front passenger mirror
- And folding both outside mirrors
It is recommended to fold the mirrors, for example, to save them when parking or in narrow spaces.
The reflective surface of the mirror is set to the desired position by pressing the corresponding side of the large-format button C with arrows printed on it.
Warning: If the electric drive fails, grasp the edge of the mirror with your hand and set it by pressing on the edge of the reflective surface.
Warning: When the mirror is displaced due to external forces (for example, a blow during maneuvering) perform full electrical folding of the mirrors. Never set the mirrors to their original position by hand, as this may adversely affect their function.