
Table of contents: Exterior rearview mirrors ↓ Outdoor lighting control ↓ Windscreen wiper and instrument… ↓
Caution: In auto-dimming rearview mirrors (in electrochromic mirrors) contains liquid electrolyte, which, if the mirror is damaged, may leak and cause irritation to the skin, eyes and respiratory system. This applies primarily to people suffering from asthma or other similar diseases. In this case, it is necessary to provide intensive ventilation with fresh air. If electrolyte comes into contact with skin, eyes, respiratory system, clothing or shoes, rinse with plenty of water (mouth - rinse). If electrolyte comes into contact with plastic trim parts, remove it as quickly as possible with a damp sponge or cloth.
The interior rearview mirror has an automatic dimming function depending on the amount of light falling on it. For this feature to function properly, the rear window shade must be lowered. When the interior light is turned on or reverse gear is engaged, automatic dimming is disabled.
Exterior rearview mirrors
Please note: The exterior rearview mirrors are curved, which increases the field of view, but objects reflected in the curved parts of the mirrors appear further away than they actually are. These mirrors are intended for assessing the traffic situation and should not be used to determine the distance to an object.
The outside rearview mirrors dim automatically when the interior rearview mirror dimming function is turned on.
The exterior rearview mirrors have a heating function and electric adjustment, and on some models, electric folding. To control the electric drive adjustment, a handle is installed in the driver's door, the positions of which are shown in Illustration 5.1.
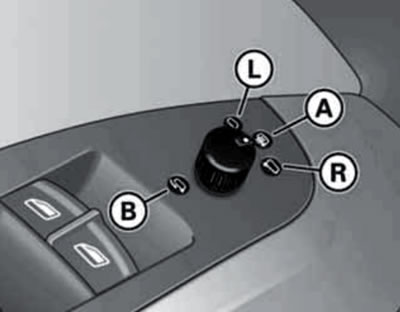
5.1. Positions of the outside mirror adjuster.
A - Neutral position, heated mirrors.
B - Folding both mirrors.
L - Left mirror adjustment.
R - Right mirror adjustment.
To change the position of the mirror, turn the switch to the appropriate position (L or R), and then tilt the regulator in the appropriate direction. When in position (R) and reverse gear, the right mirror is lowered slightly to improve curb visibility when parking; the mirror returns to its original position when moving forward at a speed of more than 15 km/h, and also when turning the regulator to position (A) or (L).
Heated outside rearview mirrors are activated when the rear window defroster is on and the switch is set to position (A). Depending on the outside air temperature, the rear window defroster also operates in other positions if the ignition is on.
If the electric drive for adjusting the outside mirrors is faulty, they can be adjusted manually by gently pressing on the reflective elements.
If the rear view mirrors have shifted without using the electric drive (for example, they were hit during maneuvering), do not return them to their original position manually to avoid damaging the mechanism. The correct way would be to fully fold the mirrors using the electric drive, and then unfold them.
Outdoor lighting control
Comment:
- Do not leave lights on for long periods of time with the engine off to avoid draining the battery. If the exterior lights are not turned off after the key is removed from the ignition switch and the driver's door is open, a warning sound is activated.
- Comply with legal regulations regarding the use of lighting fixtures. Automation of external lighting is an auxiliary function and does not relieve the driver from the obligation to use external lighting devices properly. The light sensor may not respond to rain or fog; do not stick any stickers on the windshield in front of the light sensor, so as not to disrupt the operation of the automatic system.
A switch is used to control the external lighting (8 in illustration 6.1), and also the upper left steering column switch (9).
On the menu "Car>Systeme>Ausenbeleuch-tung" the following functions can be activated on the MMI display:
- After turning off the ignition and opening the driver's door - turning on for a while (from 0 to 60 seconds) fog lights, tail lights and license plate light to illuminate the way home (function "Coming home");
- When unlocking a single lock, the fog lights, rear lights and license plate light are turned on to illuminate the area around the car (function "Leaving home");
- Automatic switching on of the parking lights and low beam headlights (DRL) when the ignition is switched on, regardless of the position of the exterior lighting control switch (function "Tagfahrlicht").
The exterior lighting control switch has the following positions
- 0 - Off.
- AUTO - Automatic mode (if there is a light sensor). The low beams turn on and off automatically depending on the ambient light. When the ignition is turned off, the low beams turn off automatically. In the AUTO position, the fog lights/rear fog lights cannot be turned on. When the low beam is automatically switched on, you can manually turn the high beam on/off; if the low beam is turned on and the high beam is turned off automatically, and then turned on again, the high beam will not turn on automatically (if necessary, turn it off and on again manually). If the light sensor is faulty, the corresponding indicator lamp in the instrument cluster lights up, and the low beam in the "AUTO" position will remain on constantly, regardless of the light level.
 - Side lights (regardless of whether the ignition is on).
 - Low or high beam headlights (depending on the position of the left upper steering column switch, see below). When the ignition is off, only the parking lights are on.
 - Fog lights: pull the switch towards you to the first detent position from the position
  or
or  . This is accompanied by the illumination of the corresponding indicator in the instrument cluster.
 - Rear fog lights: pull the switch towards you to the second detent position from the position
  or
or  . This is accompanied by the illumination of the corresponding indicator in the instrument cluster. If a trailer with a rear fog light is connected to the standard towing hitch, only that light is turned on.
The left upper steering column switch has the following positions
- Pull up/down - turn on right/left turn signals, or (with the ignition off) parking lights on the starboard/port side. Parking lights mean turning on the headlights and taillights at reduced brightness. If you pull the lever only to the point of resistance and immediately release it, the turn signals will flash three times; if you hold the lever past the point of resistance, the turn signals will flash until the lever is released. If you move the lever past the point of resistance, the direction indicators will flash until the steering wheel returns to the straight-ahead position after turning.
- Pull away from you - turns on high beam headlights (only when the low beam headlights are on, see above). Accompanied by the illumination of the corresponding indicator in the instrument cluster.
- Pull towards you - high beam headlights signal (regardless of whether the ignition is on). Accompanied by the illumination of the corresponding indicator in the instrument cluster.
Windscreen wiper and instrument cluster display control
Note: To avoid damaging the windshield wiper mechanism, do not operate the wipers if the glass being cleaned is dry, or move them by hand. In cold weather, before turning on the windshield wipers for the first time on a trip, check that the blades are not frozen. The windshield wipers turn on when the ignition is turned on, unless they were turned off when the ignition was turned off. In cold weather, before parking the vehicle, it is recommended to set the windshield wipers to the service position (see below). To avoid damaging the windshield wipers, avoid contact with gasoline or other solvents. To avoid damaging the pumps, do not use the windshield wipers when the washer fluid reservoir is empty or continuously for more than 10 seconds.
Caution: Do not leave the rain sensor on while washing your car. Before turning on the automatic windshield wipers in conditions where frost may form, make sure the windshield is completely clear of frost and ice. Avoid using the automatic windshield wiper function in dry weather, as it may mistakenly identify drops of dirt, fog, or insects that have fallen on the glass as raindrops. To prevent unnecessary operation of the automatic windshield wipers, replace the windshield wiper blades if they leave streaks or water marks.
To control windshield wipers and headlight washers (with headlight washers), and the right steering column switch is also used to control the multifunctional display of the instrument cluster (see illustration 5.2).
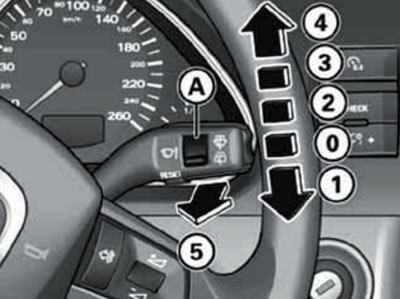
5.2. Positions of the right steering column switch.
A - Switch for adjusting the interval or sensitivity of the rain sensor (in mode "2").
0 - Windscreen wipers are off.
1 - Turn on the windshield wipers for one cycle.
2 - Interval or automatic mode (interval or sensitivity is adjusted by switch "A").
3 - Switching on normal continuous operation of the windshield wipers.
4 - Switching on accelerated continuous operation of the windshield wipers.
5 - Turning on the windshield wipers together with the washer fluid supply (short press: After releasing, the windshield wipers continue to operate for approximately 4 seconds): when pressed for a long time - additional headlight washing.
The rear window wiper is activated by pulling the switch away from you to the locked position (the cleaner will operate every 6 seconds). By holding the switch pulled away from you through the locked position, the rear window washer is turned on simultaneously with the windshield wiper. After the washer fluid supply is turned off, the windshield wiper continues to operate for an additional 4 seconds. Additionally, the rear window wiper automatically turns on when the vehicle is shifted into reverse if the windshield wipers are on.
To switch between different menu items, press the up/down buttons on the end of the steering column switch. To switch between main menu/tempostat/trip computer/navigation (short press) or reset the current value (long press) the "RESET" key on the bottom of the switch is used.
The duration of pauses in interval/automatic mode depends not only on the position of the regulator (A), but also on the speed of the vehicle. When stopped, the windshield wipers, which operate in continuous mode, switch to interval mode.
If the automatic windshield wiper mode remains on when the ignition is turned off, this mode will be turned off when the ignition is turned on again. To resume automatic windshield wiper operation, accelerate to 6 km/h, or turn off the windshield wipers and turn on automatic mode again.
Windscreen wipers and washers only operate when the ignition is on. The windshield washer fluid nozzles are heated automatically when the ignition is on. At temperatures below 4°C, after the ignition is switched off, the windshield wiper blades are set to the "winter position", i.e. in the heated zone of the windshield. This makes it easier to clear the windshield wipers of snow and ice. The next time the windshield wipers are turned on, they will return to the normal parking position.
To move the wiper arms away from the windshield, they must first be set to the service position. To do this, go to the menu "Car>Systeme>Sheibenwischer>Servicestellung" select "ein" ("on") on the MMI display. To return the windshield wipers to their original position, select "aus" ("off") in the menu, or move the right steering column stalk to any position.