Repair Chevrolet Repair Toyota Repair Honda Repair AvtoVAZ Repair Mercedes-Benz Repair BMW Repair Opel
Home  |  Contacts  |  Sitemap  |    
English Русский
Български
Беларускі
Український
Српски
Hrvatski
Română
Polski
Slovenský
Magyar
AudiManual.ru


  • AUDI 80
  • AUDI 100
  • AUDI A3
  • AUDI A4
  • AUDI A6
  • AUDI A8
  • AUDI Q
  • OTHER
  • ARTICLES
B4 (1991-1996) B3 (1986-1991) B3 (1986-1991, petrol) B2 (1979-1986)

Exterior rear view mirrors (Audi 80 B4)

  • Home
  • Audi 80
  • B4 (1991-1996)
  • Body
  • Body and trim
  • Exterior rear view mirrors
            0
Table of contents: Electrically adjustable exterior… ↓ Manually adjustable exterior mirrors ↓ Replacing mirror glass ↓ Exterior mirrors - adjustment ↓ Front and rear glass ↓
Removal

Electrically adjustable exterior mirrors


1. Move the mirror housing to the side.

This will provide access to the mounting bolts.

2. Disconnect the multi-pin plug near the mirror mounting support.

Manually adjustable exterior mirrors


3. Remove the door trim.

4. Remove the connecting bolts on the front of the door that secure the outer and inner parts of the door. Loosen the connecting bolts on the back of the door, but do not remove them. This will allow you to remove the drive for the outside mirrors, which is located between the two components of the door.

5. Move the mirror housing to the side and unscrew the mirror mounting bolts.

When installing the mirror, do not mix up the holes for the mirror mounting bolts.

On the driver's door, this is a hole in the front at the bottom and at the top at the back (if two holes). On the passenger door there is an opening at the front, at the top, and at the bottom, at the back.

Replacing mirror glass


The mirror glass itself, regardless of the drive, is clamped in the housing with clamps.

Attention! When removing and replacing the mirror glass, wear gloves to avoid cuts, as the glass may crack.


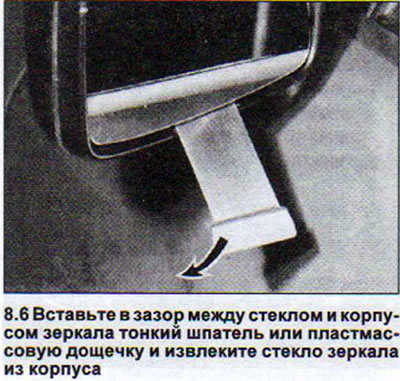
6. Insert a thin spatula or plastic board into the gap between the glass and the mirror housing and remove the mirror glass from the housing (see illustration). If necessary, press the mirror glass from the top side in a similar manner.


6. Insert a thin spatula or plastic board into the gap between the glass and the mirror housing and…


When installing the mirror glass in place, simply place it on the clips and press on it until the clips click into place.

Attention! It is necessary to press on the mirror glass in its center.


Exterior mirrors - adjustment


The manual mirror drive can be adjusted to avoid free play when installing the mirror. A small screwdriver is required for adjustment.

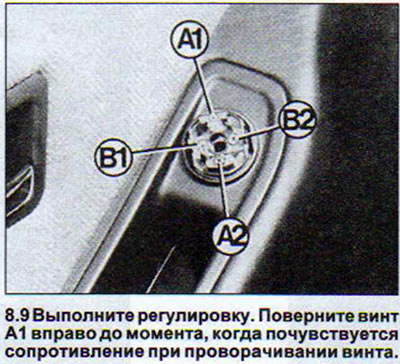
7. Remove the mirror mounting head. Two screws opposite each other are responsible for moving the mirror in one direction (top/bottom, right/left). One screw has a left-hand thread, the other has a right-hand thread.

8. Make the adjustment. Turn screw A1 to the right until you feel resistance when turning the screw.

9. Turn screw A2 to the left until you feel resistance when turning the screw. The same applies to screws B1 and B2 (see illustration).

9. Turn screw A2 to the left until you feel resistance when turning the screw. The same applies to…


10. Make sure that the adjustment is made correctly. The mirror should move without much effort, and the idle movement of the mirror installation head should be minimal.


Attention! If the outside mirror vibrates while driving, it is necessary to tighten the mirror adjustment mechanism. Too easy a movement of the mirror adjustment head leads to the fact that the slightest touch knocks the mirror adjustment off. It is recommended to adjust the movement of the mirror adjustment mechanism.


Front and rear glass


Attention! The front and rear windows of the car, as well as the triangular window near the rear pillar, are glued in a special way and represent a structural element that affects its stability. This means that a car enthusiast cannot remove, replace and install the windshield and rear windows on his own without special tools.


(The original material is located on the website Audimanual.ru)
The article was checked by auto expert Timur Bazhenov
This article is available at russian, bulgarian, belarusian, ukrainian, serbian, croatian, romanian, polish, slovak, hungarian

Share information:
Previous articles
Audi 80 B4: Body and trim
Next articles

Doors
Front Fender and Door Moldings — Removal and Installation
Wings — removal and installation
Hood — removal and fitting
Trunk lid — removal and fitting
Rear drop door
Rear bumper — removal and installation
Instrument panel and center console


Similar articles on other Audi car models:
Rear view mirrors Audi 100 C3 (1982-1990, diesel)
Electric windows and rear view mirrors Audi A3 Type 8L (1996-2003)
Electrically heated door rear view mirrors Audi A4 B6 (2000-2006)
Rear view mirrors Audi A6 C5 (1997-2004)
Interior rear view mirror Audi A8 D2 (1994-2002)
Rear view mirrors, exterior lighting and windshield wiper… Audi Q7 Typ 4L (2005-2015, diesel)
Removal and installation the rear view mirror Audi A2 (1999-2005)
Link to this page in different formats


Visitor comments

No comments yet


How much will 24 + 47 =


80(B4, 1991-1996) 
  • General information
  • User manual
  • Maintenance
  • Troubleshooting
  • Power unit
  • Engine
  • Cooling system
  • Heating and ventilation
  • Petrol injection
  • Diesel fuel system
  • Fuel system
  • Exhaust systems
  • Ignition system
  • Transmission
  • Clutch
  • Car gearbox
  • Chassis
  • Brake system
  • Suspension and steering wheel
  • Body
  • Body and trim
  • Electrical equipment
  • Electrical system
  • Electrical circuits
 
80(B3, 1986-1991) 
  • General information
  • Repair characteristics
  • Maintenance
  • Power unit
  • Gasoline engine
  • Diesel engine
  • Engine lubrication system
  • Fuel system (gasoline)
  • Injection system (gasoline)
  • Fuel system (diesel)
  • Ignition system
  • Cooling system
  • Heater
  • Exhaust system
  • Transmission
  • Clutch and gearbox
  • Chassis
  • Steering
  • Brake system
  • Car suspension
  • Body
  • Body elements
  • Electrical equipment
  • Power devices
  • Lighting and appliances
  • Electrical circuits
 
80(B3, 1986-1991, petrol) 
  • General information
  • User manual
  • Maintenance
  • Power unit
  • Engine 4-cylinder
  • Engine 5-cylinder
  • Cooling system
  • Fuel and exhaust systems
  • Ignition system
  • Transmission
  • Clutch
  • Mechanical transmission
  • Automatic transmission
  • Drive shafts
  • Chassis
  • Brake system
  • Suspension
  • Steering
  • Body
  • Exterior
  • Interior
  • Electrical equipment
  • Equipment and devices
  • Electrical circuits
 
80(B2, 1979-1986) 
  • General information
  • User manual
  • Power unit
  • Engine FZ
  • Engine EP, YP, YZ, DT, DS, DZ
  • Transmission
  • Clutch
  • 4 speed gearbox
  • 5 speed gearbox
  • Front wheel drive
  • Chassis
  • Front suspension
  • Rear suspension
  • Steering
  • Brake system
  • Electrical equipment
  • Equipment and devices
  • Electrical circuits
 
AudiManual.ru © 2017-2026 · Mobile version · Feedback · Sitemap: EN BG BY UA RS HR RO PL SK HU · Site search · News and articles
80 B2 · 80 B3 petrol · 80 B3 · 80 B4 · 100 C3 diesel · 100 C3 petrol · 100 C3 · 100 C4 petrol · 100 C4 · A3 Type 8L · A4 B5 petrol · A4 B5 · A4 B6 petrol · A4 B6 · A4 B7 · A4 B8 · A6 C4 · A6 C5 · A6 C5 Allroad · A8 D2 · Q5 Type 8R · Q7 Typ 4L · Audi A2 ·
This site uses cookies 🍪. Click the button to accept this fact.