
1. Remove the wheel whose wing needs to be removed.
2. Remove the plastic plug at the lower rear end of the bumper.
3. Disconnect the bumper side from the wing mount to the body. To do this, press the bumper down at the bracket level and simultaneously pull it towards you.
4. Remove all bolts or nuts securing the wheel arch to the wing.
5. Unscrew the plastic nut at the front of the wheel arch.
6. Turn the rotary lock connecting the wheel arch trim to the engine compartment mudguard by 90° to the left.
7. Remove the trim (fender liner) from the studs and press it inward from the outer contour of the wheel arch.
8. Do not apply too much force when tightening the plastic nuts/bolts securing the wheel arch to the wing - the threads may be damaged.
9. Remove the bumper.
10. Remove one bolt at the lower front of the wing and two at the rear. The bolts have heads with holes for a socket wrench.
11. Remove the bolt under the bumper hole.
12. Unscrew the two bolts at the rear of the wing that hold the wing to the corners (see illustration).
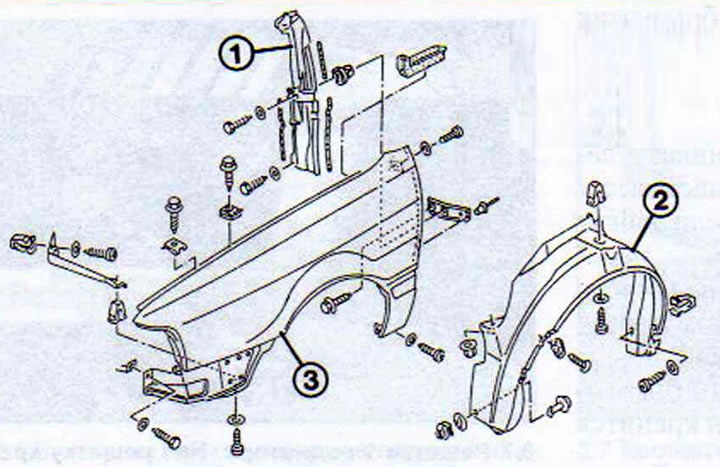
5.12. The wing, its components and fastening
13. Open the front door.
14. Remove the bolt above the door hinge.
15. Unscrew the foam seal on the upper end of the wing and remove the wing. When installing a new wing, remove the trailing edge fasteners from the old wing and rivet them onto the new wing.
16. Remove any remaining seal from the body at the joint of the rear part of the wing.
17. Straighten the sealing cord so that it is the same length and 7 mm in diameter, and glue it.
18. Install the new wing in place.
19. Adjust the wing so that the gap between the hood and the hood is the same along the entire length and is 4.5-5.5 mm.