
Table of contents: Cars with a "sedan" body ↓ Trunk lid lock - removal ↓
Cars with a "sedan" body
Removal
1. Lift the trunk lid.
2. Move the trunk trim above the left rear light and disconnect the trunk light connector.
3. Disconnect the central locking switch hose secured to the cover hinge if the vehicle is equipped with central locking.
4. Remove the thrust washers from the gas-filled shock absorber of the trunk lid and detach it from the lid.
5. Ask an assistant to support the cover and remove two bolts from the left and right hinges of the cover.
6. Remove the cover. If necessary, the hinge can be disconnected from the body.
Fit
The goal of adjusting the trunk lid is to achieve equal gaps on the left and right sides of the trunk (approximately 4-5 mm).
The adjustment is carried out after loosening the hinge mounting bolts on the trunk lid.
In addition, the trunk lid should be flush with the adjacent body parts. Height adjustment is performed after loosening the bolts securing the lid hinges to the body.
If the lid wobbles or does not close properly, its position can be adjusted using the stop buffers on the left and right sides on the bottom of the lid.
7. Loosen the buffer mounting bolt and move the buffer up or down and tighten the bolt again. The buffers are positioned correctly if the closed cover is free of tension.
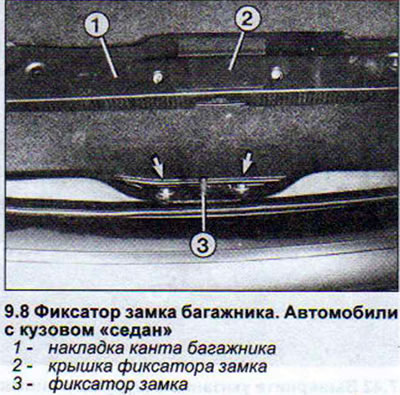
8. Make sure the lid closes properly. If necessary, adjust the position of the lock retainer on the trunk. To do this, loosen both retainer mounting bolts. The retainer itself is covered with a cover plate, which has a lid secured with two screws and provides access to the retainer (see illustration).
The headlight unit on the trunk lid should be approximately 8 mm away from the lights on the body. This can be achieved by shifting the headlight unit in the elongated holes of the mounting bolts.
Trunk lid lock - removal
9. Lift the trunk lid.
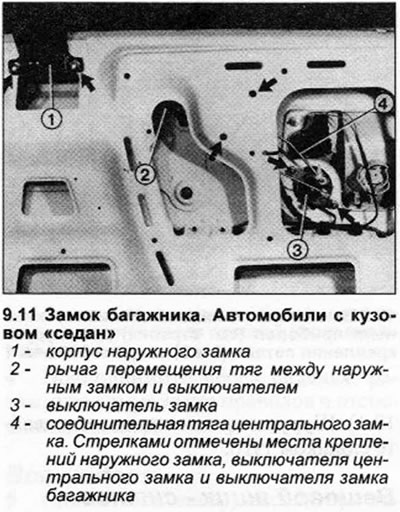
10. Remove the cover trim to gain access to the lock components. And remove the lock switch. To do this, unscrew the clamp on the drive rod and disconnect the rod (see illustration).
12. Disconnect the central locking plug.
13. Unscrew the two nuts and remove the switch.
14. Remove the outer lock housing. To do this, disconnect the drive rods from the switch and disconnect the plug.
15. Unscrew the two hex nuts securing the housing and remove the outer lock housing.
When installing, adjust the length of the drive rod to the lock switch. To do this, press the rod movement button so that the rod knees fold. Without closing the trunk lid, set the lock pawl to the "Closed" position.
16. Insert a 6 mm drill bit into the lock hole to secure the pawl in the "Closed" position.
17. Adjust the length of the drive rod and remove the drill.