
Dismantling
1. Open the lid.
2. Remove the warning triangle.
3. Unscrew the warning sign bracket.
4. Unscrew the trunk lid trim.
5. Disconnect the plug connector of the wires to the electrical components in the trunk lid and pull the connector through the entrance in the metal.
6. Disconnect the central locking hose.
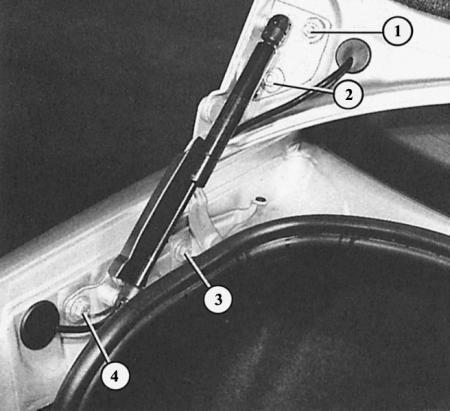
7. Fold back the retaining clamps on the gas-filled shock absorbers on the right and left and remove them. After this, you can press the gas-filled shock absorbers away from the ball heads.
8. Holding the lid with two people, unscrew the two screws on the hinge on the right and left.
9. Remove the cover from the hinge.
10. You can additionally unscrew the hinge from the body.
Adjusting the trunk lid
Trunk lid hinges: 1 and 2 – hinge/trunk lid screws; 3 and 4 – hinge/body screws.
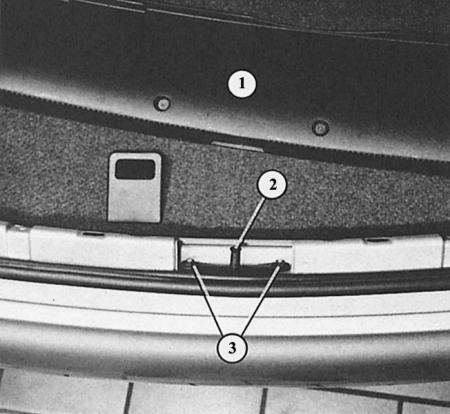
The position of the lock plate with bolt (2) at the rear on the bottom of the trunk can be adjusted after loosening both screws (3). The lock plate becomes accessible after removing the trim (1) of the trunk edge.
1. The gap between the trunk lid and the left and right body parts must be the same width (about 3 mm). The gap between the rear window and the cover on the right and left should also be the same width.
2. Adjustment is made after loosening the hinge/trunk lid screws. In addition, the lid should be in the same plane with the side parts of the body. This can be adjusted after loosening the hinge/side wall screws.
3. If the trunk lid is knocking or does not close well, you can adjust the shock absorber stop on the right and left at the bottom of the lid:
4. Loosen the mounting screw and slide it up or down and tighten it again. The thrust dampers are installed correctly if they fit without tension when the cover is closed.
5. Check the fit and closing of the trunk lid, if necessary, perform additional adjustment of the trunk lock plate.
Removal the trunk lock
1. Open the lid.
2. Remove the warning triangle.
3. Unscrew the warning triangle bracket.
4. Unscrew the trunk lid trim.
5. Removing the pusher: fold back the locking clamp on the control rod towards the locking wedge and remove the rod.
6. Disconnect the central locking connector.
7. Disconnect the central locking air hose.
8. Unscrew the two nuts and remove the push button with the lock drum from inside.
9. Removing the locking wedge: remove the control rod (fold the locking clamp to the side).
10. Unscrew the two hex nuts on the lock wedge, remove the lock wedge downwards.