
Table of contents: Door Seal Maintenance ↓ Door dismantling ↓ Correct door adjustment ↓ Door fitting ↓
The doors are screwed to the hinges as a whole with three TORX bolts (arrows).
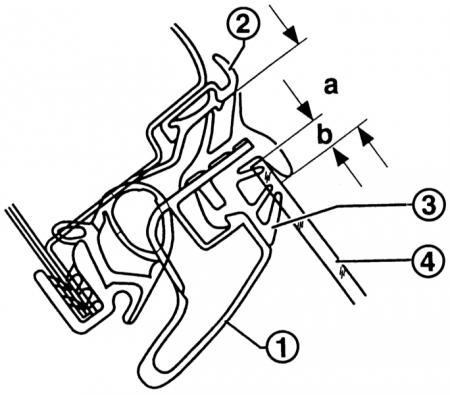
Installation control dimensions of the "door mounting unit support" (1). The outer seal (3) must fit along its entire length to the front door pillar and to the decorative strip (2) of the roof. The distance between the decorative strip of the roof and the lower edge of the seal (3) must be a = 18.3 mm. The door glass (4) must be immersed in the seal by b = 5 mm.
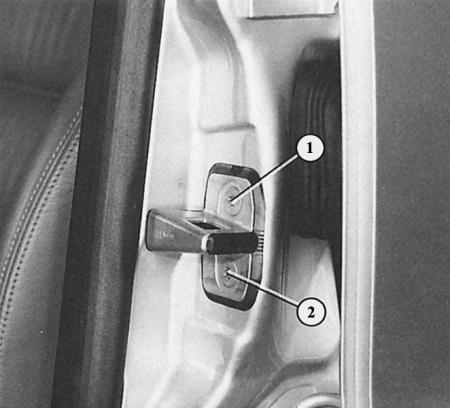
By loosening the TORX bolts (1 and 2), the lock plate can be moved for lateral adjustment at the rear of the door.
Audi traditionally uses two-piece doors. The inner part of the door, the "door mounting support," is attached to the outer part of the door, the "door base," with four bolts. This allows the outer part to be replaced in the event of minor damage, without the hassle of dismantling the window lift and release mechanisms.
Door Seal Maintenance
External seals, which are in the same plane as the doors, require special care in the Audi A4, since cracks in them cause not only leaks, but also increased noise generation during movement. The best means of caring for seals is deer fat. It has a pleasant side effect: in winter, it prevents the seal from freezing to the body, which eliminates the burdensome warming up of it with a hair dryer.
Door dismantling
1. To disconnect the plug connectors of the speakers in the door, the electric drive for adjusting the mirror or the windows, you need to remove its trim as described in this chapter. The same applies to the wires and hoses of the central lock.
2. Remove the bellows between the door and the door post from the clamps and pull the disconnected wires out of the door.
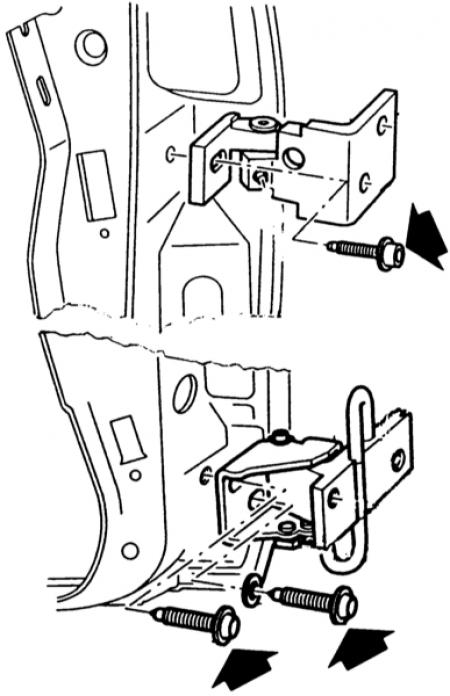
3. Unscrew one TORX bolt in the upper hinge, two such bolts in the lower hinge, remove the door. The hinges remain on the body.
4. After installation, adjust the door (next section).
Tip: The door can be removed together with all the hinges. In this case, you need to remove the trim of the front door pillar and disconnect the plug connector located underneath it. This is the only way to get to the bolt of the lower hinge screwed in from the inside.
Correct door adjustment
1. When adjusting the doors, the Audi A4 must be horizontal on the ground with all four wheels. When the car is raised, the body may bend slightly, so the door alignment will not be correct.
2. Adjustment is carried out according to the following criteria:
3. The dimensions of the gaps at the front and rear edges of the door should be as follows: wing at the front door 4 mm, front door at the rear door 5 mm, rear door to the side piece 3.5 mm. Install the doors correctly.
4. The contour of the body must be maintained: the longitudinal bearing is to ensure that the metal edges of the doors do not stand out on the contour of the body as a step or that the door is not installed too high or too deep.
5. Wind noise should be avoided. This can be achieved by adjusting the door correctly: to do this, first of all, the window frame with its gasket should fit tightly against the door opening. This is achieved by adjusting the "support of the door mounting units".
Door fitting
This describes the adjustment of the front doors. Of course, this also applies to the rear doors.
Sequence: start with adjusting the rear door if both doors are removed. If the rear door has not been removed and is still correctly adjusted, then you can start with the front door.
1. Longitudinal adjustment to set the door gap: slightly loosen the door/door hinge screws so that the door can still be slid.
2. Close the door and level the gap.
3. Carefully open the door and tighten the hinge screws.
4. Height adjustment (contour): loosen the screws between the hinge and the door as mentioned above. Slide the door up or down.
5. Tighten the screws again.
6. Lateral adjustment, front edge of the door (wind noise): not adjustable – if necessary, make intermediate plates out of metal and insert between the door and the hinge in order to extend the door further outward.
7. Lateral adjustment, rear edge of door (wind noise):
8. Slightly loosen the plate that the door lock fits into.
9. Close the door and press it into the opening according to the outer contour.
10. Open the door, tighten the lock plate.
11. Check in the passenger compartment whether the door fits evenly against its rubber seal.
12. Adjusting the window frame: If the door base is adjusted correctly, now check whether the window frame sits cleanly in the door opening. The outer door seal should not protrude above the roof strip.
13. If adjustment is required, remove the door trim and loosen the four "door mounting support" mounting screws.
14. Close the door.
15. Have your assistant press the frame from the outside into the doorway – it is better to press it a little further, as the rubber door seal exerts counter pressure.
16. In order for the seals to fit tightly, you must simultaneously press the frame up and forward.
17. If the adjustment is correct, you can tighten both upper bolts and the rear lower bolt from the inside. Tightening torque: 30 Nm.
18. Please note additionally: the installation wedge at the bottom bolt must always be placed in front. Before tightening the bolt, it must be moved upwards so that it is slightly jammed.
19. There is an additional option for adjusting the rear edge of the door with a setting wedge: due to the deeper latch of the wedge, the lower edge of the door goes inward, and the upper one goes outward. Pulling the wedge more strongly causes the opposite reaction.
(The original article is available on the website «AUDIMANUAL»)