
Table of contents: Removal the door trim ↓ Removal the door panel ↓ Removal the door lock ↓ Removal the outside door handle ↓ Removal the locking cylinder ↓ Removal window lifters ↓ Removal the door glass ↓
Removal the door trim
We will describe the removal of the front door trim. Removing the rear door trim is done in exactly the same way.
Removing the window lift handle: insert a screwdriver under the decorative trim near the handle axis and press the fastening tab. Remove the trim in the direction of the axis. Unscrew the Phillips-head bolts located underneath.
Driver's door with switches in trim: remove switches (removing the switch: Insert a flat-head screwdriver or a blunt knife between the rear edge of the switch and the armrest to release the spring clips from their grooves. Pull the switch block upwards and disconnect the plug).
Front doors without switches with mechanical adjustment of external mirrors: remove both wheels. If necessary, help yourself with a screwdriver.
Insert a Phillips-head screwdriver into the hole in the inner door handle from below to release the latches on the front door handle strip.
Now pull out the insert.
Now unscrew both Phillips-head screws visible in the door handle.
Pull the small bar in front of the door opening handle forward. (On the right side of the vehicle, remove the window switch if necessary.)
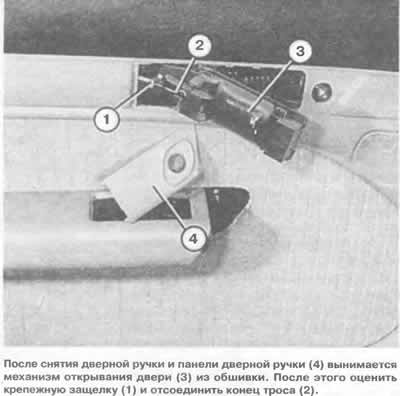
Pull the door opening mechanism cup forward and remove it from the clips.
On the back of the door opening mechanism, remove the bracket and disconnect the cable.
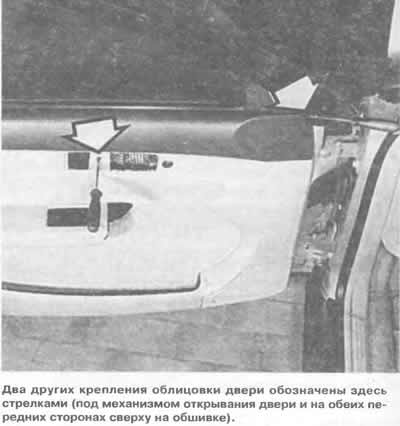
Remove one Phillips head screw at the back and front of the outside of the door trim.
Remove the rubber seals from the front and back of the window frame trim.
The door locking button from the inside remains installed.
Now lightly tap the edge of your palm on the door armrest trim from below to lift it up and thereby detach the latches on the back of the trim from the door frame.
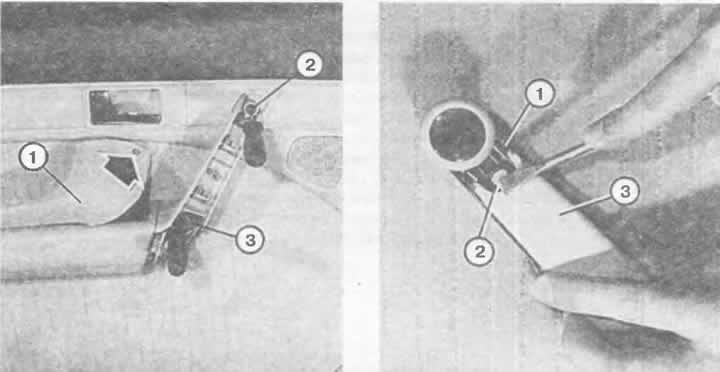
Left: The door handle strip (1) can be moved through the hole (arrow). To remove the door handle, loosen both Phillips head screws (2 and 3).
Right: The panel (3) of the window lift handle (1) can be removed after pressing the fastening tab (2).
Remove the trim.
Before installation, insert rubber crackers into the mounting holes on the door frame.
The crackers should be lubricated with Vaseline or silicone paste.
Check the lubricating parts for damage, then secure them in the mount
Make sure that the door lock button fits correctly into the hole in the trim.
If a new door or new trim is being installed, the trim installation position can be adjusted by turning the adjusting screw at the top of the inside of the door in or out. The correct position is: the screw head should be 21 mm below the opposite window seal.
Removal the door panel
After receiving minor damage to the outer door panel, it may be necessary to separate the outer door panel from the frame for built-in door elements. In this case, it is recommended to paint the new outer door panel before installation.
Remove the door trim.
Remove the door and place the outer side on a soft pad (foam rubber, warm blankets).
Unhook the door opening mechanism cable drive from the mounting latches inward toward the lock.
Unscrew the 4 mounting screws on the end sides of the door (see illustration).
Remove the outer door panel upwards.
Removal the door lock
Remove the door trim.
Separate the door components.
Disconnect the cables and rods from the door locking mechanism.
If the locking system is centrally controlled, remove the hose from the adjusting element.
Remove the two screws on the bottom of the door.
Remove the lock from the inside.
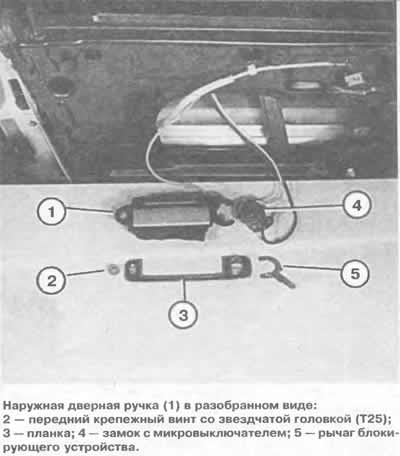
Removal the outside door handle
Front door: remove the inner door trim.
Turn aside the spring latches of both door drive levers, disconnect the drive levers from the door lock.
Remove the T25 wide star head screw through the hole in the inside of the door at the front of the door handle.
At the height of the locking cylinder, feel through the door frame for the small latch and turn it 65° towards the rear edge of the door.
Now you can remove the door handle inward.
Pull out the locking cylinder and the outer plate, turning the plate slightly.
If necessary, disconnect the wire.
Assembly: You should have a good idea of the position of the components in relation to each other. This is important in cars with a heated door lock and/or anti-theft system, because then you will also need to correctly install the heating and the microswitch in the door handle.
The lever is inserted together with the door handle pulled back and is fixed by turning it forward.
Rear door handle: removal and installation are similar to the front door handles, but they are secured with two star-head screws - without a locking lever.
Removal the locking cylinder
Remove the outside door handle.
Insert the key into the lock cylinder so that when the cylinder is removed, the locking plates and springs do not fall out at the same time.
Remove the retaining ring at the rear end of the locking cylinder.
Remove the grip and the elastic element, noting their position for reinstallation.
Remove the lock cylinder from the bar in a forward direction.
Apply an isolating and rust removing spray to the new lock cylinder.
Removal window lifters
Remove the door trim.
Detach the integrated door element box (see "Removing the panel" section). The outer door panel remains connected to the vehicle.
Lower the door glass halfway.
Place the frame for built-in door elements on a soft surface.
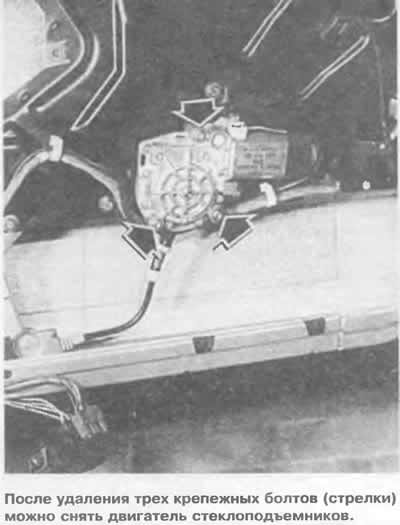
Remove 6 window regulator screws.
Turn the box over, while holding the glass and window regulator securely.
Press the retaining ring of the window regulator and glass. Remove the lining washers.
Raise the glass slightly, release the window regulator from the spring clips, pull it down and remove it.
The window lift and drive mechanism are a single unit and can only be removed or replaced as a set.
The situation is different with electric windows. All can be replaced separately.
Removal the door glass
Remove the window lift mechanism.
Remove the plugs from the glass guide.
Pull the glass out of the guide in a downward direction.
After installing the glass from below, insert the plug into the guide.
Reinstall the window regulator.
In this case, place the glass groove in the middle on the window lifter grip pin.
This position is necessary if the door glass along the upper edge does not evenly recess into the rubber seal of the window frame.
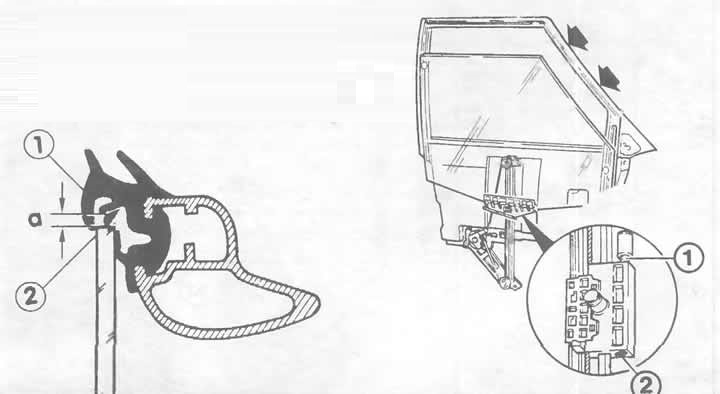
Left: Correct installation of the door glass: when the door is closed, the door glass (2) should be recessed into the edge of the door seal (1) by approximately a = 5 mm.
Right: This is where the window lift is adjusted: the upper door stop (1) is adjusted from below by the screw head (2) using an external star-head key E6. In addition to this instruction, it is important to note that the window glass must be well recessed into the rubber seal in the area of the door indicated by the arrows.
Note: After all work on removing and installing the components of the door hinge, the door should be adjusted (see above in this chapter).
[The article was copied from the website «AUDImanual»]