
Removal
Open the lid.
Fold back the luggage compartment trim.
Disconnect the plug connection of the wires and pull out the wires.
If the vehicle is equipped with a central locking system, the hose to the lid lock actuator must be disconnected.
On the right and left, fold back and remove the locking brackets on the air springs. After this, you can press the air springs away from the ball heads.
Supporting the lid with two people, unscrew the two bolts in the hinges on the right and left.
Remove the lid from the hinges.
Additionally, you can detach the hinges from the body.
Adjusting the trunk lid. Sedan
It is necessary to achieve the same gap between the right and left body parts and the trunk lid (about 4-5 mm). Also, near the rear window, the distance to the cover should be the same on the right and left.
Adjustment must be made after loosening the mounting bolts of the hinges on the trunk lid.
In addition, the lid must match the height of the wings. This can be achieved by loosening the hinge mounting bolts on the side wall.
If the trunk lid is knocking or does not close properly, you can adjust the stop buffer on the right and left at the top of the side. The stop buffer is installed correctly if it fits against the closed lid without tension.
Check the fit and closing of the trunk lid, adjust the trunk lock lock plate if necessary.
The lower edge of the trunk lid should be approximately 6.5...7 mm away from the bumper. This can be achieved by sliding the locking plate in its longitudinal holes.
Removal the trunk lock. Sedan
Open the trunk lid.
Remove the inner trim of the trunk lid.
Removing the button: Move the locking bracket on the drive rod to the side and remove the rod.
Disconnect the plug connections for the microswitch of the central locking system.
Unscrew the two nuts and remove the push button with the lock cylinders in an inward direction.
Removing the lock part: disconnect the drive rods from the push button (move the locking bracket aside), disconnect the plug connection.
Unscrew the two hex nuts from the bottom of the lock. Remove the lock downwards.
When installing the locking element, adjust the length of the drive rods to the push button.
Move the sliding button in the middle of the connecting rod back so that the halves of the rod are freely inserted into each other.
With the trunk lid open, set the lock latch to the "closed" position.
In this position, fix the threaded sections of the halves of the rod into each other and lock them with a sliding button.
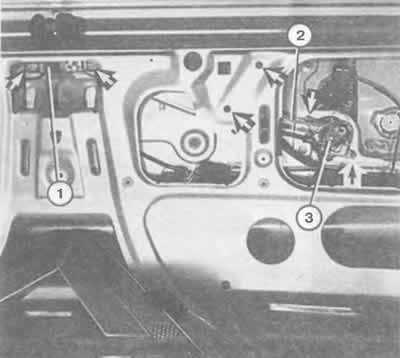
Lock and lock drive in the trunk lid of a sedan:
1 - castle;
2 - connecting rod to the central control locking system;
3 - push button.
The arrows show the attachment points of the centrally controlled lock parts and the push button.