



Table of contents: Trunk lid Sedan ↓ Adjusting the stops ↓ Adjusting the trunk lid ↓ Trunk hinge spring ↓ Spring attachment points ↓ Removal the trunk hinge cable channel ↓ Removal and installation the trunk… ↓ Removal and installation the seal ↓ Trunk adjustment ↓
Trunk lid Sedan
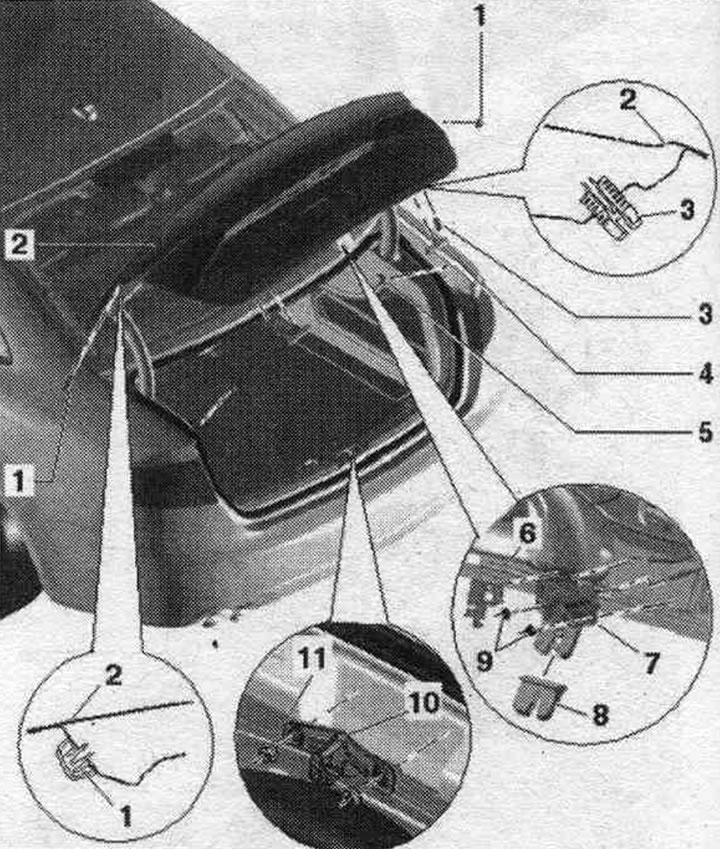
1. Stop: from the trunk side.
2. Trunk lid: removal: remove the trunk lid trim, disconnect and remove the el. wires from the lid, from the trunk side, loosen the rear nut on the hinge, unscrew both side nuts, remove the trunk lid; installation: in reverse order.; adjustment: Adjust the front height and length of the trunk using the hinge, adjust the height above the trunk lock, align the trunk lid to the side or in accordance with the gaps, adjust the buffers. Before removing on a car with a non-removable rear. beforehand, you should disconnect the cable in the casing for emergency opening of the lid lock and remove it from the lid.
3. Adjustable stop.
4. Stop: from the trunk side.
5. Stop: from the body side.
6. Cover: installed on the trunk lock.
7. Trunk lock: to remove, unscrew the bolts with the non-falling washer and remove the cable traction.
8. Lid lock trim: remove before removing the trunk trim: when installed, the trim must be securely fixed in the trunk lock.
9. Nut: 21 Nm.
10. Locking bracket: adjustment: tighten the bolts with a non-falling washer by hand (the locking bracket must be pulled upwards), carefully close the trunk lid so that it is flush with the sides at the back, carefully open the lid and tighten the screws.
11. Nut: 21 Nm.
Adjusting the stops
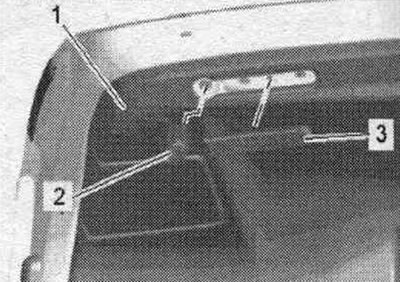
Close the trunk lid. When the trunk lid is correctly installed and closed, the adjusting stops "2" should lightly touch the body. If necessary, the adjusting stops are turned out and screwed in in accordance with the basic position of the trunk. The stops "3" must be installed with a click, the trunk lining "1" must be installed. Check the gaps.
Adjusting the trunk lid
Gap sizes
Clearances can be checked using template "3371".
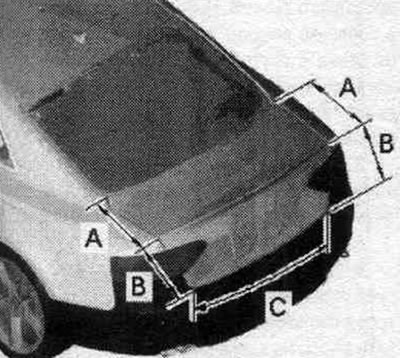
In zone "A" = 3.5 + 0.5 mm.
In area "B" = 3.7±0.5 mm.
In the area "C" = 5.0 + 0.5 mm.
Height adjustment
You can adjust the height of the trunk lid by loosening the nut and sliding the lid in the direction of the arrow.
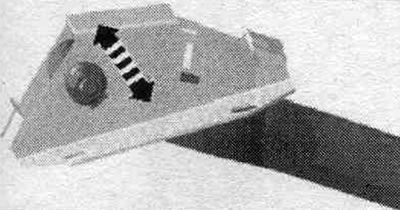
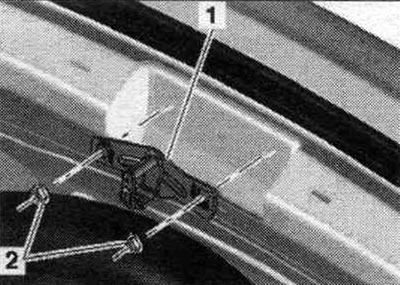
With the hinge installed, the rear shelf must be removed. With the rear installed. remove the springs from the hinge on the shelf. Unscrew the hinge towards the rear. shelf, loosen the nut on the hinge and move the lid accordingly. After per. tighten the nut on the hinge to a torque of 20 Nm. Install the hinge, as well as the spring and, if necessary, the gas strut. You can adjust the rear cover height by sliding lock bracket "1." Loosen nut "2," slide the lock bracket accordingly, and tighten the nuts to the specified torque. puffs.
Removing and installing the trunk hinge
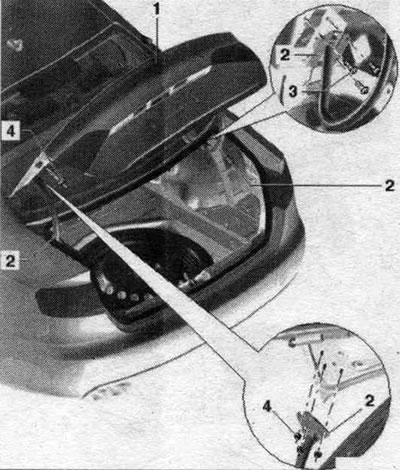
1. Lid.
2. Trunk hinge: removal: from the trunk side, loosen the rear nut, unscrew both side nuts, unscrew the bolts under the rear. shelf and remove the hinge; installation: Insert the hinge under the rear shelf and secure with nuts, place the trunk lid on the hinge and secure with nuts, connect the spring and gas strut, carefully close the trunk lid, align the trunk lid from the side and longitudinally.
3. Bolt: 21 Nm.
4. Nut: 21 Nm.
Trunk hinge spring
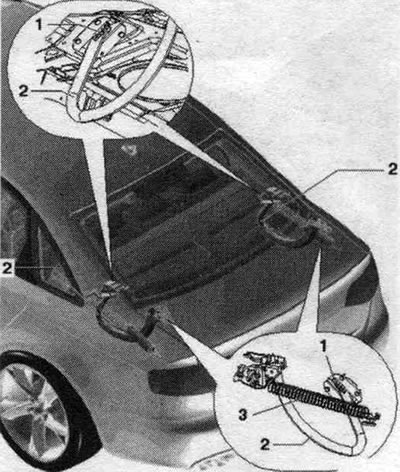
1. Damping element: not a spare part.
2. Trunk hinge.
3. Spring: take into account the attachment points.
Spring attachment points
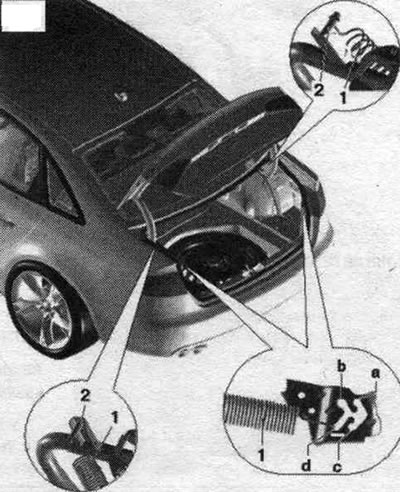
1. Spring: installation: install the spring with the trunk lid open, first from the hinge side, and then from the body side, on the left side of the car the spring eye on the mounting bolt should be facing down, as in the figure, on the right side of the car - up; attachment points on the body: on the right side, attach the spring at point "a", on the left side, after installation, attach the trunk end stop and the spring at point "d".
2. Mounting bolts: take into account the different installation directions of the spring on the left and right; the spring eye on the left side faces down, on the right side - up.
Removal the trunk hinge cable channel
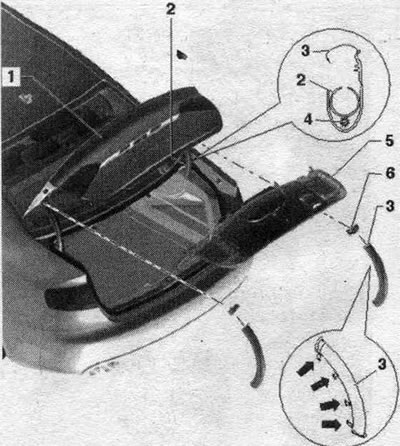
1. Lid.
2. Trunk hinge.
3. Cable channel: release the "arrow" fasteners and remove the cable channel from the trunk hinge.
4. Electric cable.
5. Trunk lining.
6. Spacer: Only after removal can the trunk trim be removed; remove from the lid.
Removal the spring lining
Disconnect the spring cover from the side and remove the mounting bolt downwards.
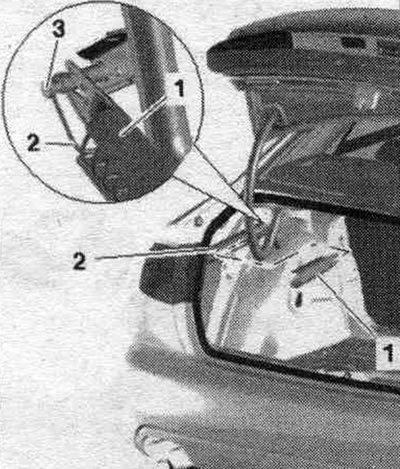
Removal the gas-filled shock absorber
Use a small screwdriver to lift the "arrow" mounting springs on the gas-filled shock absorber "1" and remove them from the ball-head bolt "2".
Trunk hinge end stop
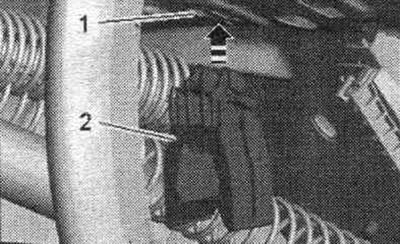
To remove, slide the latch on the clamp to the side. Fix the end stop "2" under the rear shelf "1" in the direction of the arrow. The latch on the clamp should snap into place.
Removal and installation the trunk lid lock
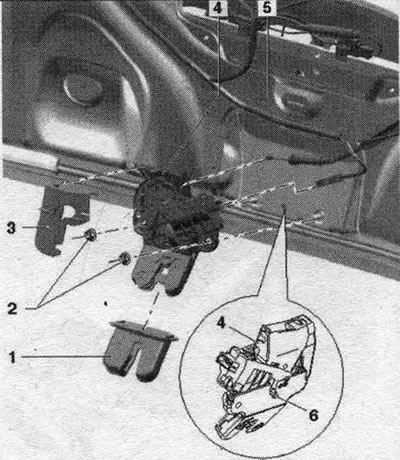
1. Trim: Before removing the trunk trim, remove it from the lock.
2. Nut: 21 Nm.
3. Lid lock cover: When installed, the cover should lock into the lid lock with an audible click.
4. Trunk lock: Before removing, remove the lid lock cover; the trunk lid trim is removed, disconnect the plug connector, if necessary, disconnect the emergency opening cable rod, unscrew the nuts and remove the lid lock, remove the trunk lock with a clamp from the central hole.
5. Central hole.
6. Centering clamp: To install the trunk lock, press it into the center hole with the clamp.
Emergency opening of the lid lock
The emergency opening device is installed only on vehicles with a non-removable rear. wall.
Cover side gasket
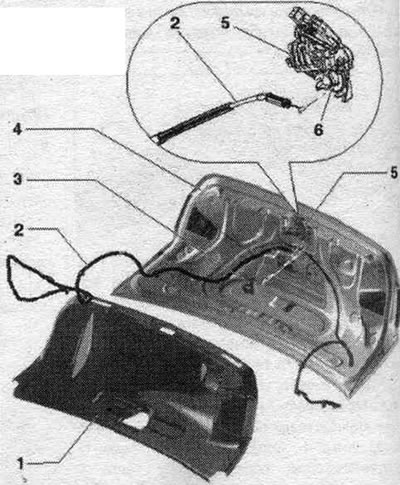
1. Trunk lining.
2. Cable in the sheath: before removing, unlock the lid lock cover, first remove it from the support in the trunk lock, then disconnect it from the drive lever. When installing a new cable in a sheath, it should be routed starting from the lock on the inside of the lid along the lid hinge into the passenger compartment. The cable clamps in the sheath are pre-positioned and are inserted into the corresponding holes.
3. Overlay: unlock.
4. Lid: When removing the trunk, release the cable in the sheath and remove it from the hinge.
5. Trunk lock.
6. Emergency opening drive lever: When installing, first connect the sheathed cable to the drive lever, then press it into the stop on the lid lock.
Laying from the body side
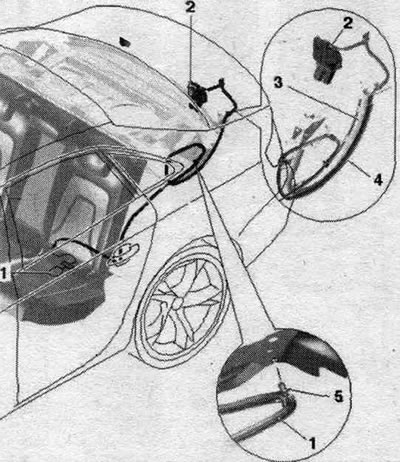
1. Cable in a sheath: lay it starting from the lid lock along the lid hinge into the passenger compartment, as shown in the figure
2. Trunk lock.
3. Trunk hinge.
4. Cover: install on the lid hinge and secure from the back side using the tabs; the sheathed cable must be correctly routed in the cladding.
5. Clamp: The pins are pre-positioned and should be inserted into the corresponding holes.
Removal and installation the seal
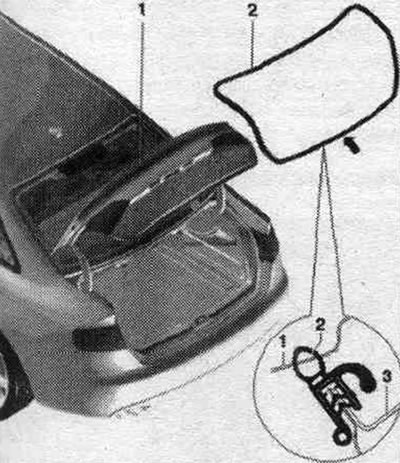
1. Trunk lid.
2. Cover seal: to remove, remove the seal from the body flange; when installing a vulcanized rubber seal, align it with the "arrow" joint of the seal in the center of the vehicle; install the seal on the body flange by pressing on it along the perimeter, starting from the joint gap.
3. Body flanging.
Trunk adjustment
Gap sizes
Adjust the cover according to the gap sizes.
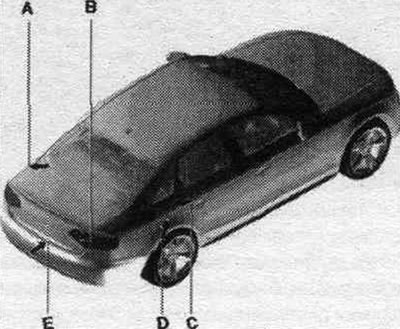
Size "A" = 4.0 + 0.5 mm.
Size "B" = 4.5 + 0.5 mm.
Size "C" = front and back 2.2 mm.
Size "D" = top and bottom 2 mm.
Dimension "E" = 5±0.5 mm.
(The original material is located on the website «AudiManual.ru»)