
Table of contents: Removal ↓ Removal the lock cylinder ↓ Removal the rear door handle drive.… ↓ Removal the rear door locks. Station… ↓
Removal
Preliminary work: open the back door and prop it up.
On both sides at the top, unfasten the corrugated tubes for the wires at the rear door.
Remove the upper trim of the rear door from below.
Remove the trim on the sides of the rear door (left and right next to the glass) towards the middle of the car.
Unscrew the screws on the sides of the armrest, in the bucket platform of the handle and in the lower trim.
Remove the lower trim of the rear door downwards.
Disconnect or remove the electrical plug connections, the central locking system hose and the hose to the rear windscreen washer nozzle.
Release the wiring harness and hoses from the fasteners or adhesive tape.
Remove the wiring seal on the rear door.
Remove the wiring harness and hoses from the rear door.
Loosen the hex nuts securing the spoiler to the recess in the corrugated casing on both sides of the rear door.
Remove the spoiler.
Remove the supports from both sides.
Removal: press the air springs away from the upper ball joints (on the door).
Remove the protective caps of the nuts on the right and left.
Loosen the hex nuts on the door hinge.
Remove the gaskets under the nuts upwards.
An assistant should help you lift the rear door up.
Assembly: First check if there are sealing rings on the rear door threaded bolts.
When assembling the rear door, make sure that all trim parts are securely fastened.
The hoses of the central locking system and the rear window washer system must not be pinched.
Removal the lock cylinder
Removing the lock cylinder is identical to that described in the section "Removal the trunk lock" for sedan.
Removal the rear door handle drive. Station wagon
Remove the rear door trim.
Disconnect all connecting rods from the handle drive.
To do this, move aside the locking brackets of the connecting rods to the locks.
Remove two hex bolts and nuts.
Remove the handle drive.
Installation: Insert the handle drive from the luggage compartment in the middle and parallel through the rectangular hole in the lower outer part of the door.
The stopper and groove seal must fit against the bottom outside of the door.
Turn the handle drive until the through holes and the mounting holes in the bottom of the door align.
Tighten the handle drive with a washer and a hex bolt (10 Nm).
Reattach all connecting rods and adjust their length.
Connecting rod to the lock cylinder: set the release lever to the "open" position.
Push back the sliding button in the middle of the connecting rod so that the halves fit freely into each other.
In this position, fix the threaded parts of the halves of the rod into each other and lock them with a sliding button.
Adjust the connecting rods to the rear door locks - see the next section.
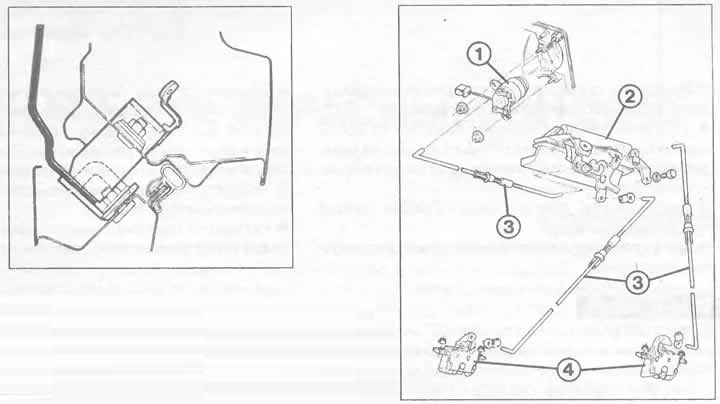
Right: Rear door lock actuator for the station wagon version.
The numbers mean:
1 — lock cylinder;
2 — rear door handle drive;
3 - connecting rods;
4 - lock.
Left: To adjust the rear door from inside the car, a 3mm thick spacer plate must be inserted between the lock and the locking plate (highlighted in red in the picture).
Removal the rear door locks. Station wagon
Remove the rear door interior trim.
Disengage the lock connecting rods by moving the locking brackets to the side.
In each lock, unscrew the two hex nuts inside the door frame.
Remove the lock in an inward direction.
Installation: Lightly tighten the lock nuts, set the mounting holes in the center.
Loosen the locking clamp slightly (part of the lock at the bottom of the body).
Close the back door.
Insert the spacer plate from inside the luggage compartment (3mm thick) between the lock and the locking bracket.
Close the lock into the second locking groove.
Adjust and secure the gaps.
Tighten the hex nuts.
Remove the spacer plate; the adjustment of the rear door lock is complete.
Now all that remains is to set the length (built-in) drive rods.
Push back the sliding button in the middle of both connecting rods so that the halves are freely inserted into each other.
With the rear door open, set the lock latch to the "closed" position (second locking groove).
In this position, fix the threaded parts of the halves of the rod one in the other and lock with a sliding button.
(Content source: the specified website: audimanual.ru)