
Table of contents: Caring for door gaskets ↓ Removal the door ↓ Correct installation of the door ↓ Door alignment ↓
The Audi-100 is distinguished by its doors, which consist of two parts. The inner part of the doors, the frame for hanging the mechanisms, is fixed to the outer part, the main element of the door, with four bolts. Thanks to this, in case of minor damage in an accident, the outer part can be replaced without wasting time on rearranging the window lift and release mechanisms.
Caring for door gaskets
The outer door seals in the Audi 100 require special care, as cracked seals are not only not airtight, but also cause loud noises from the air pressure during the trip. The best product for caring for the seals is deer fat. It has another useful effect: in winter, it prevents the seals from freezing to the body.
Removal the door
On models with speakers installed in the doors, electric adjustment or electric windows, the door trim must be removed to disconnect the cable plug connections. How to do this is described below. The same must be done with the wires and hoses of the central locking system.
Unscrew two hex bolts from the upper and lower hinges, remove the door. The hinges remain on the body.
After installation, align the new door (see next section).
Correct installation of the door
To install and adjust the door, the car must be horizontal on the ground with all four wheels. If the car is raised, the body may be slightly skewed, which will ultimately cause the door to be skewed.
Adjustment: The gap width of the front and rear edges of the doors should match. Otherwise, move the doors.
Gap width:
- wing/front door: 4-5mm;
- front door/Back door: 4.5-5.5mm;
- rear door/rear side: 3.5-4.5mm.
The contour of the body must be consistent: check along the entire perimeter whether the center line at the height of the door handles runs evenly, without steps, and whether the door is installed too low or too high. Further: along the front and rear edges of the door, they must contact the adjacent metal parts, i.e. they must not be displaced inward or outward after installation.
Take care of sound insulation. This can be achieved by installing the doors correctly. For this, the "carrier of the door parts" - i.e. the upper part of the door, the window frame - must be precisely located in the door recess. The window glass sits 5.5-7.5 mm deeper than the black decorative strip of the roof edge.
Door alignment
Horizontal adjustment for setting the door gap: unscrew the rear bolt at the hinge-to-body connection, then slightly unscrew the threaded sleeve located behind it.
Loosen the front bolt slightly where the hinge and body meet, so that the door can be moved.
Close the door and adjust the door gap.
Carefully open the door and tighten the front hinge bolts.
Vertical adjustment (contour): loosen the bolts between the hinge and the body (as has already been done), move the door up or down.
Tighten the bolts again.
Side adjustment, front edge of door (soundproofing): Loosen the bolts between the hinge and the door frame.
Close the door and slide it into the door opening until it is fully seated.
Open the door, tighten the bolts.
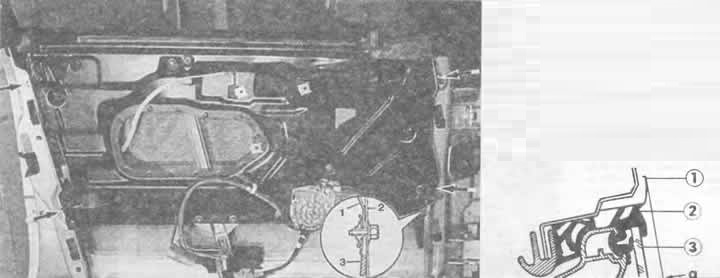
Left: The arrows indicate the hexagonal bolts that are loosened to separate the two door parts. The enlarged image in the white circle shows the position of the adjustment wedge (3), which is moved more or less to adjust between the door part carrier (1) and the main door body (2).
Below: Installing the top edge of the door frame. The outer seal (2) should fit tightly around the roof column and the decorative strip. The distance between the decorative roof strip (1) and the door glass (3) should be 5.5-7.5 mm.
Lateral adjustment, rear edge of door (soundproofing): slightly loosen the locking bolt that the door lock goes into.
Close the door and slide it until it fits completely in the door niche.
Open the door, tighten the lock bolt.
Check from inside the vehicle to ensure that the door fits evenly against the rubber seals.
Installing the window frame: When the main door element is adjusted correctly, you should check the position of the window frame in the door cutout. In this case, the outer door sealing gasket should not protrude beyond the roof rail. It should be perfectly positioned along the contour of the door cutout
If adjustment is necessary, remove the door trim and loosen the four window frame mounting bolts.
Close the door.
Ask an assistant to press the frame into the door cutout - it is better to press a little harder - the rubber acts as a shock absorber. Check again: the glass is located 5.5-7.5 mm deeper than the black strip along the edge of the roof.
Additionally, please note: under the front lower fastening of the door component carrier there is an adjusting wedge, which should always be there. By changing the position of this wedge, you can adjust the tilt of the door in relation to the adjacent body parts in the area of the rear door pillar:
If the door protrudes too far outward at the bottom back, insert the adjusting wedge deeper. Result: the door deviates outward at the top edge and inward at the bottom edge.
If the installation is correct, tighten the bolts from the inside (top first). Tightening torque: 20 Nm.