
Removing moldings
Molding on the front fender: remove the wheel housing trim (three screw connections).
Loosen the hex nut on the inside of the wing.
Slide the molding back and remove from the fender.
Molding on the back side (rear fender): when removed, the molding deteriorates (retaining lug breaks).
To remove the molding with the rear door open, push it strongly from the front of the mounting.
When installing, insert the molding into the mounting clip.
If you want to install the old molding, it must be additionally glued (e.g. with silicate sealant).
Moldings on the doors: Loosen the fastening of the molding along the lower edge of the door.
Pull the molding out of the latches on the door downwards and remove.
Bottom protective pad
On the lower edge of the doors, as well as on the adjacent metal parts on the corresponding version of the car, there is a thin protective strip. Below is the release plan.
Front wing lower trim: unscrew the 3 screw connections of the wheel housing trim at the rear edge and press it a little to the side.
Loosen the hex nut on the inside of the fender.
Disconnect the front trim and lift slightly, then pull forward and remove from the wing.
When installing the lining, connect to the front side of the wing.
Door linings: press the protective cover on the front of the lining and remove the lining towards the rear with the door open from the spring clip.
Rear wheel arch outer trim: remove/detach cover for rear wheel arch outer trim.
Remove the trim forward from the retaining spring clip.
When installing, insert the lining strip under the trim. Install wheel arch protection.
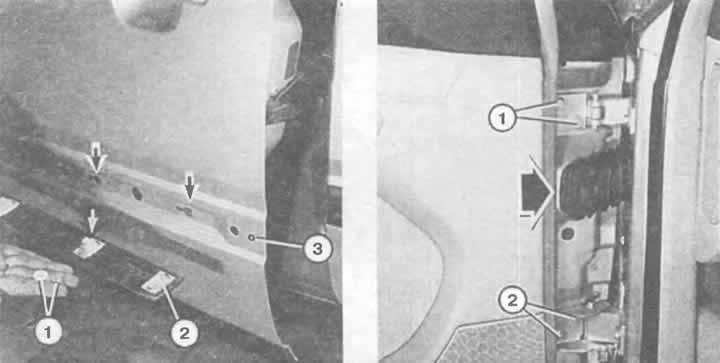
Left: trim strips on doors suspended on plastic holders (arrows) in the slots of the door. The rear end of the bar holder is bolted to the body with a nut and bolt (2) through the hole in the door.
Right: Removing the door. First remove all electrical wires from the door, rubber folded boot (arrow) remove and unscrew the four hex bolts (1 and 2).
Visitor comments