Repair Chevrolet Repair Toyota Repair Honda Repair AvtoVAZ Repair Mercedes-Benz Repair BMW Repair Opel
Home  |  Contacts  |  Sitemap  |    
English Русский
Български
Беларускі
Український
Српски
Hrvatski
Română
Polski
Slovenský
Magyar
AudiManual.ru


  • AUDI 80
  • AUDI 100
  • AUDI A3
  • AUDI A4
  • AUDI A6
  • AUDI A8
  • AUDI Q
  • OTHER
  • ARTICLES
A2 (1999-2005)

Replacing the upper moldings (Audi A2)

  • Home
  • Audi
  • A2 (1999-2005)
  • Body
  • Doors, locks and windows
  • Replacing the upper moldings
            0
Instructions. Protective moldings cannot be removed without damage. To facilitate removal, heat the moldings with a heat gun. The temperature of the surfaces to be glued should not be lower than the room temperature; if necessary, heat the surfaces with a heat gun.


1. Front molding. There should be no glue, dust or oil residue on the surface to be glued. First,…

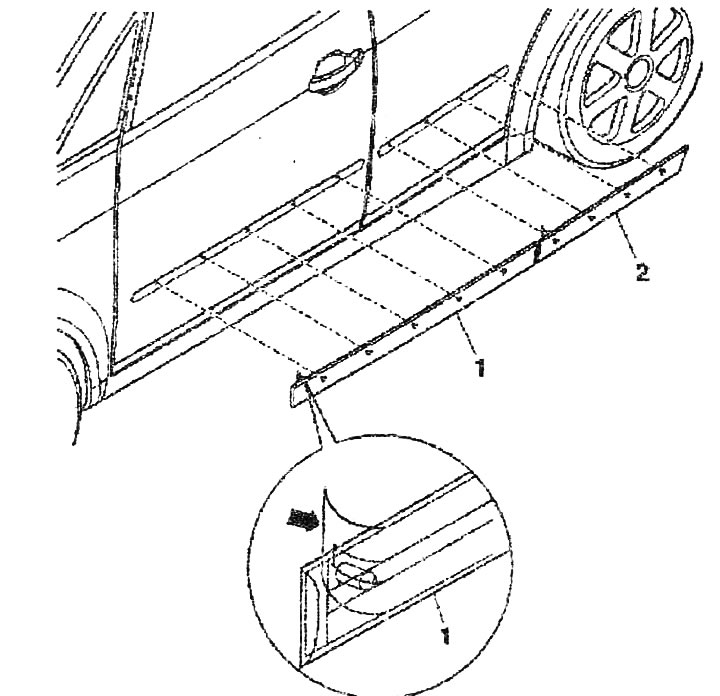
1. Front molding. There should be no glue, dust or oil residue on the surface to be glued. First, treat the outer metal body paneling with cleaning gasoline. Treat the surface to be glued with silicone remover and wipe the surface dry. Remove the protective film "arrow". Install the molding together with the guide pins on the door, as shown in the figure. Press the molding firmly over the entire surface
2. Rear molding. Installation is identical to the front molding.
The article was checked by auto expert Daniil Ushakov
This article is available at russian, bulgarian, belarusian, ukrainian, serbian, croatian, romanian, polish, slovak, hungarian

Share information:
Previous articles
Audi A2: Doors, locks and windows
Next articles

Removal and installation side glass
Removal and installation the rear side glass
Removal the front side glass
Removal and installation the front side glass
Replacing lower moldings
Removal and installation the threshold trim
Removal and installation the B-pillar trim
Removal and installation the threshold trim


Similar articles on other Audi car models:
Rear Brake Shoes — Checking and Replacing Audi 80 B3 (1986-1991, petrol)
Front Brake Disc Pads — Checking and Replacing Audi 100 C3 (1982-1990, diesel)
Checking the condition and replacing engine compartment hoses,… Audi A3 Type 8L (1996-2003)
Replacing the exhaust system Audi A4 B5 (1994-2001, petrol)
Replacing the battery in the remote control key Audi A6 C5 (1997-2004)
Replacing spark plugs Audi A8 D2 (1994-2002)
Removal and installation timing chain covers, replacing the seal… Audi Q7 Typ 4L (2005-2015, diesel)
Link to this page in different formats


Visitor comments

No comments yet


How much will 13 + 28 =


Audi A2(1999-2005) 
  • General information
  • Introduction to the guide
  • Maintenance
  • Engine 1.4 l (gasoline)
  • Engine repair
  • Lubrication system
  • Cooling system
  • Exhaust system
  • Engine 1.6 l (gasoline)
  • Engine repair
  • Lubrication system
  • Cooling system
  • Exhaust system
  • Engine 1.2 l (diesel)
  • Engine repair
  • Lubrication system
  • Cooling system
  • Injection and turbocharging
  • Engine 1.4 l (diesel)
  • Engine repair
  • Lubrication system
  • Cooling system
  • Turbocharging system
  • Supply system
  • Fuel injection system
  • Exhaust system
  • Transmission
  • Mechanical gearbox 02J
  • Mechanical gearbox 02T
  • Mechanical gearbox 085 DS
  • Chassis
  • Car suspension
  • Steering
  • Brake system
  • Body
  • Exterior
  • Interior
  • Seats
  • Doors, locks and windows
  • Safety system
  • Heating and air conditioning
  • Electrical equipment
  • Power devices
  • Equipment and devices
  • Wipers and washers
  • Lighting and lamps
  • Breakers and switches
  • Electrical circuits
 
AudiManual.ru © 2017-2026 · Mobile version · Feedback · Sitemap: EN BG BY UA RS HR RO PL SK HU · Site search · News and articles
80 B2 · 80 B3 petrol · 80 B3 · 80 B4 · 100 C3 diesel · 100 C3 petrol · 100 C3 · 100 C4 petrol · 100 C4 · A3 Type 8L · A4 B5 petrol · A4 B5 · A4 B6 petrol · A4 B6 · A4 B7 · A4 B8 · A6 C4 · A6 C5 · A6 C5 Allroad · A8 D2 · Q5 Type 8R · Q7 Typ 4L · Audi A2 ·
This site uses cookies 🍪. Click the button to accept this fact.