



Diesel engine repair 1.2 l car Audi A2

Engine number and characteristics
Engine number The engine number ("engine letter designation" and "serial number") is located at the junction of the engine and the gearbox "arrow"....
Engine number The engine number ("engine letter designation" and "serial number") is located at the junction of the engine and the gearbox "arrow"....

Removal and installation the engine
Removal Instructions. The engine is removed together with the gearbox in the forward direction. When installing, install all the binders removed or cut off...
Removal Instructions. The engine is removed together with the gearbox in the forward direction. When installing, install all the binders removed or cut off...

Removal and installation engine mounts
Removal Remove the engine hood. Remove the engine cover "arrows". Remove the noise insulation screen located below, for this: disconnect the crankcase...
Removal Remove the engine hood. Remove the engine cover "arrows". Remove the noise insulation screen located below, for this: disconnect the crankcase...

Removal and installation the engine mount
Removal Remove the noise insulation screen "arrows". Unscrew bolts "B" and "C" and remove the engine support. Installation Installation is in reverse order,...
Removal Remove the noise insulation screen "arrows". Unscrew bolts "B" and "C" and remove the engine support. Installation Installation is in reverse order,...

Removal and installation a poly V-belt
Removal Remove the noise insulation screen. Instructions, Mark the direction of rotation of the poly V-belt with chalk or a felt-tip pen. Changing the...
Removal Remove the noise insulation screen. Instructions, Mark the direction of rotation of the poly V-belt with chalk or a felt-tip pen. Changing the...

Removal and installation the torsional vibration damper
Removal Remove the poly V-belt. Unscrew the damper, holding the central bolt with a spanner. Installation Installation is carried out in reverse order, taking...
Removal Remove the poly V-belt. Unscrew the damper, holding the central bolt with a spanner. Installation Installation is carried out in reverse order, taking...
Removal and installation the generator bracket
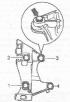
Removal Remove the generator. Unscrew bolts "1...4" and remove the generator bracket. Installation Make sure there is a centering sleeve "arrow" for the...
Removal Remove the generator. Unscrew bolts "1...4" and remove the generator bracket. Installation Make sure there is a centering sleeve "arrow" for the...

Belt Drive Camshaft — Design Description
Belt drive camshaft: 1. Upper timing belt cover 2. Toothed belt. Before removing, mark the direction of travel with chalk or a felt-tip pen. Changing the...
Belt drive camshaft: 1. Upper timing belt cover 2. Toothed belt. Before removing, mark the direction of travel with chalk or a felt-tip pen. Changing the...

Removal and installation the timing belt
Removal Remove the right front wheel. Remove the noise insulation screen. Instructions: Mark the direction of rotation of the poly V-belt with chalk or a...
Removal Remove the right front wheel. Remove the noise insulation screen. Instructions: Mark the direction of rotation of the poly V-belt with chalk or a...

Removal and installation sealing flanges and flywheel
Removal and installation sealing flanges and flywheel: 1. Cuff. Replacement, do not lubricate with oil 2. Front sealing flange, mounted on centering bushings...
Removal and installation sealing flanges and flywheel: 1. Cuff. Replacement, do not lubricate with oil 2. Front sealing flange, mounted on centering bushings...

Replacing the crankshaft seal on the belt pulley side
The engine is installed. Remove the toothed belt. Hold the crankshaft gear with the support "3415" and remove it. Before installing the puller, screw the...
The engine is installed. Remove the toothed belt. Hold the crankshaft gear with the support "3415" and remove it. Before installing the puller, screw the...

Removal and installation the front sealing flange
Removal The engine is installed. Remove the air duct from the turbocharger. Remove the toothed belt. Hold the crankshaft gear with the support "3415" and...
Removal The engine is installed. Remove the air duct from the turbocharger. Remove the toothed belt. Hold the crankshaft gear with the support "3415" and...

Removal and installation the rear sealing flange
Removal The gearbox is removed. Remove the flywheel. Remove the gasket from the flange and from the centering bushings "arrow". Unscrew bolts "1...8". Remove...
Removal The gearbox is removed. Remove the flywheel. Remove the gasket from the flange and from the centering bushings "arrow". Unscrew bolts "1...8". Remove...

Balance shaft and crankshaft frame — design description
Instructions: Before installation, all mounting and working surfaces must be lubricated. Balance shaft and crankshaft frame: 1. Chain. Observe the installation...
Instructions: Before installation, all mounting and working surfaces must be lubricated. Balance shaft and crankshaft frame: 1. Chain. Observe the installation...

Removal and installation of balance shaft and crankshaft frame
Removal Remove the poly V-belt. Remove the toothed belt. Remove the oil pan. Remove the front sealing flange. Unscrew the "arrow" bolts. Unlock the 5 fasteners...
Removal Remove the poly V-belt. Remove the toothed belt. Remove the oil pan. Remove the front sealing flange. Unscrew the "arrow" bolts. Unlock the 5 fasteners...

Crankshaft — design description
Caution! Do not remove the crankshaft. Even loosening the nuts on the main bearing caps causes deformation of the cylinder block main bearing beds, and such...
Caution! Do not remove the crankshaft. Even loosening the nuts on the main bearing caps causes deformation of the cylinder block main bearing beds, and such...

Removal and installation the crankshaft sprocket
Removal Remove the oil pan. Remove the front seal, flange. Remove the following parts: oil pump sprocket, chain tensioner. Chain. Remove the crankshaft...
Removal Remove the oil pan. Remove the front seal, flange. Remove the following parts: oil pump sprocket, chain tensioner. Chain. Remove the crankshaft...

Removal and installation the cylinder head cover
Removal Remove the engine hood. Remove the engine cover "arrows". Remove the noise insulation screen located below, for this, disconnect the crankcase...
Removal Remove the engine hood. Remove the engine cover "arrows". Remove the noise insulation screen located below, for this, disconnect the crankcase...

Removal and installation of the cylinder head
Removal Observe safety precautions when disconnecting the battery terminals. The battery is located in a special compartment in the trunk. Turn off the...
Removal Observe safety precautions when disconnecting the battery terminals. The battery is located in a special compartment in the trunk. Turn off the...

Removal and installation the intake manifold
Removal Remove the engine hood. Remove the engine cover "arrows". Remove the noise insulation screen located below; to do this, disconnect the crankcase...
Removal Remove the engine hood. Remove the engine cover "arrows". Remove the noise insulation screen located below; to do this, disconnect the crankcase...

Valve mechanism repair
Instructions: After installing the camshaft, the engine must not be started for approximately 30 minutes. The hydraulic tappets must be settled (otherwise the...
Instructions: After installing the camshaft, the engine must not be started for approximately 30 minutes. The hydraulic tappets must be settled (otherwise the...

Bearing cap seals 1 and 4
Apply a thin and even layer of sealant to surface "1"; sealant. Instructions: Make sure that no sealant gets into the grooves "arrows". Bearing cover 4 is...
Apply a thin and even layer of sealant to surface "1"; sealant. Instructions: Make sure that no sealant gets into the grooves "arrows". Bearing cover 4 is...

Replacing the camshaft seal
The cylinder head is installed. Remove the toothed belt. Remove the locking pin "3359". Unscrew the bolts "1" and remove the camshaft gear from the hub. Loosen...
The cylinder head is installed. Remove the toothed belt. Remove the locking pin "3359". Unscrew the bolts "1" and remove the camshaft gear from the hub. Loosen...

Removal and installation the camshaft
Removal The cylinder head is installed. Remove the toothed belt. Remove the locking pin "3359". Unscrew the bolts "1" and remove the camshaft gear from the...
Removal The cylinder head is installed. Remove the toothed belt. Remove the locking pin "3359". Unscrew the bolts "1" and remove the camshaft gear from the...
This section is available on russian, bulgarian, belarusian, ukrainian, serbian, croatian, romanian, polish, slovak, hungarian
Similar sections of other Audi car models:
Power unit: Engine FZ Audi 80 B2 (1979-1986)
Power unit: Engines 5-cylinder Audi 100 C3 (1982-1990)
Power unit: Engine repair Audi A3 Type 8L (1996-2003)
Power unit: Engine repair Audi A4 B5 (1994-2001, petrol)
Power unit: Engine repair Audi A6 C5 (1997-2004)
Power unit: Engine FZ Audi 80 B2 (1979-1986)
Power unit: Engines 5-cylinder Audi 100 C3 (1982-1990)
Power unit: Engine repair Audi A3 Type 8L (1996-2003)
Power unit: Engine repair Audi A4 B5 (1994-2001, petrol)
Power unit: Engine repair Audi A6 C5 (1997-2004)
Share information:
- General information
- Introduction to the guide
- Maintenance
- Engine 1.4 l (gasoline)
- Engine repair
- Lubrication system
- Cooling system
- Exhaust system
- Engine 1.6 l (gasoline)
- Engine repair
- Lubrication system
- Cooling system
- Exhaust system
- Engine 1.2 l (diesel)
- Engine repair
- Lubrication system
- Cooling system
- Injection and turbocharging
- Engine 1.4 l (diesel)
- Engine repair
- Lubrication system
- Cooling system
- Turbocharging system
- Supply system
- Fuel injection system
- Exhaust system
- Transmission
- Mechanical gearbox 02J
- Mechanical gearbox 02T
- Mechanical gearbox 085 DS
- Chassis
- Car suspension
- Steering
- Brake system
- Body
- Exterior
- Interior
- Seats
- Doors, locks and windows
- Safety system
- Heating and air conditioning
- Electrical equipment
- Power devices
- Equipment and devices
- Wipers and washers
- Lighting and lamps
- Breakers and switches
- Electrical circuits