
Repair Chevrolet Repair Toyota Repair Honda Repair AvtoVAZ Repair Mercedes-Benz Repair BMW Repair Opel
Home  |  Contacts  |  Sitemap  |    
English Русский
Български
Беларускі
Український
Српски
Hrvatski
Română
Polski
Slovenský
Magyar
AudiManual.ru


  • AUDI 80
  • AUDI 100
  • AUDI A3
  • AUDI A4
  • AUDI A6
  • AUDI A8
  • AUDI Q
  • OTHER
  • ARTICLES
A2 (1999-2005)

Removal and installation the camshaft (Audi A2)

  • Home
  • Audi
  • A2 (1999-2005)
  • Engine 1.2 l (diesel)
  • Engine repair
  • Removal and installation the camshaft
            0
Table of contents: Removal ↓ Installation ↓ Valve sizes ↓

Removal


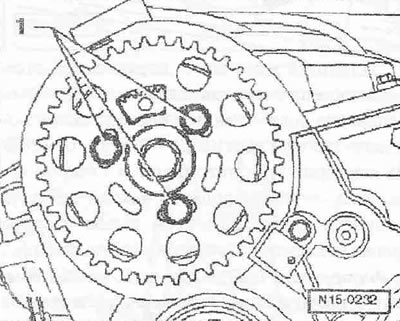
The cylinder head is installed. Remove the toothed belt. Remove the locking pin "3359". Unscrew the bolts "1" and remove the camshaft gear from the hub.
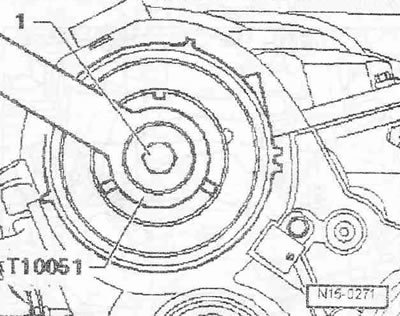
Loosen the hub nut «1» by holding it with the «T10051» support. Loosen the bolt by about 2 turns.


Loosen the hub nut "1" by holding it with the "T10051" support. Loosen the bolt by about 2 turns.
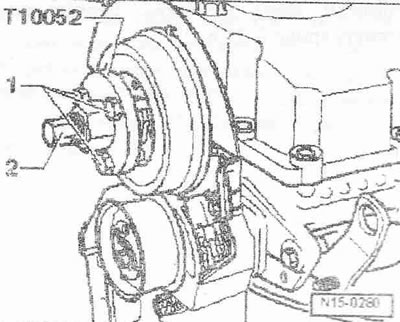
Place the puller «T10052» on the hub and screw in bolts «1». Remove the hub from the camshaft,…


Place the puller "T10052" on the hub and screw in bolts "1". Remove the hub from the camshaft, holding the puller's hexagon with a 30 key and screwing in bolt "2". Remove the cylinder head cover.
First unscrew the outer and then the inner bolts of the balance shaft, and remove it. Remove the…


First unscrew the outer and then the inner bolts of the balance shaft, and remove it. Remove the tandem pump. Remove covers "2" and "3". Crosswise unscrew covers "1" and "4"


Instructions. Bearing cover "4" is marked like bearing cover "5". Make sure that the camshaft bearing shells are not mixed up. Using a waterproof marker, mark the location of the shells on the camshaft on the back of the shells.


Remove the camshaft.

Installation
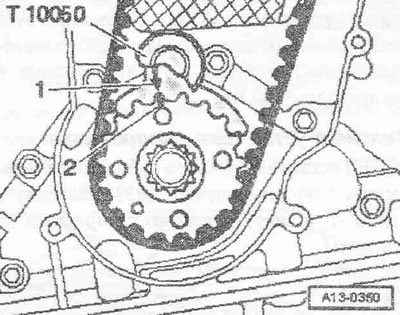


Installation in reverse order, taking into account the following: the crankshaft gear must be…


Installation in reverse order, taking into account the following: the crankshaft gear must be locked using the crankshaft stopper "T10050". The marks on the toothed belt gear and the crankshaft stopper "arrow" must be opposite each other. In this case, the stopper journal must enter the hole of the sealing flange.

Instructions: Make sure that used camshaft bearing shells are not mixed up (take into account the markings). When installing the camshaft, ensure that the retaining protrusions of the liners in the bearing caps and cylinder head are correctly seated.
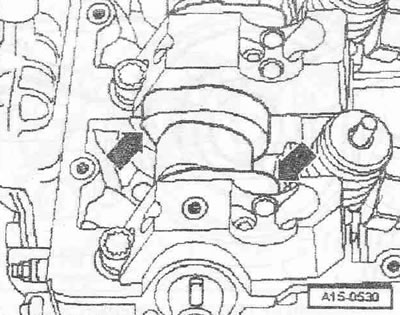

Lubricate the working surfaces of the camshaft with engine oil. Bring the camshaft to the TDC…


Lubricate the working surfaces of the camshaft with engine oil. Bring the camshaft to the TDC position of the first cylinder: the cams of the first cylinder of the camshaft should be facing up "arrows". Crosswise tighten the covers "2" and "3".
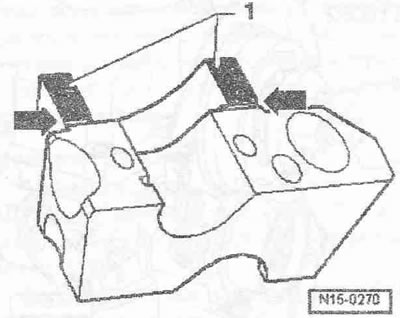


Apply a thin, even layer of sealant to the surface of bearing caps «1» and «4». Make sure that the…


Apply a thin, even layer of sealant to the surface of bearing caps "1" and "4". Make sure that the sealant does not get into the "arrow" grooves or onto other surfaces. Install and tighten bearing caps "1" and "4". Bearing cap "4" must be flush with the outer edge of the cylinder head, otherwise the tandem pump may become unsealed. Install the camshaft seal. Install the balance shaft and tighten the inner bolts first, then the outer bolts of the shaft in several steps. Place the hub on the camshaft. Tighten the bolt, holding it with the "T10051" support. Install the camshaft gear on the hub. The "arrow" toothed segment on the camshaft timing belt gear must face up.
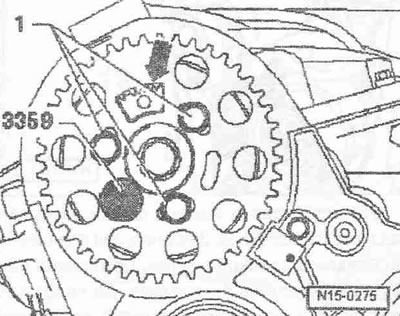
Do not screw in bolts «1» completely. Secure the camshaft hub with locking pin «3359». Install the…


Do not screw in bolts "1" completely. Secure the camshaft hub with locking pin "3359". Install the timing belt (adjust valve timing). Install the tandem pump. If the balance shaft or the ball head bolts and adjusting bolts have been replaced, the unit injectors must be adjusted. Install the cylinder head cover.


Instructions: After installing the camshaft, the engine must not be started for approximately 30 minutes. The hydraulic tappets must be settled (otherwise the valves will touch the pistons). After working on the valve mechanism, turn the engine by hand at least 2 turns to make sure that none of the valves are in contact with the piston.


Tightening torques
  • Bearing cap to cylinder head: 8 Nm + 90° 1)
  • Balance shaft to cylinder head: 20 Nm + 90° 1)
  • Hub to camshaft: 100 Nm

1) Replace the bolts

Valve sizes
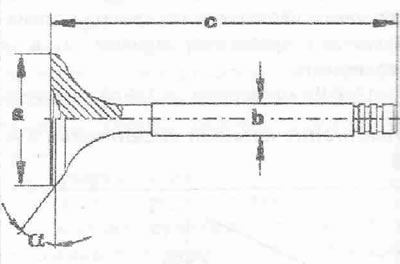


Removal and installation the camshaft


SizeInlet valveExhaust valve
a mm35.9531,45
b mm6,9806,956
with mm89,9589,95
α°4545

Instructions. It is prohibited to process the valves. Only lapping is allowed.
The article was checked by auto expert Daniil Ushakov
This article is available at russian, bulgarian, belarusian, ukrainian, serbian, croatian, romanian, polish, slovak, hungarian

Share information:
Previous articles
Audi A2: Engine repair
Next articles

Replacing the camshaft seal
Bearing cap seals 1 and 4
Valve mechanism repair
Removal and installation the intake manifold


Similar articles on other Audi car models:
Camshaft and tappets — removal, inspection and installation Audi 80 B3 (1986-1991, petrol)
Camshaft Cover — Removal and Installation Audi 100 C3 (1982-1990, diesel)
Adjusting the camshaft Audi A4 B6 (2000-2006, petrol)
Electrical diagram of the Motronic control unit, air mass meter,… Audi A6 C5 (1997-2004)
Camshaft Audi A8 D2 (1994-2002)
Camshaft chain drives Audi Q5 Type 8R (2008-2017)
Link to this page in different formats


Visitor comments

No comments yet


How much will 35 + 28 =


Audi A2(1999-2005) 
  • General information
  • Introduction to the guide
  • Maintenance
  • Engine 1.4 l (gasoline)
  • Engine repair
  • Lubrication system
  • Cooling system
  • Exhaust system
  • Engine 1.6 l (gasoline)
  • Engine repair
  • Lubrication system
  • Cooling system
  • Exhaust system
  • Engine 1.2 l (diesel)
  • Engine repair
  • Lubrication system
  • Cooling system
  • Injection and turbocharging
  • Engine 1.4 l (diesel)
  • Engine repair
  • Lubrication system
  • Cooling system
  • Turbocharging system
  • Supply system
  • Fuel injection system
  • Exhaust system
  • Transmission
  • Mechanical gearbox 02J
  • Mechanical gearbox 02T
  • Mechanical gearbox 085 DS
  • Chassis
  • Car suspension
  • Steering
  • Brake system
  • Body
  • Exterior
  • Interior
  • Seats
  • Doors, locks and windows
  • Safety system
  • Heating and air conditioning
  • Electrical equipment
  • Power devices
  • Equipment and devices
  • Wipers and washers
  • Lighting and lamps
  • Breakers and switches
  • Electrical circuits
 
AudiManual.ru © 2017-2026 · Mobile version · Feedback · Sitemap: EN BG BY UA RS HR RO PL SK HU · Site search · News and articles
80 B2 · 80 B3 petrol · 80 B3 · 80 B4 · 100 C3 diesel · 100 C3 petrol · 100 C3 · 100 C4 petrol · 100 C4 · A3 Type 8L · A4 B5 petrol · A4 B5 · A4 B6 petrol · A4 B6 · A4 B7 · A4 B8 · A6 C4 · A6 C5 · A6 C5 Allroad · A8 D2 · Q5 Type 8R · Q7 Typ 4L · Audi A2 ·
This site uses cookies 🍪. Click the button to accept this fact.