Repair Chevrolet Repair Toyota Repair Honda Repair AvtoVAZ Repair Mercedes-Benz Repair BMW Repair Opel
Home  |  Contacts  |  Sitemap  |    
English Русский
Български
Беларускі
Український
Српски
Hrvatski
Română
Polski
Slovenský
Magyar
AudiManual.ru


  • AUDI 80
  • AUDI 100
  • AUDI A3
  • AUDI A4
  • AUDI A6
  • AUDI A8
  • AUDI Q
  • OTHER
  • ARTICLES
A2 (1999-2005)

Removal the front side glass (Audi A2)

  • Home
  • Audi
  • A2 (1999-2005)
  • Body
  • Doors, locks and windows
  • Removal the front side glass
            0
Table of contents: Undamaged glass ↓ Removal damaged glass ↓ Installing new glass ↓
Undamaged glass


Undamaged glass


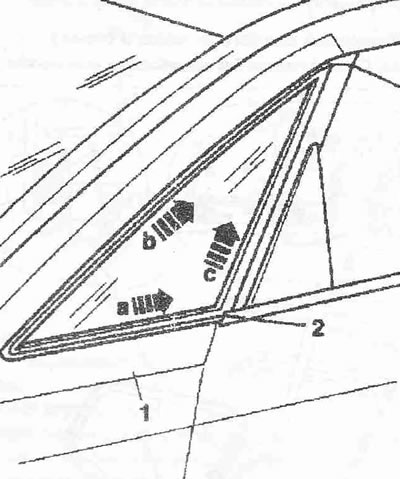
The A-pillar trim has been removed. Seal the area around the edges of the glass with fabric-backed adhesive tape "1" to protect the paintwork. Remove the glass trim around the entire perimeter to facilitate access. Lay the string around the tank glass as shown in the figure. Insert the upper and lower ends of the string into the two handles of the cutting tool "V.A.G 1351". First pull the string "2" in the direction of the arrow "a" through the glue roller. Then pull the string to the post A in the direction of the arrow "b". Finally, pull the string from the bottom up in the direction of the arrow "c" and completely cut out the glass.

Removal damaged glass


When removing a damaged side window, follow the instructions given in the description of removing a damaged rear window - Symbol identifying the position of the illustration.

Installing new glass


Before installing a new glass, it is necessary to cut off the remains of the roller from the body side near the glass frame, but in no case remove the roller completely. The remaining layer serves as a reactive primer for applying a new layer of glue. Treat the adhesive surface with a cleaner "D 009 401 04" and primer for glass and varnish "D 009 200 02". Observe the drying time of the primer (10 minutes). Consider the different distance of the adhesive roller to the edge of the glass. Apply the glue. Roller height = 12 mm + 3 mm. Roller width = 8 mm±2 mm. The glass must be inserted within 10 minutes after applying the glue, otherwise the adhesive properties will decrease.


Insert the glass into the opening and slide it back until the stop «1» is adjacent to the B pillar…


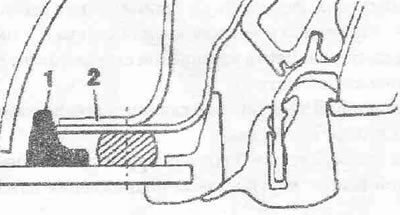
Insert the glass into the opening and slide it back until the stop "1" is adjacent to the B pillar "2". Fix the glass in the opening using adhesive tape. Observe the minimum curing time.

The original version is on the portal AUDIMANUAL
The article was checked by auto expert Daniil Ushakov
This article is available at russian, bulgarian, belarusian, ukrainian, serbian, croatian, romanian, polish, slovak, hungarian

Share information:
Previous articles
Audi A2: Doors, locks and windows
Next articles

Removal and installation the front side glass
Removal and installation the windshield
Removal and installation the sunroof fairing
Removal and installation the sliding frame
Removal and installation the rear side glass
Removal and installation side glass
Replacing the upper moldings
Replacing lower moldings


Similar articles on other Audi car models:
Windshield, rear window glass and rear door window glass —… Audi 80 B3 (1986-1991, petrol)
Windshield, Rear Window and Door Glass — Removal and Installation Audi 100 C3 (1982-1990, diesel)
Removal and installation the front seat cover Audi A3 Type 8L (1996-2003)
Front door glass — removal and installation Audi A4 B8 (2007-2015)
Front door glass and window lifter — removal and installation Audi A6 C5 Allroad (1999-2005)
Front door glass Audi A8 D2 (1994-2002)
Removal the outer front glass pressure plate Audi Q5 Type 8R (2008-2017)
Link to this page in different formats


Visitor comments

No comments yet


How much will 48 + 13 =


Audi A2(1999-2005) 
  • General information
  • Introduction to the guide
  • Maintenance
  • Engine 1.4 l (gasoline)
  • Engine repair
  • Lubrication system
  • Cooling system
  • Exhaust system
  • Engine 1.6 l (gasoline)
  • Engine repair
  • Lubrication system
  • Cooling system
  • Exhaust system
  • Engine 1.2 l (diesel)
  • Engine repair
  • Lubrication system
  • Cooling system
  • Injection and turbocharging
  • Engine 1.4 l (diesel)
  • Engine repair
  • Lubrication system
  • Cooling system
  • Turbocharging system
  • Supply system
  • Fuel injection system
  • Exhaust system
  • Transmission
  • Mechanical gearbox 02J
  • Mechanical gearbox 02T
  • Mechanical gearbox 085 DS
  • Chassis
  • Car suspension
  • Steering
  • Brake system
  • Body
  • Exterior
  • Interior
  • Seats
  • Doors, locks and windows
  • Safety system
  • Heating and air conditioning
  • Electrical equipment
  • Power devices
  • Equipment and devices
  • Wipers and washers
  • Lighting and lamps
  • Breakers and switches
  • Electrical circuits
 
AudiManual.ru © 2017-2026 · Mobile version · Feedback · Sitemap: EN BG BY UA RS HR RO PL SK HU · Site search · News and articles
80 B2 · 80 B3 petrol · 80 B3 · 80 B4 · 100 C3 diesel · 100 C3 petrol · 100 C3 · 100 C4 petrol · 100 C4 · A3 Type 8L · A4 B5 petrol · A4 B5 · A4 B6 petrol · A4 B6 · A4 B7 · A4 B8 · A6 C4 · A6 C5 · A6 C5 Allroad · A8 D2 · Q5 Type 8R · Q7 Typ 4L · Audi A2 ·
This site uses cookies 🍪. Click the button to accept this fact.