



Table of contents: Opening from the outside ↓ Opening from the inside ↓ Child safety latches ↓ Heated front door lock cylinders ↓ Trunk lock ↓ Central lock ↓ Opening the car from the outside ↓ Opening/closing the car from the… ↓ Infrared remote control ↓ Opening and closing the car ↓ Replacing batteries in the key ↓ Warning signal ↓ LED ↓ Deactivating vehicle interior control ↓
Opening from the outside
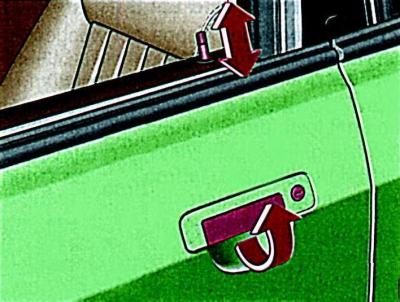
Fig. 1–2. Directions for opening and locking the door lock
Open the door lock and pull up on the outside door handle to open the door (Fig. 1–2).
Opening from the inside
On vehicles with non-retractable locking buttons, all doors can be unlocked by lifting the locking buttons.
On vehicles with fully retractable locking buttons, pull the inside door handle all the way out.
Child safety latches
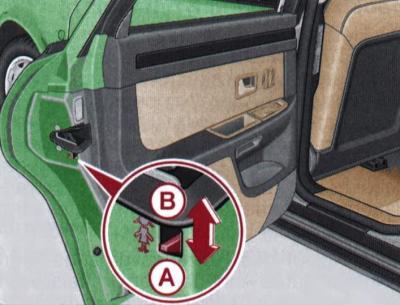
Fig. 1–3. Location of the child safety latch on the rear door: A – the latch is on; B – the latch is off
The design of the rear side doors includes an additional device to ensure child safety (Fig. 1–3).
To engage the latch, open the rear door and move the latch down (position A). The inside door handle is now locked - the door can only be opened from the outside. The lock button for this door must be raised.
To disengage the safety latch, open the rear door and move the latch up (position B). Now the door can be opened from the inside again. The lock button must be raised.
Heated front door lock cylinders
The heating of the lock cylinders in the front doors is switched on by briefly lifting the door handle.
Heating can be switched on when the outside air temperature is below 5°C. The heating time is set automatically and depends on the air temperature. The maximum heating time is approximately 50 sec.
After the heating time has elapsed, the next heating cycle begins when the door handle is briefly lifted and switched on again.
Trunk lock
The trunk lock can be opened and closed with the central lock. In addition, the trunk lock can be locked for a long time.
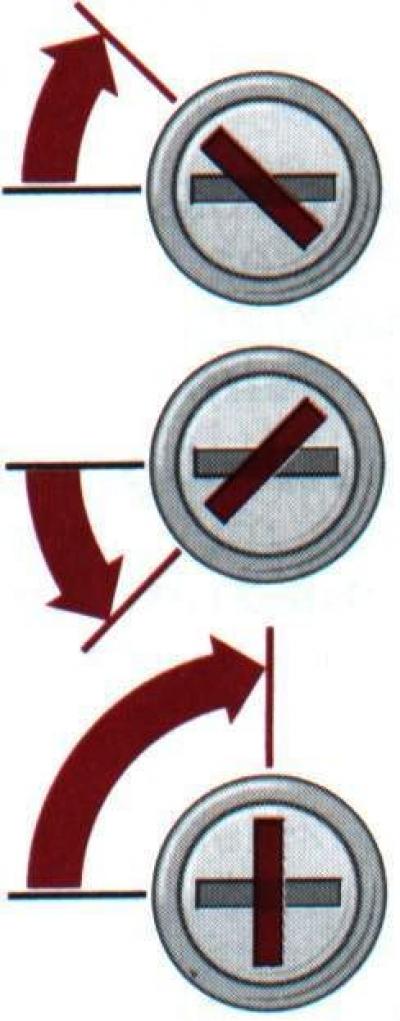
Fig. 1–4. Key positions in the door lock
If the key is held in the vertical position of the lock cylinder, the trunk lock is disconnected from the central locking system and is locked for a long time (Fig. 1–4).
After turning the lock cylinder to the horizontal position, the trunk lock is connected to the central locking system.
To open trunk lock with the lock cylinder in the horizontal position, press the lock cylinder and open the trunk.
Central lock
When the front doors or the luggage compartment are unlocked or locked, the central locking system simultaneously unlocks or locks all doors, the fuel filler flap and the luggage compartment lock (depending on its position).
The central locking system is equipped with a self-insurance system: after the car is locked from the outside, the internal door lock buttons are immediately activated. This reduces the likelihood of unauthorized persons entering the car.
The central locking system can be controlled from the outside either with a key or by means of a radio remote control.
The central locking system offers the following functions in addition to the central lock:
- only the driver's door, front passenger door or trunk do not close;
- closing and opening from the inside is carried out by the central locking switch located on the driver's door.

Fig. 1–5. Internal door opening handle
Opening the car from the outside
Turn the key once until it stops in the driver's door, front passenger door or trunk lock. This opens only the corresponding lock. The other locks remain closed. After closing the trunk lid, its lock will close automatically after 5 seconds.
To open all vehicle locks, turn the key twice until it stops in the driver's door, front passenger door or trunk lock.
Opening/closing the car from the inside
To lock the car, press the lower half of the central locking switch - all locks are closed.
To open the car, press the upper half of the central locking switch - all locks open.
Infrared remote control
The infrared remote control allows you to operate the central locking and the warning alarm system.
The infrared radio transmitter with batteries is located in the handle of the car key locks. The sensors of the infrared remote control receiver are located at the top of the central pillars.
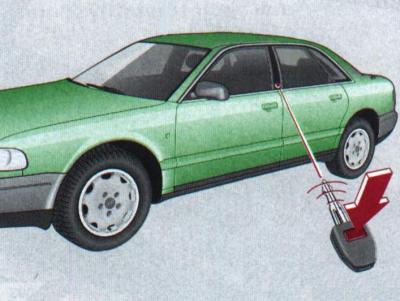
Fig. 1–6. Infrared remote control receiver operating range
Fig. 1–6 shows the coverage area of the infrared remote control receiver (on both sides of the car).
The maximum range depends on various factors and is 2-4 m. The range decreases when the batteries are discharged and the receiver sensors are dirty.
Opening and closing the car
Point the key at the infrared remote control receiver sensor and press the button. The locks will open central locking system and the alarm will be switched off or the locks will close central locking system and the alarm will turn on.
When closing the vehicle with the windows and sunroof open, keep the button pressed until the windows and sunroof close. Releasing the button earlier will stop the windows and sunroof from closing.
Replacing batteries in the key
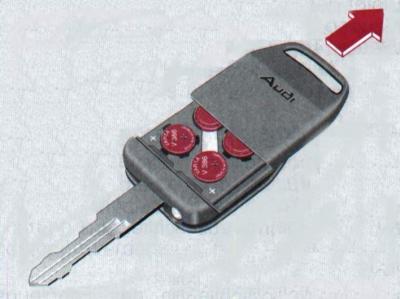
Fig. 1–7. Removing the cover on the key head
Move the cover on the key head (Fig. 1–7) in the direction of the arrow and remove it.
Replace the batteries and install the cover on the key head until it locks firmly into place. The location of the battery terminals is indicated on the battery container.
Warning signal
The warning alarm system makes it much more difficult to break into and steal the car. In the event of malicious entry into the car, sound and light alarm signals are activated.
A car with an alarm system has the following protection: engine compartment, luggage compartment, doors, radio, salon.
The warning alarm system is activated automatically when one of the front doors or the trunk lid is locked (back door). To do this, turn the key once in the locking direction.
The warning alarm system can also be activated when the car is locked using the remote control.
The warning alarm system comes into operation 30 seconds after the locks are closed.
If all doors, the trunk and the hood are closed, one short beep will be heard when the warning system is activated.
If there is no sound signal, check and close the doors and trunk.
After turning on the warning alarm system, check the position of the interior door lock buttons.
LED
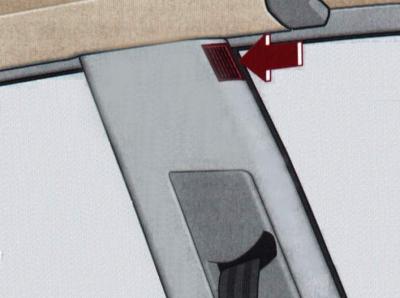
Fig. 1–8. Location of the vehicle interior control LED
After the warning signal system is switched on, the LED (Fig. 1-8) located in the rear fog light switch flashes quickly for 30 seconds and then starts to flash slowly. This indicates that the warning signal system is operating normally.
If after 30 seconds the LED remains lit continuously, the car interior is not controlled by the alarm system.
Deactivating vehicle interior control
The control can be activated as follows:
- open the driver's or front passenger's door;
- cover the front of the sensor with your hand until the LED flashes for about 3 seconds;
- lock the car.
There is no fast blinking of the LED for monitoring the car interior. After about 30 seconds, the LED starts blinking at a slow pace.
The article was copied from the website AUDImanual.ru