Repair Chevrolet Repair Toyota Repair Honda Repair AvtoVAZ Repair Mercedes-Benz Repair BMW Repair Opel
Home  |  Contacts  |  Sitemap  |    
English Русский
Български
Беларускі
Український
Српски
Hrvatski
Română
Polski
Slovenský
Magyar
AudiManual.ru


  • AUDI 80
  • AUDI 100
  • AUDI A3
  • AUDI A4
  • AUDI A6
  • AUDI A8
  • AUDI Q
  • OTHER
  • ARTICLES
A2 (1999-2005)

Gaps for adjusting the front doors (Audi A2)

  • Home
  • Audi
  • A2 (1999-2005)
  • Body
  • Doors, locks and windows
  • Gaps for adjusting the front doors
            0
Table of contents: Making an auxiliary template ↓ Front door hinges ↓ Joint width ↓ Adjustment using the lock bracket ↓
1. Bracket of built-in door parts. Size «a» = 5 mm + 1.5 mm. Adjust size «a» using the auxiliary…

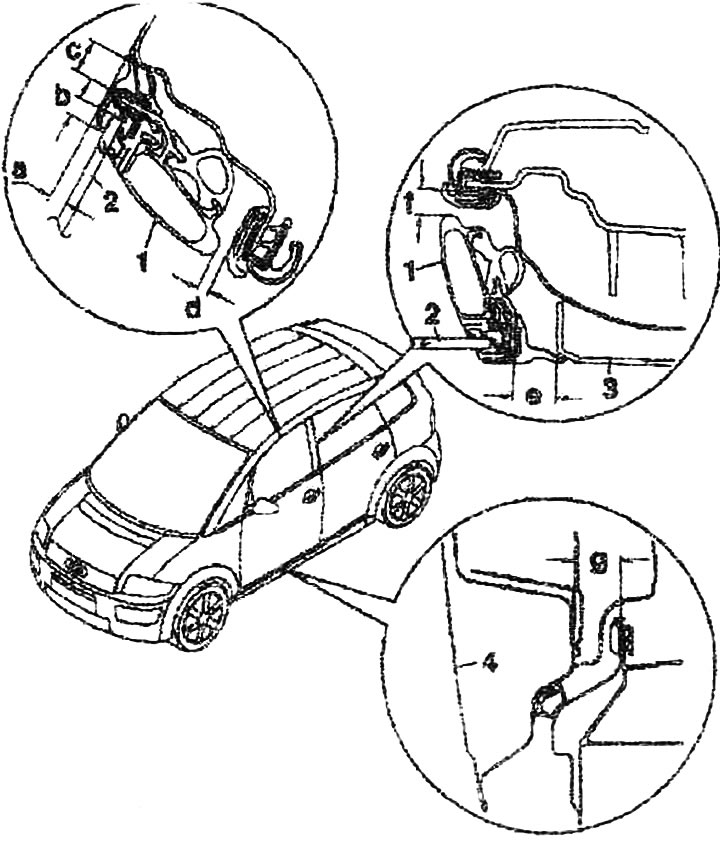
1. Bracket of built-in door parts. Size "a" = 5 mm + 1.5 mm. Adjust size "a" using the auxiliary template. Size "b" = 5 mm. 2 mm. Size "c" = 9.5 mm±1 mm. Size "d" = 8.5 mm±1 mm (distance to pillar B)
2. Door glass. Size "b" = 5 mm. 2 mm. To check size "b" completely close the glass (insert into the door seal). Mark the lower edge of the door seal on the glass with a thin felt-tip pen. Open the glass and measure the dimension "b" from the upper edge of the glass to the mark made with the felt-tip pen
3. Pillar cover C. Dimension "e" = 15.5 mm±1 mm, dimension "f" = 9 mm±1 mm
4. Front door. Dimension "g" = 31 mm±1 mm. Can only be measured with the door trim removed


Making an auxiliary template


Make an auxiliary template according to the given dimensions, for example from plastic or plywood.…


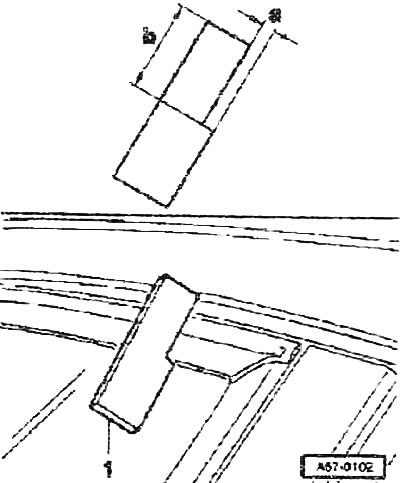
Make an auxiliary template according to the given dimensions, for example from plastic or plywood. Dimension "a" = 5 mm, dimension "b" = approx. 30 mm. With the correct adjustment of the bracket of the built-in door parts, the template should fit against the door glass as well as the roof strip, while being at a distance of approx. 100 mm from the B-pillar.


Front door hinges


1. Bolt Torg, 30 Nm. Accessible from inside the car. Before unscrewing, it is necessary to remove…

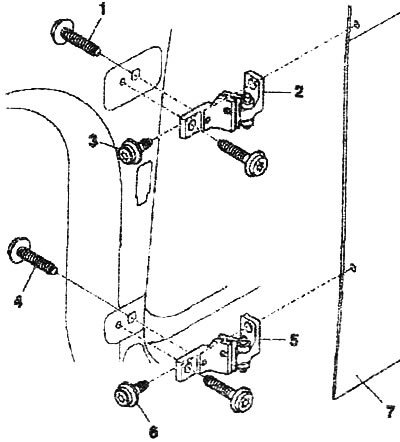
1. Bolt Torg, 30 Nm. Accessible from inside the car. Before unscrewing, it is necessary to remove the lower trim of the A-pillar.
2. Upper door hinge
3. Bolt Tough, 30 Nm
4. Bolt Torg, 30 Nm. Accessible from inside the car. Before unscrewing, it is necessary to remove the lower A-pillar trim.
5. Bottom door hinge
6. Bolt Tough, 30 Nm
7. Front door


Joint width


The rear door must be adjusted. Dimension «A» = 3.5 mm±0.5 mm, dimension «B» = 4 mm±0.5 mm,…


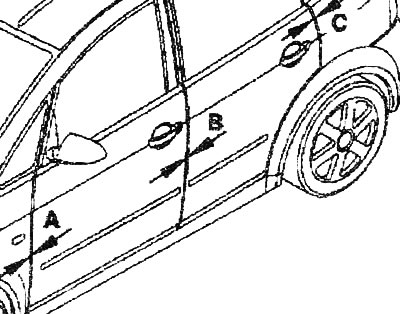
The rear door must be adjusted. Dimension "A" = 3.5 mm±0.5 mm, dimension "B" = 4 mm±0.5 mm, dimension "C" = 3.5 mm±0.5 mm. Check the joint width using the installation template "3371". The gap size or joint width can be adjusted by loosening the hinge bolts and moving the doors.

Adjustment using the lock bracket


There are marks on the lock bracket or on the B-pillar, by which you can precisely adjust the door.…


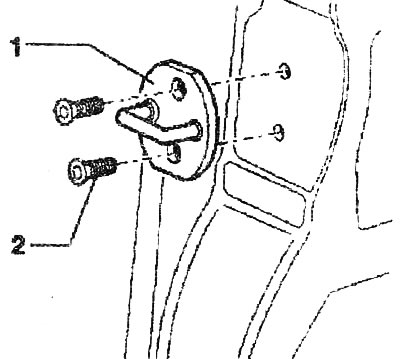
There are marks on the lock bracket or on the B-pillar, by which you can precisely adjust the door. Loosen bolts "2". Move the lock bracket "1" so that the door is level with the contour of the body. Tighten the bolts. Tightening torque 20 Nm. Adjustment is permitted only in the direction towards the center of the car, and not in height.
The article was checked by auto expert Daniil Ushakov
This article is available at russian, bulgarian, belarusian, ukrainian, serbian, croatian, romanian, polish, slovak, hungarian

Share information:
Previous articles
Audi A2: Doors, locks and windows
Next articles

Removal and installation the front door and the bracket for the…
Removal and installation the front door mounting bracket
Removal and installation the trunk gasket
Removal and installation the trunk lock bracket
Removal and installation the front door opening limiter
Removal and installation the window lifter and door glass
Front door handle and lock
Removal the lock cylinder and the front door handle


Similar articles on other Audi car models:
Adjusting the front wheel alignment angles Audi 80 B2 (1979-1986)
Pushers — checking and adjusting clearances Audi 100 C3 (1982-1990, diesel)
Removal and installation the front door and adjusting element… Audi A3 Type 8L (1996-2003)
Adjusting the front wheel alignment angles Audi A4 B7 (2004-2008)
Adjusting the position of the front door Audi A6 C5 (1997-2004)
Adjusting the position of the front bumper Audi A8 D2 (1994-2002)
Lighting and switches in the front doors Audi Q5 Type 8R (2008-2017)
Link to this page in different formats


Visitor comments

No comments yet


How much will 28 + 24 =


Audi A2(1999-2005) 
  • General information
  • Introduction to the guide
  • Maintenance
  • Engine 1.4 l (gasoline)
  • Engine repair
  • Lubrication system
  • Cooling system
  • Exhaust system
  • Engine 1.6 l (gasoline)
  • Engine repair
  • Lubrication system
  • Cooling system
  • Exhaust system
  • Engine 1.2 l (diesel)
  • Engine repair
  • Lubrication system
  • Cooling system
  • Injection and turbocharging
  • Engine 1.4 l (diesel)
  • Engine repair
  • Lubrication system
  • Cooling system
  • Turbocharging system
  • Supply system
  • Fuel injection system
  • Exhaust system
  • Transmission
  • Mechanical gearbox 02J
  • Mechanical gearbox 02T
  • Mechanical gearbox 085 DS
  • Chassis
  • Car suspension
  • Steering
  • Brake system
  • Body
  • Exterior
  • Interior
  • Seats
  • Doors, locks and windows
  • Safety system
  • Heating and air conditioning
  • Electrical equipment
  • Power devices
  • Equipment and devices
  • Wipers and washers
  • Lighting and lamps
  • Breakers and switches
  • Electrical circuits
 
AudiManual.ru © 2017-2026 · Mobile version · Feedback · Sitemap: EN BG BY UA RS HR RO PL SK HU · Site search · News and articles
80 B2 · 80 B3 petrol · 80 B3 · 80 B4 · 100 C3 diesel · 100 C3 petrol · 100 C3 · 100 C4 petrol · 100 C4 · A3 Type 8L · A4 B5 petrol · A4 B5 · A4 B6 petrol · A4 B6 · A4 B7 · A4 B8 · A6 C4 · A6 C5 · A6 C5 Allroad · A8 D2 · Q5 Type 8R · Q7 Typ 4L · Audi A2 ·
This site uses cookies 🍪. Click the button to accept this fact.