
Table of contents: Checking the adjustment of the main… ↓ Headlight adjustment ↓
As a rule, the following description of inspection and adjustment is valid for all countries. However, national regulations or requirements in individual countries should be taken into account.
Check and adjustment conditions: tire pressure is normal. Diffusers must not be damaged or dirty. Reflectors and lamps are in good condition. The vehicle load must be adjusted. Load: one passenger or 75 kg on the driver's seat in an unladen vehicle (net weight). Net weight is the weight of a vehicle ready for operation with a fully filled fuel tank (at least 90%), including the weight of all supplied components (for example, a spare tire, a tool, a jack, a fire extinguisher, etc.). If the fuel tank is not at least 90% full, load as follows: Check the fuel level in the fuel tank using the indicator. Determine the additional weight using the table below and place it in the trunk.
Tables of filling volumes
| Fuel level in the fuel tank in the instrument cluster | 1.2L TDI engine Additional load in kg | 1.4L Petrol Engine 1.4L TDI Engine Additional load in kg |
| 1/4 | 15 | 25 |
| 1/2 | 10 | 17 |
| 3/4 | 5 | 8 |
| full filling | 0 | 0 |
Example: 1.2L TDI engine. If the tank is half full, an additional 10 kg·must be placed in the luggage compartment.
Instructions: It is best to use a canister of water as additional mass (A 5-liter canister of water has a mass of approximately 5 kg).
It is necessary to roll the car for several meters or press it several times from the front and back so that the springs sag. The car and the headlight adjustment tester must be on a flat, level surface. The car and, accordingly, the headlight adjustment tester must be aligned. Make sure that the headlight adjustment tester is located in front of the headlight at a distance of 30 cm. The headlight angle values in "%" are stamped on the top of the headlight housing. The headlight angle must be adjusted according to these parameters. The data in percent are calculated for 10 m of projection distance. If the headlight angle is, for example, 1.0% for a car with a headlight angle adjustment system, then this means 10 cm.
It is necessary to adjust the angle of inclination. Angle of inclination: main headlight and high beam 10 cm. For cars with adjustable headlight angle: the knurled wheel for adjusting the range of illumination of the headlights should be in the "0" position.
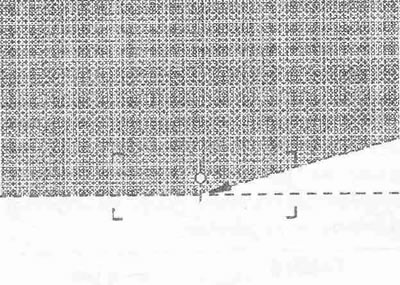
Checking the adjustment of the main headlights (using the new test screen without the 15° adjustment line)
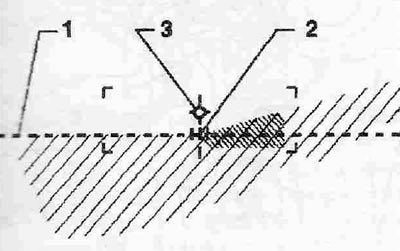
With the low beam on, the horizontal light and shadow boundary of the dividing strip "1" must touch the control surface. The bending point "2" between the left horizontal part and the right rising part of the light and shadow boundary must lie on the perpendicular drawn through the central mark "3". The light core of the light beam must be to the right of the perpendicular.
Instructions: To more easily determine the refraction point "2", cover and reopen the left half of the headlight several times (in the direction of movement). After completion, check the low beam headlight angle again. After the low beam correction has been carried out according to the instructions, the center of the high beam light beam must be positioned at the central mark "3".
When using the old control screen with the 15° correction line, the correction is done in the same way as for the new screen. To avoid correction errors, the 15° correction line can no longer be taken into account.
Headlight adjustment
Main headlight (right)

Perform adjustment with a suitable screwdriver (do not damage the adjustment wheel) or a socket Allen key.
- 1. Headlight horizontal adjustment screw
- 2. Headlight vertical adjustment screw
Use a Phillips screwdriver or Allen key to adjust the appropriate screw. The left headlight adjustment bolts are arranged in mirror image.
Fog light in the bumper
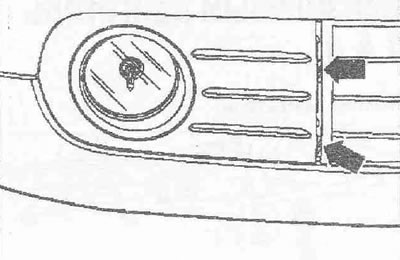
Angle of inclination: fog lamp 20 cm.
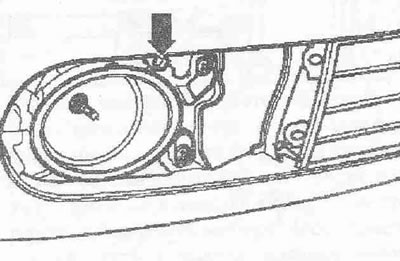
Use a screwdriver to unlock the "arrow" trim and remove it. To adjust the illumination range, rotate the "arrow" adjusting screw. Side adjustment is not provided.
Other additional lights
Additional headlights of other systems must be checked or adjusted in accordance with the regulations applicable to them.