



Table of contents: Checking the fuel level in the float… ↓ Adjusting the idle speed of a cold… ↓ Adjusting the starting clearances of… ↓ Checking the pneumatic drive of the… ↓ Adjusting the opening of the… ↓ Adjusting the opening of the… ↓ Adjusting the accelerator pump ↓ Checking the operation of the… ↓ Adjusting the idle speed of a warm… ↓
Checking the fuel level in the float chamber
The position of the float in the float chamber is not adjustable. If a malfunction is detected, check the tightness of the float and the condition of the needle valve, replace the faulty parts.
Adjusting the idle speed of a cold engine
Warm up the engine to operating temperature.
Connect the tachometer according to the operating instructions.
Remove the air filter and plug the hose that supplies the coolant to the thermostat.
Disconnect the tee of the vacuum hose connecting the three-stage pneumatic drive of the 1st chamber throttle valve and the pneumatic valve with a thermal time relay.
Close the hose coming from the pneumatic drive of the 1st chamber throttle valve with a plug.
Check and, if necessary, adjust the crankshaft rotation speed within 2800-3200 rpm using the screw on the 1st chamber throttle control lever, which rests on the movable rod of the pneumatic drive.
After adjustment, lock the stop screw with a drop of paint.
Adjusting the starting clearances of the air damper
Remove the starter cover.
Pull the air damper control lever down and secure it in this position.
Connect a vacuum gauge and a vacuum pump to the air damper pneumatic drive.
Create a vacuum of 100 mbar in the air damper pneumatic drive.
Check the tightness of the air damper pneumatic drive; the vacuum in it should not fall by more than 5 mbar per minute and decrease to less than 40 mbar.
Bring the vacuum in the air damper pneumatic drive to 200-300 mbar.
Measure the starting gap of the first stage of the air damper with a set of feeler gauges. On cars with a DT engine, the gap should be within 2.3±0.15 mm. On cars with a DS engine, it should be within 2.3±0.15 mm.
If necessary, set the correct clearance using the air damper pneumatic drive diaphragm stroke adjustment screw (see photo).
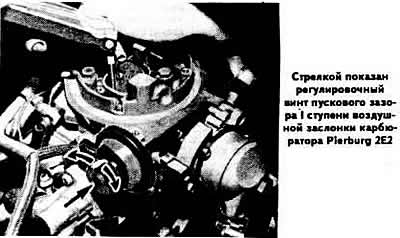
Close the atmospheric hole of the air damper pneumatic drive with a plug, create a vacuum of 200 mbar with it. If it is maintained for at least 1 minute, then the pneumatic drive is hermetically sealed.
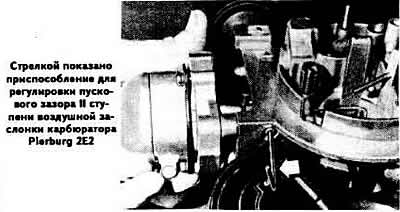
Measure the starting gap of the second stage of the air compressor using a set of feeler gauges damper, which on cars with an OT engine should be in within 5.8±0.15 mm. On vehicles with a DS engine, the gap should be
women should be within 4.7±0.15 mm.
If necessary, adjust the gap using the adjusting screw on the end of the air damper pneumatic drive rod (see photo).
Checking the pneumatic drive of the throttle valve of the 2nd chamber
Connect a vacuum gauge and a vacuum pump to the pneumatic drive of the 2nd chamber throttle valve and create a vacuum of 50 mbar in the pneumatic drive. If it does not drop within 2 minutes, the pneumatic drive is sealed.
Fully open the throttle valve of the 1st chamber, maintaining a vacuum of 50 mbar in the pneumatic drive of the throttle valve of the 2nd chamber.
Make sure that the throttle valve of the 2nd chamber is fully open.
Adjusting the opening of the throttle valve of the 1st chamber
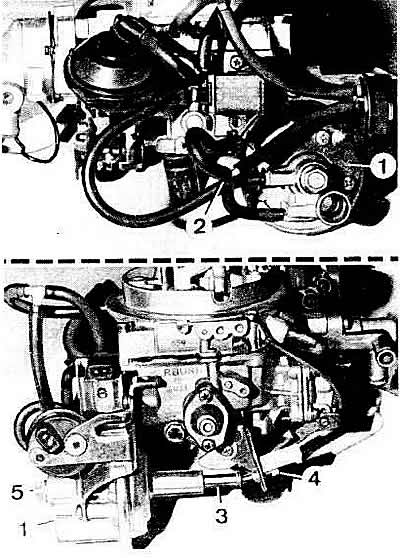
Adjusting the opening of the throttle valve of the 1st chamber and the position of the pneumatic drive rod of the throttle valve of the 1st chamber of the Pierburg 2E2 carburetor at forced idle:
1 — pneumatic drive of the throttle valve of the 1st chamber;
2 — tee of vacuum hoses of pneumatic drive of throttle valve of 1st chamber and pneumatic valve with thermal time relay;
3 — movable rod of the pneumatic drive of the throttle valve of the 1st chamber;
4 - throttle valve limit screw;
5 — adjusting screw for the protrusion of the 1st chamber throttle pneumatic drive rod at forced idle.
The position of the throttle valve of the 1st chamber is adjusted at the factory; if the adjustment is not correct, it can be restored as follows:
- connect the vacuum pump to the pneumatic drive of the throttle valve of the 1st chamber and close the atmospheric hole of the pneumatic drive with a plug (see photo);
- turn the 1st chamber throttle valve opening cam so as to release the 1st chamber throttle valve and set it to the closed position;
- apply a vacuum to the pneumatic drive sufficient for maximum retraction of the throttle valve stop of the 1st chamber;
- set the throttle valve of the 1st chamber to the closed position;
- i turn the throttle valve limit screw so that it moves away from the throttle valve control lever of the 1st chamber, then screw the limit pin until it touches
- lever;
- turn the limit screw another ¼ turn and lock it in this position.
Adjusting the opening of the throttle valve of the 2nd chamber
The position of the throttle valve of the 2nd chamber is adjusted at the factory, but in case of a violation of the adjustment it can be restored on a previously removed carburetor as follows:
- fully open the throttle valve of the 1st chamber and fix it in this position;
- set the throttle control lever of the 2nd chamber to the closed position;
- unscrew the limit screw of the 2nd chamber throttle valve so that it moves away from the stop. Then screw in the limit screw so that it barely touches the stop;
- turn the limit screw another ¼ turn and lock it in this position;
- return throttle valve 1st chamber 8 closed position;
- measure the free travel of the 2nd chamber throttle control lever on its drive fork, which should be 0.4±0.1 mm on the inner side and 1.0±0.1 mm on the outer side;
- if necessary, adjust the free travel of the lever by bending the ends of the fork.
Adjusting the accelerator pump
Remove the carburetor.
Fully retract the movable rod of the pneumatic drive of the throttle valve of the 1st chamber, turn the cam for opening the throttle valve of the 1st chamber so as to release the throttle valve of the 1st chamber and open it fully.
Place a measuring cup under the carburetor.
Smoothly open and close the throttle valve of the 1st chamber, thereby activating the accelerator pump.
Measure the amount of fuel in the measuring cup, which for cars with a DT engine should be within 1.0±0.2 cm³, for cars with a DS engine - within 1.1±0.15 cm³.
If necessary, achieve the required performance by compensating the cam of the drive on the throttle control lever of the 1st chamber.
Checking the operation of the pneumatic drive of the throttle valve of the 1st chamber at forced idle speed
Disconnect the vacuum hoses from the pneumatic drive.
Attach a vacuum pump in place of the hose going through tee from a pneumatic valve with a thermal time relay (see photo).
Create a vacuum in the pneumatic drive to simulate its idle operation.
Measure the output value of the pneumatic actuator's movable shock relative to the edge of the guide sleeve, which should be 15 mm.
Increase the vacuum in the pneumatic drive to simulate its operation at forced idle.
Measure the size of the rod extension relative to the edge of the guide sleeve, which should be 10 mm.
Adjusting the idle speed of a warm engine
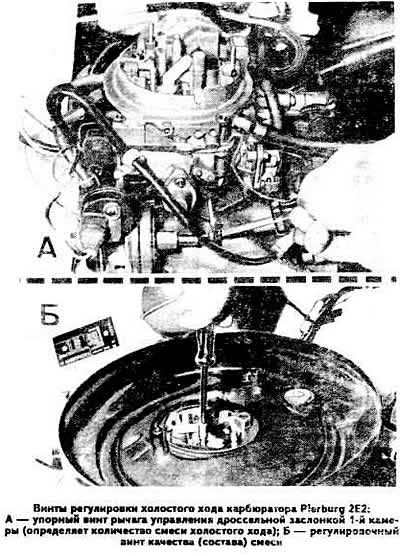
Adjustment of the engine idle code must be performed on a warm engine (with the air damper fully open) with the ignition timing set correctly and with the current consumers switched off.
Connect the tachometer according to the operating instructions.
Using the stop handle of the 1st chamber throttle control lever, resting on the movable rod of the 1st chamber throttle pneumatic drive, set the engine crankshaft speed within 700-800 rpm.
Check the carbon monoxide (CO) content in the exhaust gases using a gas analyzer and adjust it if necessary.
Remove the air filter cover and disconnect the crankcase ventilation hose.
Adjust the engine idle speed as described above.
Using the mixture quality (composition) adjustment screw, achieve a CO content within 0.5-1.5%, and when the screw is screwed in, the combustible mixture is enriched, and vice versa.
Check and, if necessary, restore the engine idle speed to 700-800 rpm.
Note. When servicing the Pierburg 2E2 carburetor, for more precise adjustment of the CO content, it is recommended to replace the perforated emulsion tubes with the slotted ones supplied with the spare parts. In this case, it is necessary to replace the seal above the emulsion tube.
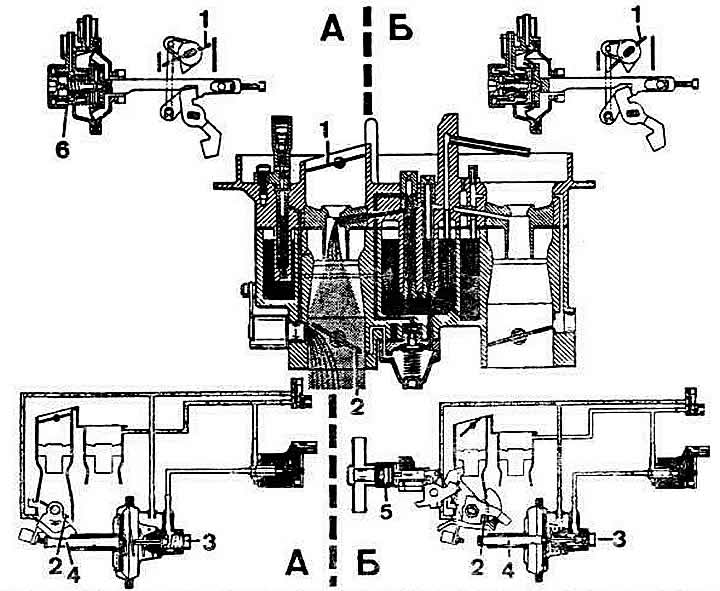
The Pierburg 2E2 carburetor operation diagram when starting a cold engine: 1 - air damper; 2 — throttle valve of the 1st chamber; 3 - pneumatic drive of the throttle valve of the 1st chamber; 4 - 1st chamber throttle valve pneumatic actuator rod; 5 - thermal power element; 6 - pneumatic drive of the air damper.