
Repair Chevrolet Repair Toyota Repair Honda Repair AvtoVAZ Repair Mercedes-Benz Repair BMW Repair Opel
Home  |  Contacts  |  Sitemap  |    
English Русский
Български
Беларускі
Український
Српски
Hrvatski
Română
Polski
Slovenský
Magyar
AudiManual.ru


  • AUDI 80
  • AUDI 100
  • AUDI A3
  • AUDI A4
  • AUDI A6
  • AUDI A8
  • AUDI Q
  • OTHER
  • ARTICLES
B4 (1991-1996) B3 (1986-1991) B3 (1986-1991, petrol) B2 (1979-1986)

Removal and installation/adjustment of doors (Audi 80 B3)

  • Home
  • Audi 80
  • B3 (1986-1991)
  • Body
  • Body elements
  • Removal and installation/adjustment of doors
            0
Table of contents: Removal ↓ Installation ↓ Adjustment ↓

Removal


Remove the door frame.
Remove the door frame.


Unscrew the door and remove it. First mark the installation position by tracing the bolt heads with a felt-tip pen.

Installation


Install the door, align it and tighten it to 30 Nm.

Install a doorway.

Adjustment


Adjustment is made when the applied markings did not provide a good door installation, or when a new door is installed.

When adjusting the gap sizes, it is essential to maintain the same gap along the entire contour relative to the surrounding elements. In this case, the unloaded door frame at the back should be approximately 1 cm higher than at the front. The gap sizes are given in Fig. 57-269, see item 20.
When adjusting the gap sizes, it is essential to maintain the same gap along the entire contour…


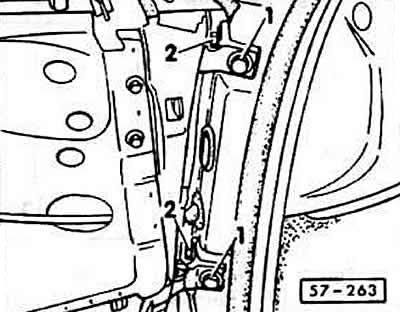
To adjust the gaps, unscrew bolts "1" and use a hex key to unscrew the threaded bushings located at the rear so that there is no contact with the front pillar.


Release without unscrewing bolts "2", then close the door and move the door to set the gap size a = 5+1 mm.

Note: To loosen and tighten bolt -2, use a bent open-end wrench for the diesel injection pump, such as HAZET 4561.


Adjust the door to the contour of the body. The door grooves and the body groove must match.
Adjust the door to the contour of the body. The door grooves and the body groove must match.


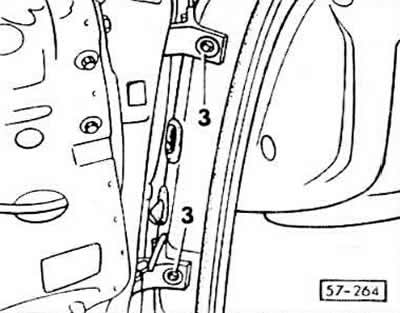
Screw the threaded sleeve "3" into the front pillar until it stops and tighten the bolts "2".

Tighten the bolts to 30 Nm.

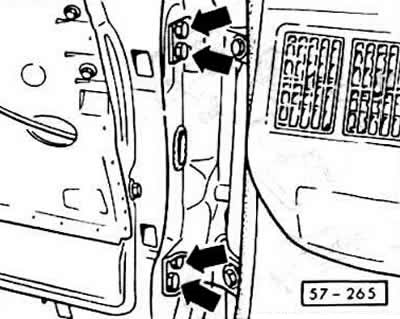
To eliminate wind noise, move the door in the longitudinal holes of the fastening bolts. To do this, loosen the bolts, -arrows- (fig. 57-265), and close the door. Move the door in or out until its surface is flush with the front wing. The door can be recessed in relation to the edge of the front wing by a maximum of 1 mm.
To eliminate wind noise, move the door in the longitudinal holes of the fastening bolts. To do…


Tighten the bolts to 30 Nm.


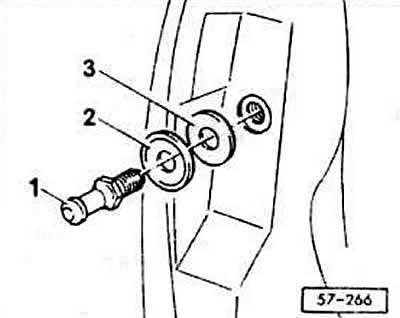
At the rear of the door, the position of the lock "1" should be adjusted.

To do this, unscrew the retainer so that it can be moved and installed with a little effort. Close the door and align it. Then carefully open the door and tighten the retainer with a force of 50 Nm. For the coupe, tighten the 2 retainer mounting screws with a force of 16 Nm. Additionally shown parts: 2 - disc spring washer, depending on the model 1 or 2 pieces; 3 - plastic washer.
The article was checked by auto expert Elisey Ermolaev
This article is available at russian, bulgarian, belarusian, ukrainian, serbian, croatian, romanian, polish, slovak, hungarian

Share information:
Previous articles
Audi 80 B3: Body elements
Next articles

Trunk lid lock
Adjusting the trunk lid
Removal and installation the hood
Removal and installation front fenders
Door trim
Removal and installation a door lock
Door handle
Removal and installation the door frame


Similar articles on other Audi car models:
Electric seat adjustment drive Audi 100 C3 (1982-1990, diesel)
Removal, installation and adjustment of the hood Audi A3 Type 8L (1996-2003)
Doors — dismantling and adjustment Audi A4 B5 (1994-2001, petrol)
Door frame adjustment Audi A6 C5 (1997-2004)
Car doors Audi A8 D2 (1994-2002)
Timing chain covers, valve 1 of timing phase adjustment «N205» Audi Q5 Type 8R (2008-2017)
Headlights — checking adjustment, adjusting if necessary Audi A2 (1999-2005)
Link to this page in different formats


Visitor comments

No comments yet


How much will 41 + 41 =


80(B4, 1991-1996) 
  • General information
  • User manual
  • Maintenance
  • Troubleshooting
  • Power unit
  • Engine
  • Cooling system
  • Heating and ventilation
  • Petrol injection
  • Diesel fuel system
  • Fuel system
  • Exhaust systems
  • Ignition system
  • Transmission
  • Clutch
  • Car gearbox
  • Chassis
  • Brake system
  • Suspension and steering wheel
  • Body
  • Body and trim
  • Electrical equipment
  • Electrical system
  • Electrical circuits
 
80(B3, 1986-1991) 
  • General information
  • Repair characteristics
  • Maintenance
  • Power unit
  • Gasoline engine
  • Diesel engine
  • Engine lubrication system
  • Fuel system (gasoline)
  • Injection system (gasoline)
  • Fuel system (diesel)
  • Ignition system
  • Cooling system
  • Heater
  • Exhaust system
  • Transmission
  • Clutch and gearbox
  • Chassis
  • Steering
  • Brake system
  • Car suspension
  • Body
  • Body elements
  • Electrical equipment
  • Power devices
  • Lighting and appliances
  • Electrical circuits
 
80(B3, 1986-1991, petrol) 
  • General information
  • User manual
  • Maintenance
  • Power unit
  • Engine 4-cylinder
  • Engine 5-cylinder
  • Cooling system
  • Fuel and exhaust systems
  • Ignition system
  • Transmission
  • Clutch
  • Mechanical transmission
  • Automatic transmission
  • Drive shafts
  • Chassis
  • Brake system
  • Suspension
  • Steering
  • Body
  • Exterior
  • Interior
  • Electrical equipment
  • Equipment and devices
  • Electrical circuits
 
80(B2, 1979-1986) 
  • General information
  • User manual
  • Power unit
  • Engine FZ
  • Engine EP, YP, YZ, DT, DS, DZ
  • Transmission
  • Clutch
  • 4 speed gearbox
  • 5 speed gearbox
  • Front wheel drive
  • Chassis
  • Front suspension
  • Rear suspension
  • Steering
  • Brake system
  • Electrical equipment
  • Equipment and devices
  • Electrical circuits
 
AudiManual.ru © 2017-2026 · Mobile version · Feedback · Sitemap: EN BG BY UA RS HR RO PL SK HU · Site search · News and articles
80 B2 · 80 B3 petrol · 80 B3 · 80 B4 · 100 C3 diesel · 100 C3 petrol · 100 C3 · 100 C4 petrol · 100 C4 · A3 Type 8L · A4 B5 petrol · A4 B5 · A4 B6 petrol · A4 B6 · A4 B7 · A4 B8 · A6 C4 · A6 C5 · A6 C5 Allroad · A8 D2 · Q5 Type 8R · Q7 Typ 4L · Audi A2 ·
This site uses cookies 🍪. Click the button to accept this fact.