
Repair Chevrolet Repair Toyota Repair Honda Repair AvtoVAZ Repair Mercedes-Benz Repair BMW Repair Opel
Home  |  Contacts  |  Sitemap  |    
English Русский
Български
Беларускі
Український
Српски
Hrvatski
Română
Polski
Slovenský
Magyar
AudiManual.ru


  • AUDI 80
  • AUDI 100
  • AUDI A3
  • AUDI A4
  • AUDI A6
  • AUDI A8
  • AUDI Q
  • OTHER
  • ARTICLES
B4 (1991-1996) B3 (1986-1991) B3 (1986-1991, petrol) B2 (1979-1986)

Rear bumper — removal and installation (Audi 80 B4)

  • Home
  • Audi 80
  • B4 (1991-1996)
  • Body
  • Body and trim
  • Rear bumper — removal and installation
            0
Table of contents: Cars with a "sedan" body ↓ Avant body cars ↓ All models ↓ Avant cars ↓

Cars with a "sedan" body


1. Fold the floor mat in the trunk upward.

Avant body cars


2. Remove the lock trim.

3. Lift the floor mat.

4. Remove the trim on the sides of the trunk, but only at the rear.

5. Install a socket wrench on the bumper mounting bolt (length approximately 500 mm) with a nozzle and a ratchet, pulling back the upholstery and inserting the key between the upholstery and the side of the body.

6. Unscrew all the bumper mounting bolts in this manner.

All models


7. Unscrew two hex bolts on the right and left sides of the trunk (see illustration).
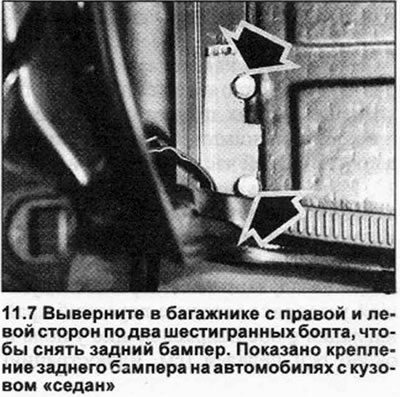
7. Unscrew two hex bolts on the right and left sides of the trunk (see illustration).


8. Unscrew two self-tapping screws on the right and left sides that secure the bumper to the wheel arch.

9. Disconnect the bumper sides from the brackets on the body. To do this, press down the side of the bumper while simultaneously pushing its upper edge towards you.

10. Lift both ends of the bumper above the wheel arches and remove it by pushing it backwards.

When installing the bumper, it should first be positioned on the mounts on the rear of the body.


11. Insert the lower edge of the bumper side panels into the brackets attached to the body. Then press the side panel from above so that it is fixed in the bracket. Make sure that the fastening latches on the lower edge of the bumper are fixed.

12. Place the ends of the bumper onto their mounting points on the wheel arch and tighten the mounting bolts.

Avant cars


To adjust the height of the bumper, you can move the bracket on which the bumper is mounted. The gap between the lower edge of the body sides (rear wings) and the bumper should be 6.5-7.5 mm.

[This article was copied from an online resource: audimanual.ru]
The article was checked by auto expert Timur Bazhenov
This article is available at russian, bulgarian, belarusian, ukrainian, serbian, croatian, romanian, polish, slovak, hungarian

Share information:
Previous articles
Audi 80 B4: Body and trim
Next articles

Rear drop door
Trunk lid — removal and fitting
Exterior rear view mirrors
Doors
Instrument panel and center console
Seats


Similar articles on other Audi car models:
Trunk lid and rear bumper Audi 100 C4 (1990-1994)
Electric windows and rear view mirrors Audi A3 Type 8L (1996-2003)
Rear bumper — dismantling Audi A4 B5 (1994-2001, petrol)
Rear bumper Audi A6 C5 (1997-2004)
Rear bumper Audi A8 D2 (1994-2002)
Rear bumper Audi Q5 Type 8R (2008-2017)
Removal and installation the rear bumper Audi A2 (1999-2005)
Link to this page in different formats


Visitor comments

No comments yet


How much will 24 + 29 =


80(B4, 1991-1996) 
  • General information
  • User manual
  • Maintenance
  • Troubleshooting
  • Power unit
  • Engine
  • Cooling system
  • Heating and ventilation
  • Petrol injection
  • Diesel fuel system
  • Fuel system
  • Exhaust systems
  • Ignition system
  • Transmission
  • Clutch
  • Car gearbox
  • Chassis
  • Brake system
  • Suspension and steering wheel
  • Body
  • Body and trim
  • Electrical equipment
  • Electrical system
  • Electrical circuits
 
80(B3, 1986-1991) 
  • General information
  • Repair characteristics
  • Maintenance
  • Power unit
  • Gasoline engine
  • Diesel engine
  • Engine lubrication system
  • Fuel system (gasoline)
  • Injection system (gasoline)
  • Fuel system (diesel)
  • Ignition system
  • Cooling system
  • Heater
  • Exhaust system
  • Transmission
  • Clutch and gearbox
  • Chassis
  • Steering
  • Brake system
  • Car suspension
  • Body
  • Body elements
  • Electrical equipment
  • Power devices
  • Lighting and appliances
  • Electrical circuits
 
80(B3, 1986-1991, petrol) 
  • General information
  • User manual
  • Maintenance
  • Power unit
  • Engine 4-cylinder
  • Engine 5-cylinder
  • Cooling system
  • Fuel and exhaust systems
  • Ignition system
  • Transmission
  • Clutch
  • Mechanical transmission
  • Automatic transmission
  • Drive shafts
  • Chassis
  • Brake system
  • Suspension
  • Steering
  • Body
  • Exterior
  • Interior
  • Electrical equipment
  • Equipment and devices
  • Electrical circuits
 
80(B2, 1979-1986) 
  • General information
  • User manual
  • Power unit
  • Engine FZ
  • Engine EP, YP, YZ, DT, DS, DZ
  • Transmission
  • Clutch
  • 4 speed gearbox
  • 5 speed gearbox
  • Front wheel drive
  • Chassis
  • Front suspension
  • Rear suspension
  • Steering
  • Brake system
  • Electrical equipment
  • Equipment and devices
  • Electrical circuits
 
AudiManual.ru © 2017-2026 · Mobile version · Feedback · Sitemap: EN BG BY UA RS HR RO PL SK HU · Site search · News and articles
80 B2 · 80 B3 petrol · 80 B3 · 80 B4 · 100 C3 diesel · 100 C3 petrol · 100 C3 · 100 C4 petrol · 100 C4 · A3 Type 8L · A4 B5 petrol · A4 B5 · A4 B6 petrol · A4 B6 · A4 B7 · A4 B8 · A6 C4 · A6 C5 · A6 C5 Allroad · A8 D2 · Q5 Type 8R · Q7 Typ 4L · Audi A2 ·
This site uses cookies 🍪. Click the button to accept this fact.