
Repair Chevrolet Repair Toyota Repair Honda Repair AvtoVAZ Repair Mercedes-Benz Repair BMW Repair Opel
Home  |  Contacts  |  Sitemap  |    
English Русский
Български
Беларускі
Український
Српски
Hrvatski
Română
Polski
Slovenský
Magyar
AudiManual.ru


  • AUDI 80
  • AUDI 100
  • AUDI A3
  • AUDI A4
  • AUDI A6
  • AUDI A8
  • AUDI Q
  • OTHER
  • ARTICLES
B4 (1991-1996) B3 (1986-1991) B3 (1986-1991, petrol) B2 (1979-1986)

Rear drop door (Audi 80 B4)

  • Home
  • Audi 80
  • B4 (1991-1996)
  • Body
  • Body and trim
  • Rear drop door
            0
Table of contents: Avant cars ↓ Tailgate Handle - Removal and… ↓ Drop Door Locks - Removal and… ↓

Avant cars


Removal and installation

1. Remove the rear hatch trim.

2. Disconnect the plugs, central locking hose and rear window washer nozzle hose.

3. Open the drop door and prop it up to prevent it from closing.

4. Disconnect the gas strut from the tailgate.

5. Remove the door hinge mounting bolts. Have two assistants hold the door while doing this.

When installing, replace the sealing gaskets between the hinge and the door.

6. Adjust the mounting buffers on the tailgate so that when the lid is closed, there is a gap of 2-4 mm between the buffer and the body.

Tailgate Handle - Removal and Installation


7. Remove the door trim.

8. Disconnect all handle connecting rods.

9. Remove the two hex head bolts with washer.

10. Detach the handle.

When installing, insert the handle into the rectangular opening at the bottom of the drop-down door, working from the trunk so that it is centered and parallel. The stop with the gasket should be adjacent to the bottom of the door.

11. Turn the handle so that the through holes for the screws that secure it are aligned with the mounting holes on the bottom of the door.

12. Secure the handle with bolts and washers, tightening them to a torque of 10 Nm.

13. Connect the rods and adjust their length. To adjust the connecting rod to the lock switch, move the lock release lever in the switch to the "Open" position.

14. Press back the rod shift lever in the middle of the connecting rod so that the rod halves fit into each other. In this position, connect the threaded couplings on the rod halves and secure the rods with the shift lever.


Drop Door Locks - Removal and Installation


15. Remove the door trim and disconnect the lock rods (see illustration).
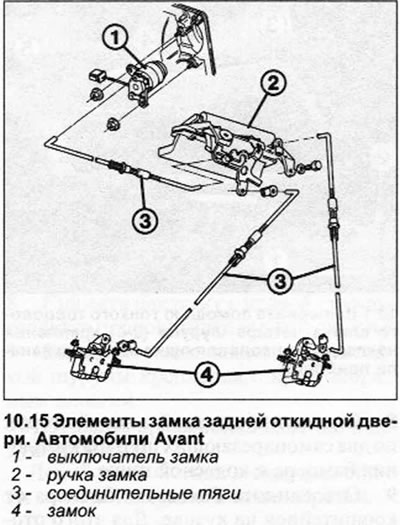
15. Remove the door trim and disconnect the lock rods (see illustration).


16. Unscrew two hex nuts in the door cavity from each lock.

17. Remove the lock by bringing it into the passenger compartment.

18. Install and center the lock and secure it with nuts without tightening them.

19. Loosen the lock retainer on the body.

20. Close the door.

21. Working from the trunk, install a 3mm thick spacer plate between the lock and the retainer (see illustration).
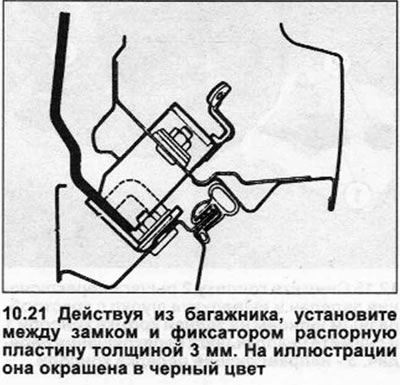
21. Working from the trunk, install a 3mm thick spacer plate between the lock and the retainer (see…


22. Close the lock and align the tailgate. The gap between the top edge of the bumper and the bottom edge of the tailgate should be 6.5-7.5 mm.

23. Tighten the hex nuts securing the lock.

24. Remove the spacer plate.
The article was checked by auto expert Timur Bazhenov
This article is available at russian, bulgarian, belarusian, ukrainian, serbian, croatian, romanian, polish, slovak, hungarian

Share information:
Previous articles
Audi 80 B4: Body and trim
Next articles

Trunk lid — removal and fitting
Exterior rear view mirrors
Doors
Front Fender and Door Moldings — Removal and Installation
Rear bumper — removal and installation
Instrument panel and center console
Seats


Similar articles on other Audi car models:
Windshield, Rear Window and Door Glass — Removal and Installation Audi 100 C3 (1982-1990, diesel)
Removal and installation the wedge element of the rear door lock Audi A3 Type 8L (1996-2003)
Electrically heated door rear view mirrors Audi A4 B6 (2000-2006)
Replacing the rear overhead door light bulb Audi A6 C4 (1994-1997)
Rear door speakers Audi A8 D2 (1994-2002)
Rear door door Seals Audi Q5 Type 8R (2008-2017)
Removal and installation the rear door mounting bracket Audi A2 (1999-2005)
Link to this page in different formats


Visitor comments

No comments yet


How much will 20 + 36 =


80(B4, 1991-1996) 
  • General information
  • User manual
  • Maintenance
  • Troubleshooting
  • Power unit
  • Engine
  • Cooling system
  • Heating and ventilation
  • Petrol injection
  • Diesel fuel system
  • Fuel system
  • Exhaust systems
  • Ignition system
  • Transmission
  • Clutch
  • Car gearbox
  • Chassis
  • Brake system
  • Suspension and steering wheel
  • Body
  • Body and trim
  • Electrical equipment
  • Electrical system
  • Electrical circuits
 
80(B3, 1986-1991) 
  • General information
  • Repair characteristics
  • Maintenance
  • Power unit
  • Gasoline engine
  • Diesel engine
  • Engine lubrication system
  • Fuel system (gasoline)
  • Injection system (gasoline)
  • Fuel system (diesel)
  • Ignition system
  • Cooling system
  • Heater
  • Exhaust system
  • Transmission
  • Clutch and gearbox
  • Chassis
  • Steering
  • Brake system
  • Car suspension
  • Body
  • Body elements
  • Electrical equipment
  • Power devices
  • Lighting and appliances
  • Electrical circuits
 
80(B3, 1986-1991, petrol) 
  • General information
  • User manual
  • Maintenance
  • Power unit
  • Engine 4-cylinder
  • Engine 5-cylinder
  • Cooling system
  • Fuel and exhaust systems
  • Ignition system
  • Transmission
  • Clutch
  • Mechanical transmission
  • Automatic transmission
  • Drive shafts
  • Chassis
  • Brake system
  • Suspension
  • Steering
  • Body
  • Exterior
  • Interior
  • Electrical equipment
  • Equipment and devices
  • Electrical circuits
 
80(B2, 1979-1986) 
  • General information
  • User manual
  • Power unit
  • Engine FZ
  • Engine EP, YP, YZ, DT, DS, DZ
  • Transmission
  • Clutch
  • 4 speed gearbox
  • 5 speed gearbox
  • Front wheel drive
  • Chassis
  • Front suspension
  • Rear suspension
  • Steering
  • Brake system
  • Electrical equipment
  • Equipment and devices
  • Electrical circuits
 
AudiManual.ru © 2017-2026 · Mobile version · Feedback · Sitemap: EN BG BY UA RS HR RO PL SK HU · Site search · News and articles
80 B2 · 80 B3 petrol · 80 B3 · 80 B4 · 100 C3 diesel · 100 C3 petrol · 100 C3 · 100 C4 petrol · 100 C4 · A3 Type 8L · A4 B5 petrol · A4 B5 · A4 B6 petrol · A4 B6 · A4 B7 · A4 B8 · A6 C4 · A6 C5 · A6 C5 Allroad · A8 D2 · Q5 Type 8R · Q7 Typ 4L · Audi A2 ·
This site uses cookies 🍪. Click the button to accept this fact.