
Removal
1. Mark the mounting position of the hood hinges if the hood is to be reinstalled.
2. Disconnect the engine compartment light wire, the jet heating wire (if any), and also the ground wire (-).
Note! If the old hood is to be installed back, then when disconnecting the wires on the hood, attach a string to their end. The string should remain in the wire hole so that you can then pull the wire back into place.
3. Disconnect the windshield washer hose.
4. Remove the lock washers on the gas strut upper retainer bolt.
5. Remove the hood hinge covers, if present.
6. Loosen the bolts securing the hood hinges to the body.
7. Ask a helper to help remove the hood. It is too heavy to do it alone.
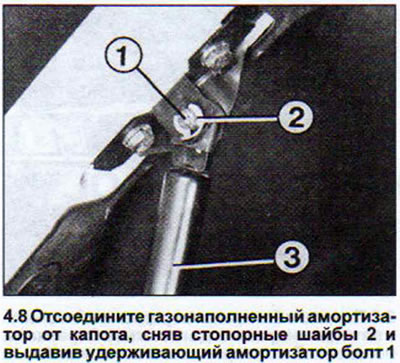
8. Disconnect the gas-filled shock absorber from the hood by pressing out the bolt holding the shock absorber (see illustration).
9. Unscrew the previously loosened hood hinge bolts and remove the hood. If necessary, you can detach the hinges from the hood.
Attention! Do not throw away the gas-filled shock absorber together with household waste. It is necessary to remove air from it by contacting a workshop.
Fit
When the hood is closed, the distance from it to the adjacent fenders should be the same. In addition, the hood should be correctly adjusted in height so that it does not protrude or sink lower than the adjacent parts, primarily the fenders.
10. Loosen the bolts that secure the hinges to the hood to adjust the hood longitudinally.
11. Loosen the bolts that secure the hood hinges to the body to allow for transverse adjustment of the hood.
13. Move the hood in the desired direction and tighten the hinge bolts.
The hood height is adjusted by screwing in or out the hood locking pin.
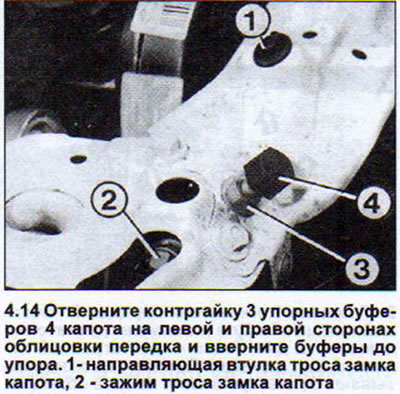
14. Loosen the lock nut of the bonnet stop buffers on the left and right sides of the front trim and screw the buffers in until they stop (see illustration).
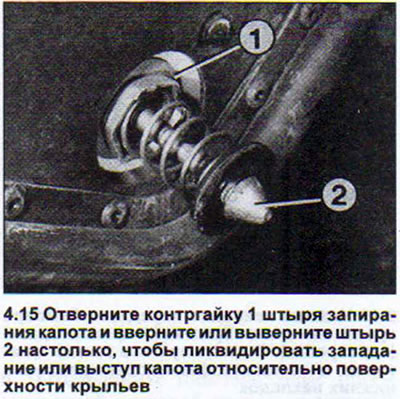
15. Use a gas wrench to loosen the lock nut of the hood locking pin and screw the pin in or out enough to eliminate the hood from sinking or protruding relative to the surface of the wings (see illustration).
16. Close the hood and make sure it is adjusted correctly.
17. Tighten the hood lock pin lock nut.
18. Make sure that the pin is aligned with the lock hole. If it is not, then move the pin along or across due to the enlarged hole in the hood by unscrewing the lock nut.
19. Turn the stop buffers out enough to prevent the hood from swinging in the closed position.
Bonnet Lock Cable - Replacement
20. Open the hood and disconnect the cable clamp from the lock (see illustration 4.14).
21. Remove the plastic guide bushing.
22. Remove the radiator cap on a car with a five-cylinder engine, and the battery cap on a car with a six-cylinder engine.
23. Release the cable from the plastic holders on the side wall of the engine compartment.
24. Remove the decorative trim under the instrument panel on the driver's side.
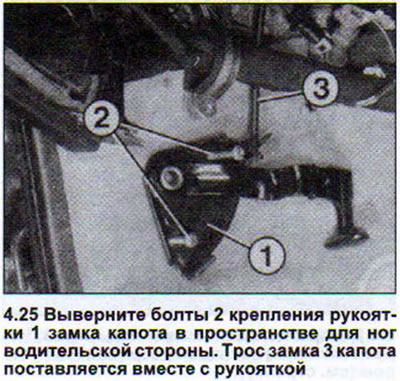
25. Remove the hood lock handle mounting bolts in the driver's side footwell (see illustration).
26. Pull the hood lock cable into the passenger compartment. The cable is flexible, be careful not to hit your eyes.
27. Route the new cable from the passenger compartment through the hole into the engine compartment and install the lock handle in place. The hood lock cable is supplied with the handle.
28. Place the left guide sleeve onto the cable.
29. Secure the cable to the lock latch and to the holders on the side wall of the engine compartment.
30. Place the right guide sleeve onto the cable.
31. Pull the rope tight and secure it.