
Repair Chevrolet Repair Toyota Repair Honda Repair AvtoVAZ Repair Mercedes-Benz Repair BMW Repair Opel
Home  |  Contacts  |  Sitemap  |    
English Русский
Български
Беларускі
Український
Српски
Hrvatski
Română
Polski
Slovenský
Magyar
AudiManual.ru


  • AUDI 80
  • AUDI 100
  • AUDI A3
  • AUDI A4
  • AUDI A6
  • AUDI A8
  • AUDI Q
  • OTHER
  • ARTICLES
Q7 Typ 4L (2005-2015, diesel) Q5 Type 8R (2008-2017)

Window lift motor, rear door window lift (Audi Q5-8R)

  • Home
  • Audi Q
  • Q5 Type 8R (2008-2017)
  • Body
  • Doors, locks and windows
  • Window lift motor, rear door window lift
            0
Table of contents: Unlock the threaded pins ↓ Upper point of screwing the window… ↓
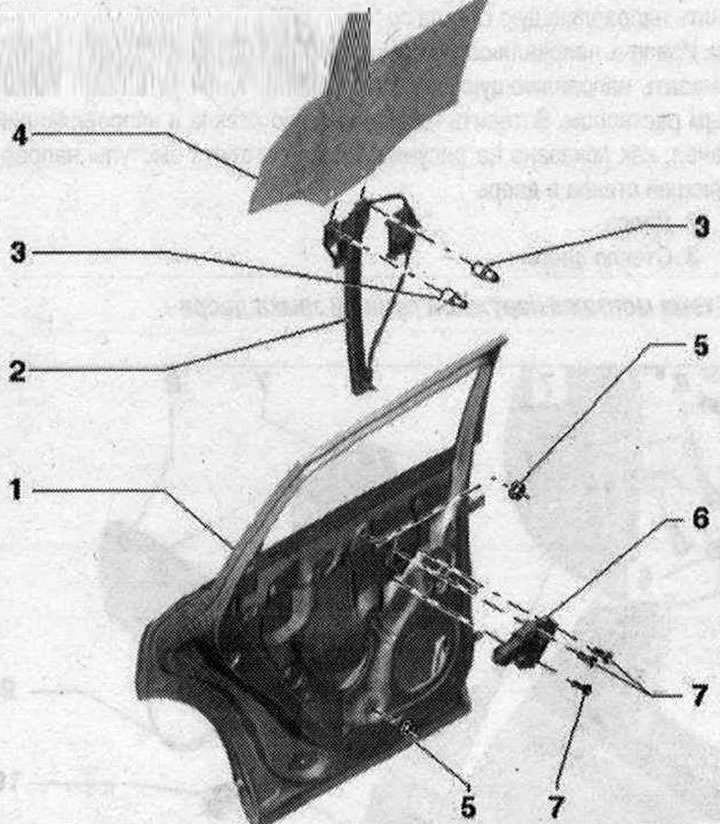
Window lift motor, window lift 1. Door; 2. Window lifter; 3. Clamp; 4. Door glass; 5. Nut. 6 Nm; 6.…

Window lift motor, window lift 1. Door; 2. Window lifter; 3. Clamp; 4. Door glass; 5. Nut. 6 Nm; 6. Window lifter motor; 7. Bolt. 3 pcs. 3.5 Nm
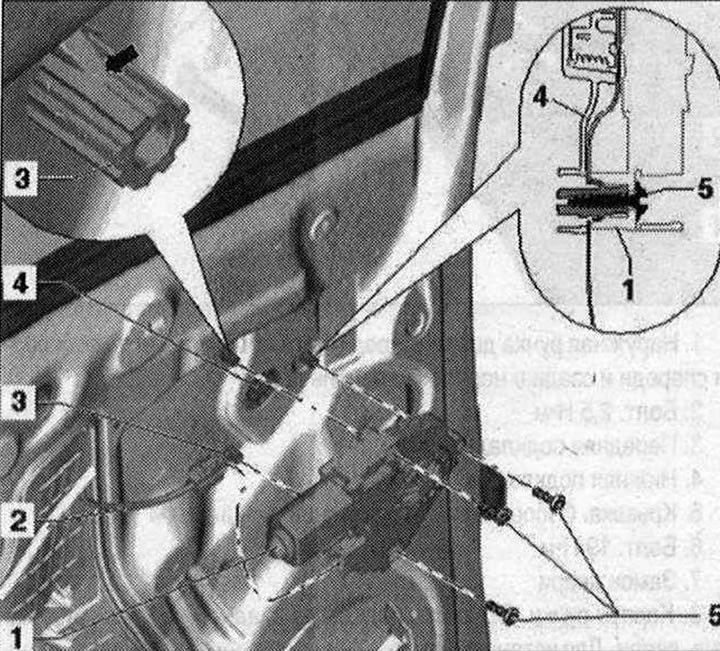

Removal the window lift motor 1. Window lift motor. The window lift motor can be removed and…

Removal the window lift motor 1. Window lift motor. The window lift motor can be removed and installed in any position of the motor or door glass. Removal: Remove the door trim. Loosen the bolts "6" and remove the motor from the window lift. Installation: The clamps "arrow" of the threaded pins of the window lift must be secured in the inner door panel. Place the window lift motor on the threaded pins and tighten the bolts "6". With the window lift switches connected, turn on the ignition and raise the door windows to the stop. Hold the window lift switch for about 2 more seconds to activate the basic setting and the raising and lowering function; 2. Electrical connector. Disconnect the plug connector from the door control unit; 3. Threaded pins; 4. Window lifter; 5. Bolt
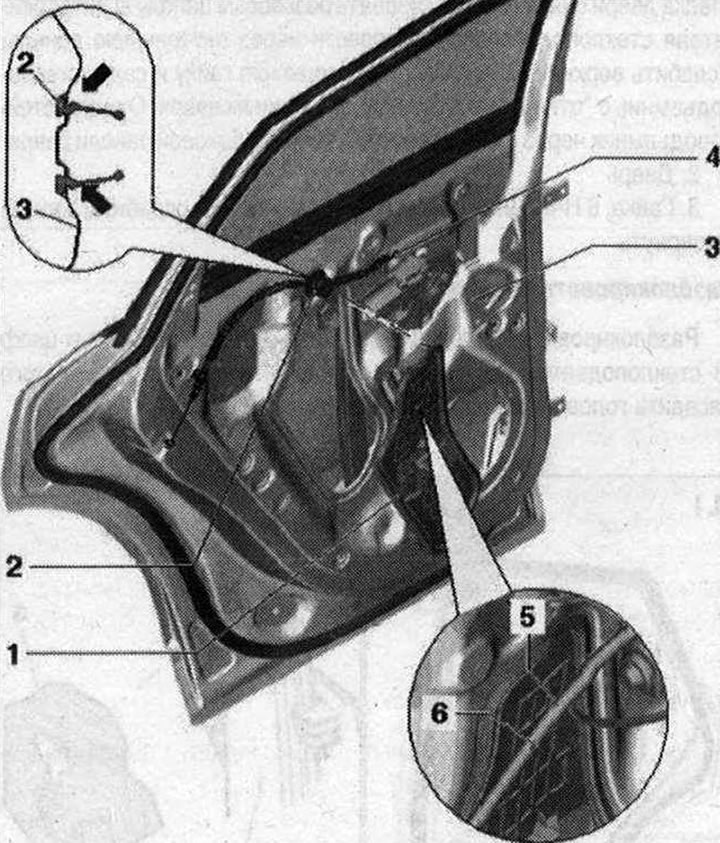


Removal the inner door panel trim 1. Trim. Remove the door trim. Remove the electrical wiring…

Removal the inner door panel trim 1. Trim. Remove the door trim. Remove the electrical wiring harness "4" from the bracket "5". Remove the trim, be sure to start from the top; 2. Nozzle. When installing, be sure to ensure that the "arrow" is seated correctly; 3. Inner door panel; 4. Cable drive; 5. El. cable. Release from bracket "6"; 6. Bracket
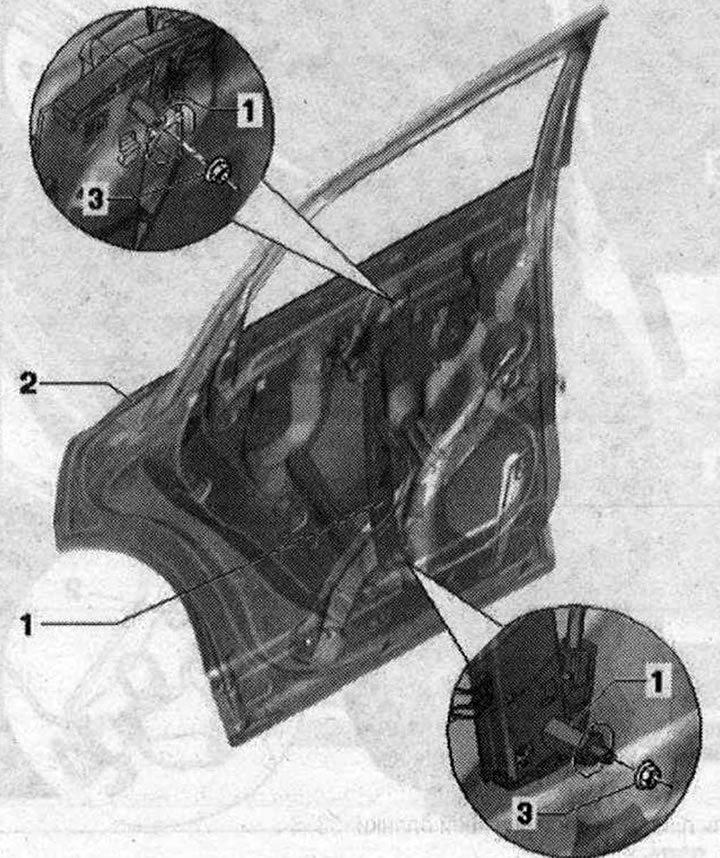

Removal the window regulator 1. Window regulator. Removal: Door trim removed. Window regulator…

Removal the window regulator 1. Window regulator. Removal: Door trim removed. Window regulator motor removed. Door glass removed. Door slot trim removed. Unlock threaded pins of window regulator motor and pass through inner panel. Loosen upper nuts. Unscrew lower nut and remove window regulator from "slotted hole" by upward movement. Press window regulator through hole in inner side panel of door; 2. Door; 3. Nut. 6 Nm. To remove the window, just loosen it at the top and unscrew it at the bottom


Unlock the threaded pins


Unlock the fastening clamps "arrow" of the threaded pins "3" of the window regulator using a socket head for 11, to do this, put the head on the threaded pins.

I
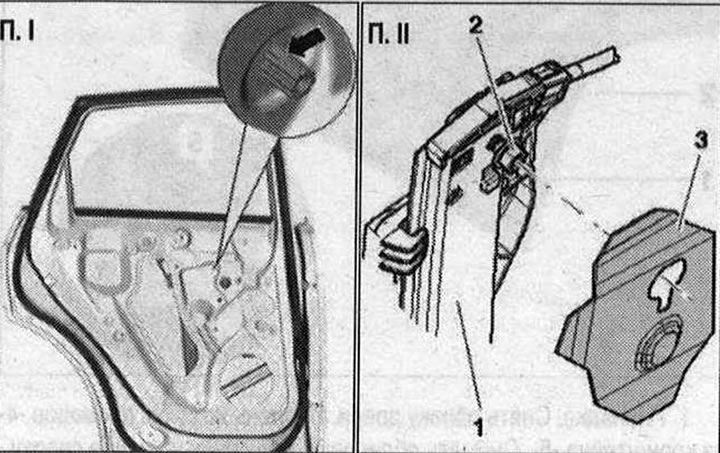


Window lift motor, rear door window lift


Upper point of screwing the window regulator bolt


To remove the window regulator "1" just loosen the nut "2".

II
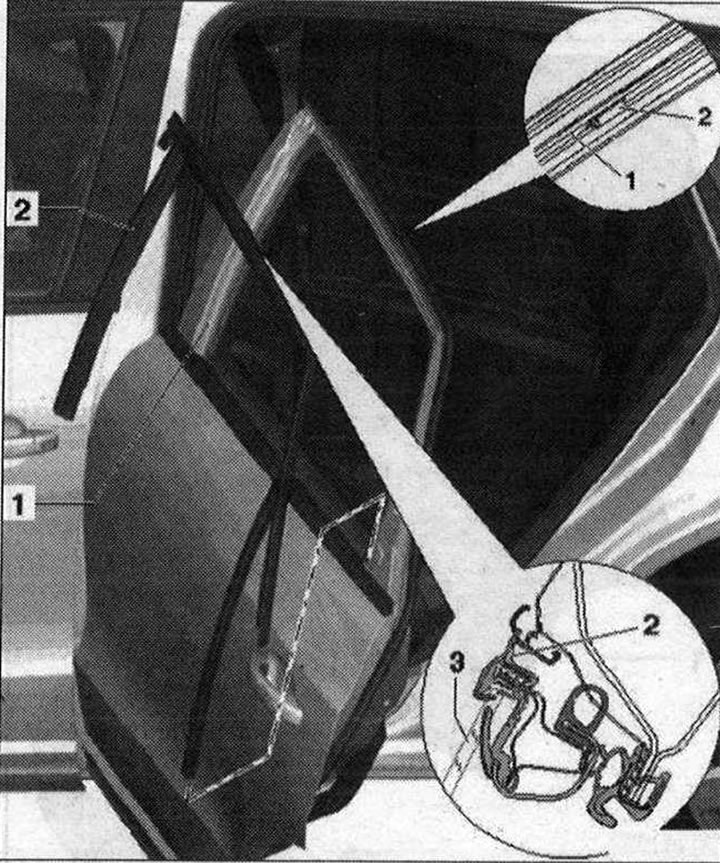


Removal the glass guide 1. Glass guide. Door glass removed. Starting from the top, remove the glass…

Removal the glass guide 1. Glass guide. Door glass removed. Starting from the top, remove the glass guide from the "B-pillar" and "C-pillar" on the side of the door. Pull the glass guide out of the door in an upward direction. Lubricate the glass guide with soapy water to make installation easier. Insert the glass guide into the guide channel as shown in the figure. Insert the glass guide tabs into the door from the side; 2. Door; 3. Door glass
The article was checked by auto expert Timur Bazhenov
This article is available at russian, bulgarian, belarusian, ukrainian, serbian, croatian, romanian, polish, slovak, hungarian

Share information:
Previous articles
Audi Q Q5 Type 8R: Doors, locks and windows
Next articles

Rear door door Seals
Back door
Fuel tank flap emergency release element
Removal the fuel tank flap opening motor
Rear Door Outside Handle and Lock Installation Diagram
Removal the rear outer door handle
Rear door lock and lock bracket
Standardization of sliding/lifting hatch


Similar articles on other Audi car models:
Windshield, rear window glass and rear door window glass —… Audi 80 B3 (1986-1991, petrol)
Windshield, Rear Window and Door Glass — Removal and Installation Audi 100 C3 (1982-1990, diesel)
Removal and installation of window lift and door glass Audi A3 Type 8L (1996-2003)
Rear door — window lift motor, window lift Audi A4 B8 (2007-2015)
Window lift motor Audi A6 C5 (1997-2004)
Rear window switches Audi A8 D2 (1994-2002)
Removal the rear window lift handle Audi A2 (1999-2005)
Link to this page in different formats


Visitor comments

No comments yet


How much will 48 + 50 =


Q7 4L(2005-2015, diesel) 
  • General information
  • Operating instructions
  • Maintenance
  • Power unit
  • Diesels 3.0 l (BUG, BUN, CAS)
  • Diesels 3.0 l (CATA, CCMA)
  • Diesels 3.0 l (CJGA/CJGC)
  • Diesels 4.2 l (BTR, CCFA/CCFC)
  • Cooling system
  • Fuel and exhaust system
  • Engine management system
  • Starting and charging
  • Transmission
  • Automatic gearbox
  • Drive shafts
  • Chassis
  • Brake system
  • Front suspension
  • Rear suspension
  • Steering system
  • Body
  • Air conditioner
  • Exterior
  • Interior
  • Electrical equipment
  • Equipment and devices
  • Electrical circuits
 
Q5 8R(2008-2017) 
  • General information
  • User manual
  • Power unit
  • Petrol engine 2.0 l
  • Petrol engine 3.2 l
  • Fuel system (petrol)
  • Diesel 2.0 liter (CA)
  • Diesel 2.0 liter (CG/CJ/CM)
  • Diesel engine 3.0 l
  • Fuel system (diesel)
  • Transmission
  • Manual gearbox 0B1
  • Manual gearbox 0B2
  • Automatic gearbox 0B5
  • Automatic gearbox 0B6
  • Chassis
  • Front suspension
  • Rear suspension
  • Brake system
  • Steering
  • Body
  • Exterior
  • Interior
  • Doors, locks and windows
  • Safety system
  • Ventilation and heating
  • Electrical equipment
  • Power devices
  • Equipment and devices
  • Lighting and alarm
  • Audio system
  • Electrical circuits
 
AudiManual.ru © 2017-2026 · Mobile version · Feedback · Sitemap: EN BG BY UA RS HR RO PL SK HU · Site search · News and articles
80 B2 · 80 B3 petrol · 80 B3 · 80 B4 · 100 C3 diesel · 100 C3 petrol · 100 C3 · 100 C4 petrol · 100 C4 · A3 Type 8L · A4 B5 petrol · A4 B5 · A4 B6 petrol · A4 B6 · A4 B7 · A4 B8 · A6 C4 · A6 C5 · A6 C5 Allroad · A8 D2 · Q5 Type 8R · Q7 Typ 4L · Audi A2 ·
This site uses cookies 🍪. Click the button to accept this fact.