
Window lifter and door window glass
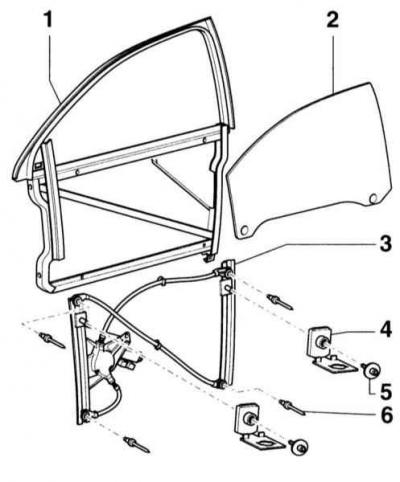
Window door
Removal
1. Lower the glass –2– all the way down.
2. Remove the door trim, refer to subsection Removal and installation door trim.
3. Remove the door adjuster holder –1–, refer to subsection Removal and installation the front door and adjusting element holder.
4. Use a felt-tip pen to mark the position of the glass relative to the supports –4– in height and in the longitudinal direction.
5. Remove screws –5–.
6. Remove the glass from the supports –4– upwards.
Installation
1. Insert the glass into the supports –4–.
2. Reinstallation: install the glass according to the previously applied markings. If you are installing a new glass, insert it into the guide and slide it towards the B-pillar until it stops.
3. New glass: raise the glass with the window lifter without the screw –5– completely upwards and then close the support –4–.
4. Insert screws –5– and tighten them to a torque of 4.5 Nm.
5. Install the holder, refer to the subsection Removal and installation the front door and adjusting element holder.
6. Install the door trim, refer to the subsection Removal and installation door trim.
Window lifter
Removal
1. Remove the door trim, refer to subsection Removal and installation door trim.
2. Remove the holder –1–, refer to subsection Removal and installation the front door and adjusting element holder.
3. Drill the heads of the rivets –6–.
4. Knock out the rivets with a punch.
5. Remove the window regulator –3–.
6. Knock the rivets out of the holder.
Installation
1. Insert the window regulator –3– into the holder –1–.
2. Secure the window lifter with new rivets. A special tool, such as HAZET 1963, is used for this.
3. Install the holder, refer to the subsection Removal and installation the front door and adjusting element holder.
4. Install the door trim, refer to the subsection Removal and installation door trim.