
Table of contents: Removal ↓ Engine 2.0 l ↓ Engine 3.0 l ↓ Engine 4.2 l ↓ All engines ↓ Examination ↓ Installation ↓
Please also refer to Section Spark plugs.
Caution: Replace spark plugs only when the engine is cold or slightly warm. If the spark plugs are removed when the engine is hot, the threads of the light metal cylinder head may be stripped.
Before you begin, prepare all the necessary tools. Some spark plug manufacturers supply special tools for measuring the spark plug gap.
- Spark plug wrench 16 mm, for example, HAZET 4766-1 or AUDI-3122B.
- If necessary, AUDI T40039 puller for ignition coils.
- Depending on the number of engine cylinders, the required number of spark plugs. The spark plugs used are listed in Specifications.
The best way to replace spark plugs is to first purchase new plugs, adjust their gap, and replace each plug one at a time. When purchasing spark plugs, it is very important to choose the correct spark plugs for your vehicle's engine. Information about them is provided in Specifications.
With new spark plugs on hand, allow the engine to cool completely before removing the old ones. During this time, you can inspect the new spark plugs for defects and check the spark plug gaps.
Safety precautions: Do not touch high voltage parts. Persons with a pacemaker should not carry out any work on the electronic ignition system.
Removal
1. Turn off the ignition.
2. Remove the top engine cover, refer to Section Removal and installation the upper engine cover/lower engine compartment protection/subframe.
3. Disconnect the spark plug connectors (1) (illustration - 1.6 l engine).
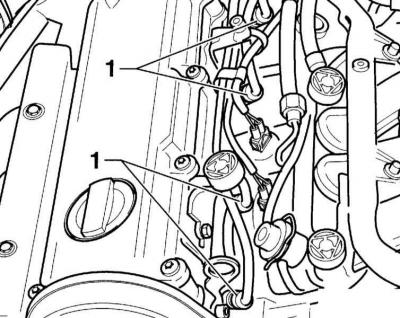
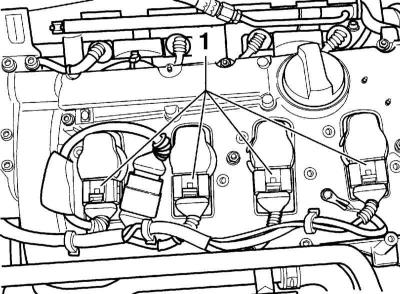
4. Disconnect the connecting plugs (1) of the ignition coils (illustration - 1.6 l engine).
5. Disconnect the rod ignition coils from the spark plugs, for example, using the AUDI T40039 puller.
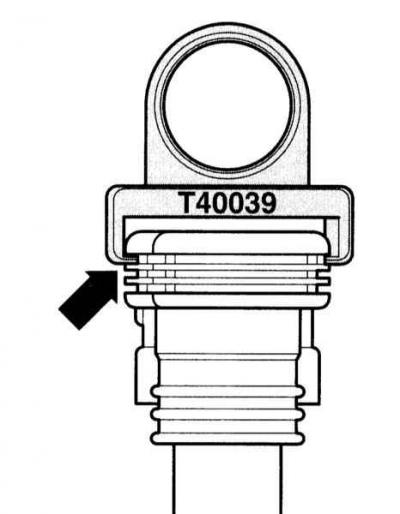
Warning: Always install the T40039 puller on the top, thickest edge (arrow on the accompanying illustration) ignition coils and pull it up. If installed on the lower edge, it may be damaged.
Engine 2.0 l
1. Remove the bolts (1).
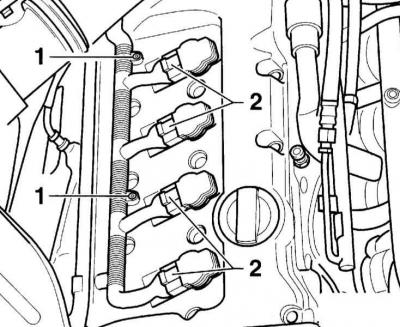
2. Disconnect the ignition coil connectors (2).
3. Remove the rod ignition coils (3), as on the 1.8 l engine, from the spark plugs, for example, using the T40039 puller.
Engine 3.0 l
1. Remove the upper part of the air filter, refer to Section Removal and installation the air filter.
2. Disconnect the coolant expansion tank from the holder and move it to the side with the hoses attached.
3. Remove the screws (1). The accompanying illustration shows the right row of cylinders.
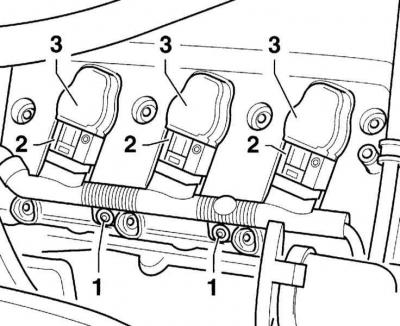
4. Disconnect the connectors (2) of the ignition coils (3).
5. Disconnect the rod ignition coils (3), as in the 1.8L engine, from the spark plugs, for example using the T40039 puller.
Engine 4.2 l
1. Remove the air filter.
2. Remove the left upper engine compartment cover.
3. Disconnect the coolant expansion tank from the holder and move it to the side with the hoses attached.
4. Remove the screws (1). The accompanying illustration shows the right row of cylinders.

5. Disconnect the connectors (2) of the ignition coils.
6. Disconnect the rod ignition coils (3), as in the 1.8L engine, from the spark plugs, for example using the T40039 puller.
All engines
1. Remove the spark plugs using a suitable spark plug wrench, such as HAZET 4766-1 or AUDI. Make sure that the spark plug wrench is not tilted. Otherwise, the ceramic insulator may be destroyed.
Examination
1. Compare the removed candle with those shown in the pictures in Chapter Engine electrical systems, this will give you useful information about the general condition of the engine.
2. Check the interelectrode gap with a feeler gauge. The illustrations show a spark plug with one ground electrode. The required gap value is given in Specifications.
Warning: New spark plugs usually have the correct spark gap.
3. To set the distance between the contacts, bend the corresponding ground electrode. To do this, tap it from the side. When bending, lean a small screwdriver against the edge of the thread. Never lean against the central electrode, as it can be damaged.
4. Apply a small amount of copper-based anti-seize compound to the threads of the new spark plug.
Installation
Install the spark plug into the cylinder head and screw it in with your fingers until it stops, then tighten it using the spark plug wrench head.
Warning: To prevent the spark plug from being screwed in incorrectly, place a small piece of rubber hose or plastic tubing on the spark plug stem. The flexible tubing will act as a universal joint, aligning the spark plug with the spark plug socket, and if the spark plug starts to become warped, the hose will slide on it, preventing the threads from being stripped.
If possible, use a torque wrench to tighten the spark plug to ensure it is installed correctly. Spark plug tightening torques are listed in Specifications. If you do not have a torque wrench, tighten new spark plugs by 90°, used spark plugs by 15°. Spark plugs that are tightened too much can damage the threads in the cylinder head when unscrewing. In this case, thread repair is performed using UTC or Heli-Coil inserts.
1. Further installation is carried out in the reverse order of removal.
2. All engines except 1.6L: Install the ignition coils with a slight twist. They should clearly lock into place.
3. 1.6L Engine: Connect the connectors. Then check the reliability of the fastening of the wires and connectors.
4. Reinstall the engine top cover, refer to Section Removal and installation the upper engine cover/lower engine compartment protection/subframe.
(The original article is posted on the resource «AudiManual»)